Ingredients
For the Graham Cracker Crust
-
- 2 cups graham cracker crumbs
-
- 1/2 cup unsalted butter, melted
-
- 1/4 cup granulated sugar
For the No-Bake Cheesecake Filling
-
- 16 oz (450 g) cream cheese, softened
-
- 1 cup powdered sugar
-
- 1 teaspoon vanilla extract
-
- 1 cup heavy whipping cream
For the Cherry Topping
-
- 1 can (21 oz / 595 g) cherry pie filling
Instructions
Start by placing the graham crackers into a food processor and pulse until fine crumbs form. If you don’t have a food processor, place the crackers in a sealed plastic bag and crush them using a rolling pin until finely ground.
Transfer the crumbs to a mixing bowl. Add the granulated sugar and stir to combine. Pour in the melted butter and mix thoroughly until all the crumbs are evenly coated and resemble wet sand.
Press the mixture firmly into the bottom of a 9-inch springform pan or pie dish. Use the bottom of a glass or measuring cup to press the crust tightly and evenly. This step is important to ensure the crust holds together when slicing.
Place the crust in the refrigerator to chill for at least 20–30 minutes while you prepare the filling.
In a large mixing bowl, pour in the cold heavy whipping cream. Using a hand mixer or stand mixer fitted with the whisk attachment, beat the cream on medium-high speed until stiff peaks form.
Stiff peaks mean the cream holds its shape when the whisk is lifted. Be careful not to overwhip, as this can cause the cream to become grainy. Set the whipped cream aside in the refrigerator.
In a separate large bowl, add the softened cream cheese. Beat on medium speed until completely smooth and creamy, scraping down the sides of the bowl as needed.
Add the powdered sugar and vanilla extract. Continue mixing until the mixture is silky, smooth, and free of lumps. Take your time here—this step ensures a perfectly creamy cheesecake texture.
Remove the whipped cream from the refrigerator. Using a spatula, gently fold the whipped cream into the cream cheese mixture.
Fold slowly in a circular motion, lifting from the bottom of the bowl to keep the filling light and airy. Continue folding until fully combined and smooth, with no streaks remaining.
Remove the chilled crust from the refrigerator. Spoon the cheesecake filling over the crust and spread it evenly using a spatula.
Smooth the top as much as possible for a clean, professional finish. Gently tap the pan on the counter once or twice to remove any air bubbles.
Cover the cheesecake loosely with plastic wrap or foil and place it in the refrigerator.
Allow it to chill for at least 4–6 hours, but overnight is highly recommended for the best texture and clean slices. The filling will firm up as it chills while remaining creamy.
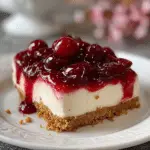
Just before serving, remove the cheesecake from the refrigerator. Spoon the cherry pie filling evenly over the top of the cheesecake.
Use the back of a spoon to gently spread the cherries, allowing some of the sauce to naturally drip toward the edges for a beautiful presentation.
Carefully release the cheesecake from the springform pan. For clean slices, use a sharp knife and wipe it clean between each cut.
Serve the cheesecake chilled, optionally garnished with whipped cream or fresh cherries.