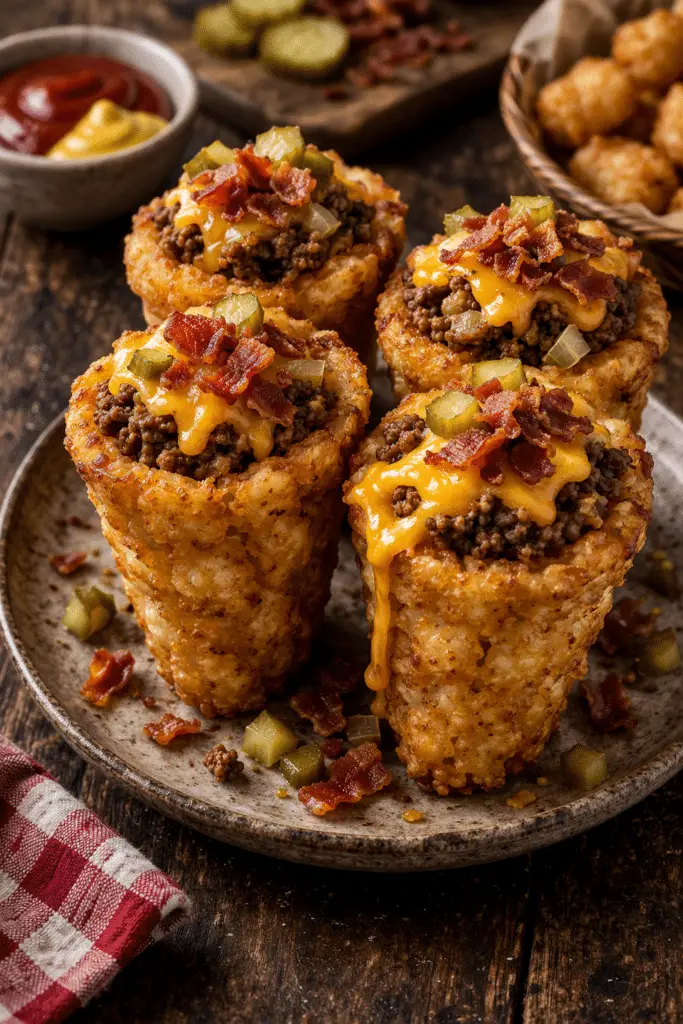
Juicy beef, crispy bacon, and melted cheese all rolled into a sizzling low-carb wrap — this recipe takes everything you love about a classic bacon cheeseburger and transforms it into a gooey, handheld bundle of comfort. It’s the kind of dish that satisfies big cravings with simple ingredients and minimal effort, making it perfect for busy weeknights, casual gatherings, or whenever you want something hearty and indulgent without going full fast-food mode.
Instead of a bun, you get a warm, toasty wrap or cheesy shell packed with savory ground beef, smoky bacon, and layers of melted cheddar and mozzarella. Optional cream cheese ties the filling together with a rich, velvety texture that feels almost like a cheeseburger dip—just wrapped and crisped to golden perfection. Every bite is a mix of crunch, melt, and meaty goodness, with all the familiar flavors of a loaded burger in a format that’s easy to customize, share, and devour.
What makes these Bacon Cheeseburger Cheese Wraps so appealing is that they strike that sweet spot between comfort and convenience. You don’t need fancy equipment, complicated techniques, or hard-to-find ingredients. Just a skillet, a handful of everyday items, and about 30 minutes. From there, you can tweak the recipe to suit low-carb preferences, mini snacks, or fully loaded monster wraps with all the toppings.
Whether you’re cooking for yourself, feeding a family, or prepping for game night, these wraps will quickly become one of those recipes you rely on when you want something fun, filling, and reliably delicious.
Core Ingredients for Making the Recipe
To prepare these Bacon Cheeseburger Cheese Wraps, you’ll be working with simple, familiar ingredients that come together to create big flavor. The key is layering textures and tastes—juicy meat, crisp bacon, melty cheese, and a warm wrap that holds it all together.
Here’s what you’ll need:
Key Ingredients First
- Ground beef
- Bacon, cooked and chopped
- Cheddar and mozzarella cheese slices
- Cream cheese (optional for extra creaminess)
For the Beef Filling
- 1 lb (450 g) ground beef – 80–85% lean works best for flavor and juiciness
- 1 tablespoon olive oil (optional, depending on how fatty your beef is)
- ½ teaspoon salt, or to taste
- ½ teaspoon black pepper
- ½ teaspoon garlic powder
- ½ teaspoon onion powder
- ½ teaspoon smoked paprika (adds a subtle smoky “grilled burger” vibe)
- 2 tablespoons cream cheese (optional but highly recommended) – makes the filling creamy and cohesive
For the Bacon
- 6–8 slices bacon – cooked until crisp and chopped into small pieces
For the Wraps and Cheese
- 6 low-carb tortillas (8-inch) or your favorite wraps
- You can use standard flour tortillas, low-carb tortillas, or even cheese-based wraps for keto
- 6 slices cheddar cheese – for sharp, classic cheeseburger flavor
- 6 slices mozzarella cheese – for extra melt and stretch
- You can also use shredded cheese if that’s what you have on hand
Optional Add-Ins & Toppings
These aren’t required, but they add fun burger-style flavor and texture:
- 2 tablespoons mayonnaise
- 1 tablespoon yellow mustard or Dijon mustard
- 2 tablespoons ketchup or burger sauce
- Dill pickle slices or chopped pickles
- Sliced red onion or sautéed onions
- Shredded lettuce or baby spinach (add after cooking for freshness)
- Tomato slices (added after heating to prevent sogginess)
- Jalapeño slices (fresh or pickled, for some heat)
These optional extras let you build each wrap exactly the way you like it—simple, loaded, spicy, or classic diner-style.
Step-by-Step

These Bacon Cheeseburger Cheese Wraps come together in a few straightforward stages: cooking the bacon, preparing the beef mixture, assembling the wraps, and toasting them until the outside is crisp and the inside is perfectly melty.
1. Cook the Bacon
- Prepare a skillet:
Place a large skillet over medium heat. - Cook the bacon:
Lay the bacon strips in a single layer and cook until they’re crisp and deep golden brown, flipping as needed. - Drain and chop:
Transfer the cooked bacon to a plate lined with paper towels to absorb excess fat.
Once cool enough to handle, chop or crumble the bacon into small pieces. Set aside.
If you’d like, you can reserve 1–2 tablespoons of the bacon fat to cook the beef for extra smoky flavor.
2. Brown the Ground Beef
- Heat the skillet:
In the same skillet (wipe out excess grease if there’s too much), add a small splash of olive oil or use reserved bacon fat. - Add the beef:
Add the ground beef to the skillet over medium-high heat. Use a spatula or wooden spoon to break it apart into small crumbles as it cooks. - Season generously:
When the meat is mostly browned but still slightly pink, add:- Salt
- Black pepper
- Garlic powder
- Onion powder
- Smoked paprika
- Cook until fully browned:
Continue sautéing until the beef is fully cooked and no pink remains. If there’s a lot of excess fat, you can drain some of it off—but leave a bit for flavor and moisture.
3. Make the Filling Creamy (Optional but Delicious)
This step is where the wraps go from “good” to “wow.”
- Add cream cheese:
Reduce the heat to low and add the cream cheese to the skillet with the hot beef. - Melt and stir:
Stir constantly until the cream cheese melts and coats the beef mixture, turning it into a rich, creamy filling that holds together nicely. - Add the bacon:
Stir in most of the chopped bacon, reserving a small handful to sprinkle on top of the filling during assembly if you like.
You should now have a skillet full of creamy, savory bacon cheeseburger filling that smells incredible.
4. Prep the Wraps and Cheese
- Warm the tortillas (optional but helpful):
To prevent cracking and to make rolling easier, briefly warm your tortillas:- You can microwave them for 15–20 seconds in a stack covered with a damp paper towel, or
- Warm them one by one in a dry skillet over low heat.
- Set up your assembly station:
Lay out your tortillas on a clean surface.
Have your cheese slices, beef mixture, bacon, and optional sauces ready.
5. Assemble the Bacon Cheeseburger Cheese Wraps
For each wrap:
- Add sauce (optional):
If using mayo, mustard, ketchup, or burger sauce, spread a thin layer in the center of the tortilla, leaving a border around the edges. This adds moisture and classic burger flavor. - Layer the cheese:
Place one slice of cheddar and one slice of mozzarella in the center.
You can slightly overlap them or tear them into pieces to create an even layer. - Add the beef and bacon mixture:
Spoon a generous amount of the hot beef filling over the cheese—about ⅓ to ½ cup, depending on the size of your wraps and how hefty you want them. - Add extra bacon (optional):
Sprinkle some of the reserved bacon over the top of the filling for extra crunch and smoky flavor. - Add optional toppings:
If you want pickles, onions, or jalapeños melted inside the wrap, add a small amount at this stage.
Save fresh ingredients like lettuce and tomato for after cooking, so they stay crisp.
6. Roll the Wraps
To keep the filling secure and prevent leaks:
- Fold the sides in:
Fold the left and right sides of the tortilla toward the center so they partially cover the filling. - Roll from the bottom:
Starting at the edge closest to you, roll the wrap up and over the filling, tucking it tightly as you go. - Seal the seam:
Place the wrap seam-side down to help it stay closed. Repeat with the remaining tortillas and filling.
7. Toast the Wraps Until Golden and Melty
- Heat a clean skillet:
Place a large nonstick skillet or griddle over medium heat. - Add a little fat:
Lightly brush the skillet with olive oil, butter, or a touch of bacon fat for extra flavor and crispness. - Toast the wraps:
Place the wraps seam-side down in the skillet. Cook for 2–3 minutes, or until the bottom is golden and crisp. - Flip carefully:
Use a spatula to gently flip each wrap. Cook the second side for another 2–3 minutes, until it’s golden and heated through and the cheese inside is fully melted. - Remove and rest:
Transfer the wraps to a cutting board or plate and let them rest for 1–2 minutes. This helps the filling settle and makes slicing easier.
8. Serve and Enjoy
Slice each wrap in half on the diagonal for a classic, café-style presentation, or serve whole if you’re feeling extra hungry.
With each bite, you’ll get the savory richness of beef, the smoky crunch of bacon, and the stretchy, gooey pull of melted cheddar and mozzarella—all wrapped up in a warm, toasty shell.
Flavor Variations and Creative Twists
One of the most fun aspects of this recipe is how flexible it is. Just like a burger joint lets you build your dream burger, you can customize these wraps to match your mood, your cravings, or what you have in the fridge.
1. Spicy Jalapeño Bacon Cheeseburger Wraps
- Add sliced fresh or pickled jalapeños inside the wrap before toasting.
- Use pepper jack cheese instead of mozzarella for added heat.
- Drizzle a bit of hot sauce or chipotle mayo over the filling before rolling.
This version has the same comfort as a bacon cheeseburger, but with a fiery kick.
2. Mushroom & Swiss Bacon Cheeseburger Wraps
- Swap mozzarella or cheddar for Swiss cheese.
- Sauté sliced mushrooms in a little butter and garlic until golden and add them to the filling.
You’ll get a flavor profile reminiscent of a mushroom Swiss burger—rich, savory, and deeply satisfying.
3. Double Cheese Deluxe Version
If you’re a true cheese lover, go all in:
- Add shredded cheese in addition to slices.
- Sprinkle a little extra cheese on the outside of the wrap while it toasts for a lightly crisp, cheesy crust.
This creates an ultra-cheesy, almost quesadilla-like shell that’s impossible to resist.
4. BBQ Bacon Cheeseburger Wraps
- Replace ketchup with BBQ sauce inside the wrap.
- Add a pinch of smoked paprika or chili powder to the beef.
You’ll get a sweet-smoky flavor profile that pairs beautifully with the bacon.
5. Keto or Ultra Low-Carb Variation
- Skip traditional tortillas and use cheese wraps or baked cheese “discs” instead:
- Spread shredded cheddar in circles on a lined baking sheet.
- Bake until melted and lightly golden, then let them cool slightly until pliable.
- Fill and roll as you would a tortilla.
This version is rich, indulgent, and almost zero-carb, perfect for keto-style eating.
How to Serve
Bacon Cheeseburger Cheese Wraps are incredibly versatile and can fit into different mealtime moods—casual dinners, game-night platters, or quick lunches. How you serve them can shift the entire experience.
As a Main Dish
Serve each person one or two wraps, depending on appetite, with simple side dishes such as:
- A crisp green salad with a tangy vinaigrette
- Roasted or air-fried vegetables
- Classic coleslaw
- Baked or air-fried potato wedges
- Sweet potato fries
The wraps are rich and filling, so lighter, fresher sides offer nice balance.
As Party Food or Game-Day Bites
Turn the wraps into shareable finger food:
- Slice each wrap into 3–4 smaller pieces.
- Secure each piece with a toothpick.
- Serve on a platter with small bowls of dipping sauces like ketchup, spicy mayo, BBQ sauce, ranch, or burger sauce.
They’re perfect for buffets, movie nights, or watching a match with friends.
With Fresh Toppings
To bring in contrast and freshness:
- After toasting, gently open the wrap and tuck in shredded lettuce, chopped tomatoes, or extra pickles.
- This gives you that “fresh burger” crunch alongside the melted interior.
With Dips and Sauces
These wraps pair beautifully with:
- Classic ketchup and mustard
- Garlic aioli
- Ranch dressing
- Chipotle mayo
- Sriracha mayo
- Smoky BBQ sauce
You can set up a mini “sauce bar” so everyone can dip and customize to their liking.
Tips & Variations
A few small choices can make a big difference in the final result. Here are some practical tips to help your Bacon Cheeseburger Cheese Wraps turn out perfectly every time.
Choose the Right Beef
- 80–85% lean ground beef gives the best flavor and juiciness.
- If your beef is very fatty, drain off some grease so the filling isn’t greasy, but don’t remove all the fat—it carries a lot of flavor.
Don’t Skip Seasoning
Ground beef can taste flat without enough seasoning. Taste and adjust the salt, pepper, and spices so the filling is flavorful on its own before you even add cheese and bacon.
Cook the Bacon Until Truly Crisp
Crispy bacon gives better texture than soft bacon in this recipe. It adds crunch and avoids becoming chewy inside the wrap.
Warm the Tortillas First
Warm tortillas are less likely to crack and roll more easily without tearing.
Avoid Overfilling
It’s tempting to pile in as much filling as possible, but overstuffed wraps can burst open or be difficult to crisp evenly. Use a generous but reasonable amount of filling.
Toast Low and Slow
Medium heat is your friend. Too high, and the outside may burn before the cheese fully melts inside. A moderate heat gives you that beautiful golden crust and gooey interior.
Add Fresh Ingredients After Cooking
Lettuce, tomato, and some pickles hold their texture better if added just before serving rather than cooked inside.
Make-Ahead Tip
You can cook the beef and bacon mixture ahead of time and store it in the refrigerator for up to 3 days. When ready to serve, all you need to do is assemble and toast the wraps.
Final Thoughts
Bacon Cheeseburger Cheese Wraps are the perfect example of how a few humble ingredients—ground beef, bacon, cheese, and wraps—can be transformed into something deeply comforting and incredibly satisfying.
They bring all the joy of a bacon cheeseburger—savory meat, smoky bacon, melty cheese, and classic burger flavors—but in a form that’s easy to eat, quick to prepare, and endlessly customizable. No need for buns, grills, or complicated steps. Just a skillet, a handful of pantry staples, and a short amount of time.
Whether you’re cooking for a weeknight dinner, prepping lunches, or putting out a platter of hearty snacks for friends, these wraps deliver on every front: flavor, texture, and comfort. They’re the kind of recipe that quickly finds a permanent place in your rotation—one you can tweak with sauces, toppings, and cheese combinations to feel new every time.
In the end, Bacon Cheeseburger Cheese Wraps remind us that comfort food doesn’t have to be fussy to be memorable. Sometimes, the simplest combinations—done well—are the ones we crave the most.
FAQ
Can I use ground turkey or chicken instead of beef?
Yes, absolutely. Ground turkey or chicken can be used in place of beef if you prefer a lighter option. Just keep in mind that these meats are leaner, so you may want to add a little extra olive oil or a splash of broth and adjust seasoning to keep the filling moist and flavorful.
Can I make these wraps ahead of time?
Yes. You can prepare the beef and bacon filling in advance and store it in an airtight container in the refrigerator for up to 3 days. When you’re ready to eat, simply assemble the wraps with fresh cheese and toast them in a skillet until golden and heated through.
If you want to fully assemble them ahead, it’s best to store them un-toasted and crisp them just before serving so they don’t become soggy.
Can I freeze Bacon Cheeseburger Cheese Wraps?
Yes. After assembling and lightly toasting them, let the wraps cool completely. Wrap each one tightly in plastic wrap or foil, then place them in a freezer-safe bag or container. They can be frozen for up to 2 months.
To reheat, thaw in the refrigerator overnight if possible, then toast in a skillet over medium heat until the outside is crisp and the inside is hot and melty. You can also reheat from frozen over lower heat with a lid to warm the center.
How can I make these more low-carb or keto-friendly?
To keep them low-carb:
- Use low-carb tortillas or cheese wraps.
- Skip ketchup (or use a sugar-free version), and use mustard and mayo instead.
For a more strict keto version, use cheese-only “shells” instead of tortillas, and keep sauces sugar-free.
Can I reduce the cheese or make these lighter?
You can definitely adjust the cheese to your taste. Use fewer slices, choose part-skim mozzarella, or skip the cream cheese if you want a slightly lighter version. The wraps will still be delicious and satisfying, just a bit less rich.
What sauces go best with Bacon Cheeseburger Cheese Wraps?
Great options include:
- Ketchup and mustard
- Burger sauce or “special sauce”
- BBQ sauce
- Ranch dressing
- Garlic or chipotle mayo
You can spread them inside before rolling or serve them on the side for dipping.