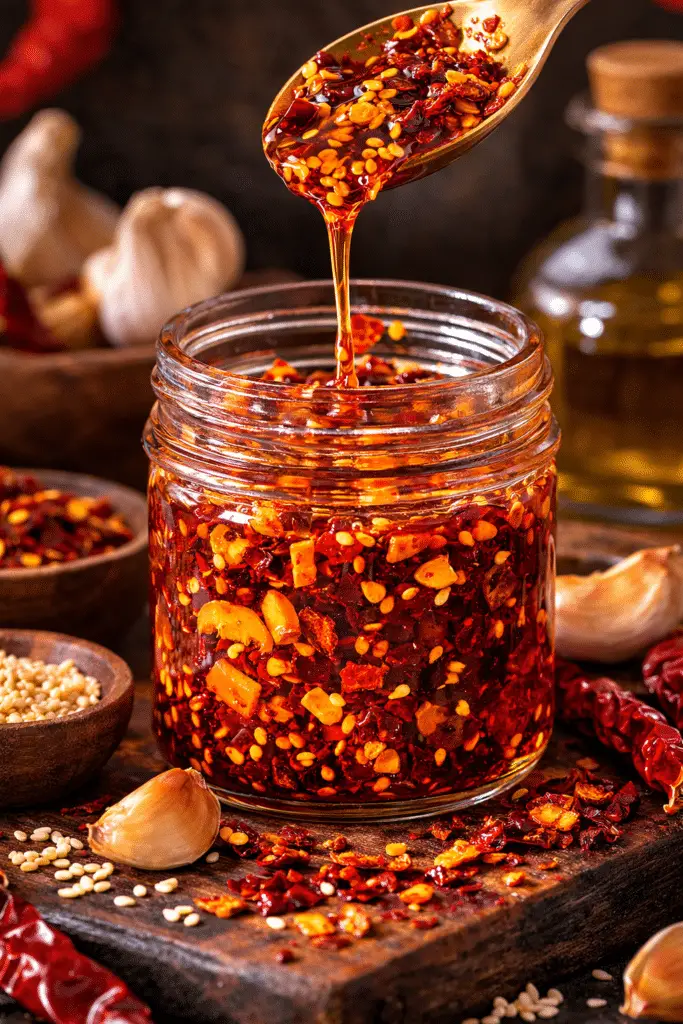
There is something almost irresistible about the moment hot oil meets fresh garlic. The kitchen fills with a deep, savory aroma, the garlic starts to sizzle softly, and within seconds you know something bold and delicious is on the way. This Chili Garlic Crisp brings that same excitement in one small jar, with crunchy bits, smoky heat, and a glossy spoonful of flavor that can wake up everything from rice bowls to eggs.
What makes this recipe especially fun is how quickly it comes together while still tasting like a condiment you would want to keep within reach all week. It is spicy, garlicky, slightly smoky, and just a little savory-sweet, with layers of texture in every bite. Once you make this homemade Chili Garlic Crisp, you may start finding excuses to add it to almost everything, and that is where the real magic begins.
Why You Will Love This Recipe
- Super quick to make with just a few minutes of cooking.
- Bold, layered flavor with heat, crunch, and savory depth.
- A small spoonful transforms simple meals instantly.
- Keeps well in the refrigerator for easy meal upgrades.
- Great for busy weekdays when food needs a fast flavor boost.
- Easy to stir onto noodles, rice, vegetables, or eggs.
- Homemade Chili Garlic Crisp tastes fresh and deeply aromatic.
Ingredients
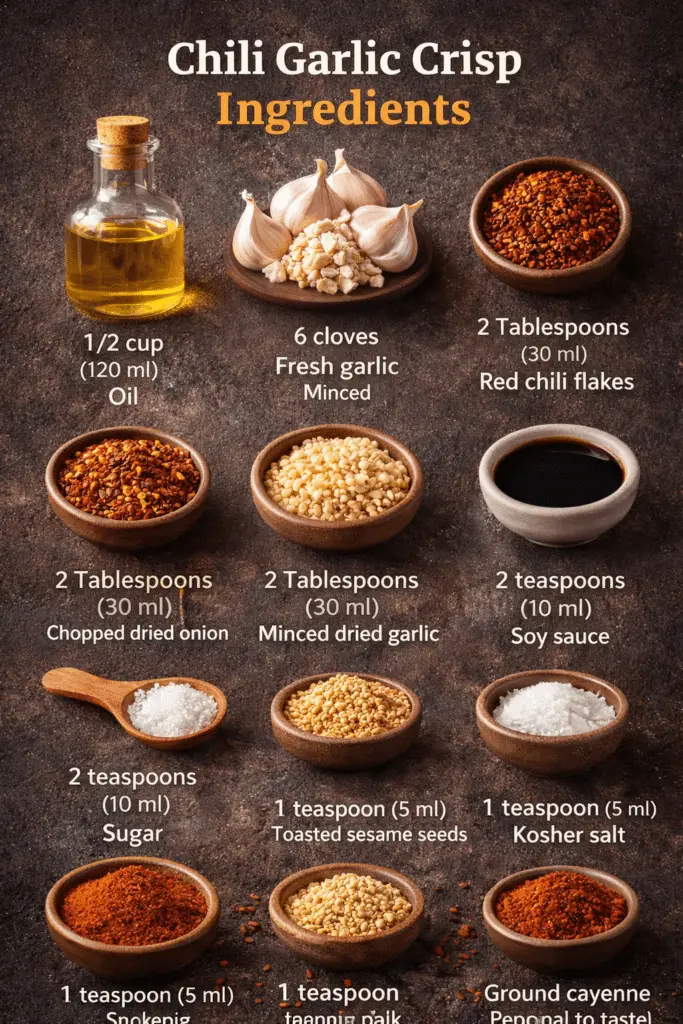
• 1/2 cup (120 ml) oil – Creates the rich base that carries all the flavor and crisp texture.
• 6 cloves fresh garlic , minced – Adds sharp, fragrant garlic flavor that becomes sweet and savory as it cooks.
• 2 Tablespoons (30 ml) red chili flakes – Brings the signature heat and classic chili crunch character.
• 2 Tablespoons (30 ml) chopped dried onion – Adds texture and a lightly sweet, savory bite.
• 2 Tablespoons (30 ml) minced dried garlic – Boosts the garlic flavor and adds extra crisp bits.
• 2 teaspoons (10 ml) soy sauce – Adds savory umami depth and balance.
• 2 teaspoons (10 ml) sugar – Softens the heat slightly and rounds out the flavors.
• 1 teaspoon (5 ml) toasted sesame seeds – Adds nutty flavor and a subtle crunch.
• 1 teaspoon (5 ml) kosher salt , if using table salt, use a little less – Sharpens and balances every other ingredient.
• 1 teaspoon (5 ml) smoked paprika – Adds gentle smokiness and warm color.
• 1 teaspoon (5 ml) ground cayenne (optional to taste) – Gives the crisp an extra fiery kick for heat lovers.
Step-by-Step

- Heat the oil over medium heat.
Place a small saucepan or skillet over medium heat and add the oil. Let it warm gently rather than rushing it on high heat. You want the oil hot enough to cook the garlic quickly, but not so hot that it scorches the aromatics before the rest of the ingredients go in. - Add the minced fresh garlic and cook briefly.
Stir in the minced fresh garlic and watch it closely. Cook for about 1 minute, stirring constantly, until it turns slightly golden and smells rich and fragrant. The color change happens fast, so stay near the stove. Burned garlic can turn bitter in seconds, which is one of the biggest differences between a balanced Chili Garlic Crisp and one that tastes harsh. - Remove from heat promptly.
As soon as the garlic reaches that lightly golden stage, take the pan off the heat. This is important because the residual heat in the oil will continue cooking the garlic for a moment. Pulling it off the burner at the right time helps preserve a savory, roasted garlic flavor without tipping into bitterness. - Stir in the dry ingredients and seasonings.
Add the red chili flakes, chopped dried onion, minced dried garlic, soy sauce, sugar, toasted sesame seeds, kosher salt, smoked paprika, and ground cayenne if using. Stir thoroughly so every ingredient is coated in the hot oil. The warm oil will bloom the spices and chili flakes, helping them release more flavor and color. - Mix until everything looks evenly distributed.
Keep stirring for a few moments until the mixture looks glossy, evenly seasoned, and packed with suspended bits of onion, garlic, seeds, and chili. At this point, you should notice the aroma deepen even more. It will smell spicy, toasty, garlicky, and just slightly smoky. - Let the mixture cool completely.
Set the pan aside and allow the chili mixture to cool fully before storing. This gives the flavors time to settle and helps the crisp bits absorb the seasoned oil. The texture becomes even better as it rests, and the overall flavor tastes more rounded once cooled. - Transfer to a clean jar or airtight container.
Spoon the cooled mixture into a mason jar or airtight container. Make sure to scrape in all the flavorful oil and crunchy bits. That balance of oil and solids is what makes Chili Garlic Crisp so satisfying, because every spoonful should contain both heat and texture. - Refrigerate and stir before using.
Store the jar in the refrigerator and stir well before each use. Some of the solids may settle to the bottom as it sits, which is completely normal. A quick stir brings everything back together so you get the full flavor in every spoonful.
Pro Tips for Perfect Results
- Watch the fresh garlic carefully because it can go from pale gold to burned very quickly.
- Do not leave the oil on high heat, or the garlic may brown too fast before the flavor develops properly.
- Stir the dry ingredients in right after removing from heat so they bloom without scorching.
- Let the mixture cool completely before sealing the jar to help preserve the best texture.
- Avoid under-seasoning by mixing thoroughly, since the salt, soy sauce, and sugar need to distribute evenly throughout the oil.
Variations & Customizations
For a milder version, simply reduce or skip the optional ground cayenne. The red chili flakes still give this Chili Garlic Crisp plenty of character, but the overall heat will be more approachable for everyday use.
If you enjoy a smokier flavor, let the smoked paprika stand out by pairing the crisp with roasted vegetables, grilled proteins, or warm grain bowls. It creates that deep, almost fire-kissed flavor without adding extra ingredients.
For more texture in each spoonful, be sure to stir from the bottom before serving. The dried onion, dried garlic, and sesame seeds settle over time, and bringing them back into the oil gives the condiment its full crunchy personality.
This recipe also works beautifully as a finishing condiment rather than a cooking sauce. Try spooning it over avocado toast, soft scrambled eggs, noodle soups, or dumplings. Have you ever had one condiment that suddenly makes leftovers exciting again? This is that kind of jar.
If you want to keep the heat more balanced, use the optional cayenne gradually. Start with less and taste after the mixture cools, since spice can feel slightly different once the oil settles and the flavors meld together.
Storage & Make Ahead
Once cooled, transfer the Chili Garlic Crisp to a mason jar or another airtight container and store it in the refrigerator. It is best kept chilled so the garlic stays fresh and the flavors remain clean and vibrant.
It should last for several days in the refrigerator when stored properly in a clean container. Always use a clean spoon when scooping some out, since that helps protect the flavor and keeps the jar fresher longer.
Before serving, stir well so the crunchy pieces redistribute through the oil. That is especially important after the jar has been sitting for a while, because the solids naturally settle at the bottom.
Freezing is generally not the best option for this recipe because the texture of the garlic and crisp bits can change once thawed. Refrigeration is the better choice for maintaining the right balance of flavor and crunch.
Since this recipe is made ahead and served as needed, reheating usually is not necessary. If the oil firms up slightly from being cold, let the jar sit at room temperature for a few minutes, then stir gently before using.
FAQ
What is chili garlic crisp made of?
This homemade Chili Garlic Crisp is made with oil, fresh garlic, red chili flakes, dried onion, dried garlic, soy sauce, sugar, sesame seeds, salt, smoked paprika, and optional ground cayenne.
Together, these ingredients create a flavorful mix of heat, crunch, savoriness, and a little sweetness in every spoonful.
How spicy is chili garlic crisp?
The spice level is moderate to bold, depending on the chili flakes and whether you include the optional cayenne.
If you want a gentler version, leaving out the cayenne keeps the flavor rich and exciting without making it overwhelmingly hot.
Can I use chili garlic crisp on more than Asian-style dishes?
Absolutely. While it is fantastic on noodles, rice, dumplings, and stir-fried foods, it is also delicious on eggs, roasted vegetables, toast, or even simple cooked potatoes.
That versatility is one reason so many people love keeping a jar of Chili Garlic Crisp ready in the fridge.
Why did my garlic burn?
This usually happens when the oil is too hot or the garlic cooks a few seconds too long. Fresh garlic browns very quickly, so medium heat and close attention matter here.
Remove the pan from the heat as soon as the garlic turns slightly golden, because it keeps cooking from the residual heat.
Can I make chili garlic crisp ahead of time?
Yes, and it is actually a great make-ahead recipe. Once cooled and stored in the refrigerator, the flavors have time to settle and blend even more.
That makes it especially handy for meal prep, quick lunches, and those busy weekday dinners when you want extra flavor fast.
Why is my chili garlic crisp not crunchy enough?
The texture can seem softer if it has not cooled fully yet or if the solids are not stirred well before serving. The dried onion, dried garlic, and sesame seeds contribute to the crisp texture.
Let the mixture cool completely and stir from the bottom of the jar before using so you get all the crunchy bits in each spoonful.
Nutrition & Time Table
| Item | Amount |
|---|---|
| Prep Time | 5 minutes |
| Cooking Time | 3 minutes |
| Total Time | 8 minutes |
| Calories (estimate) | 84 kcal |
| Protein | 0.5 g |
| Carbohydrates | 2.8 g |
| Fat | 8.2 g |

Chili Garlic Crisp
Description
A bold, spicy, crunchy condiment that adds instant flavor to noodles, rice, eggs, and more.
This quick Chili Garlic Crisp comes together fast and stores well in the fridge.
Ingredients
• 1/2 cup (120 ml) oil
• 6 cloves fresh garlic , minced
• 2 Tablespoons (30 ml) red chili flakes
• 2 Tablespoons (30 ml) chopped dried onion
• 2 Tablespoons (30 ml) minced dried garlic
• 2 teaspoons (10 ml) soy sauce
• 2 teaspoons (10 ml) sugar
• 1 teaspoon (5 ml) toasted sesame seeds
• 1 teaspoon (5 ml) kosher salt , if using table salt, use a little less
• 1 teaspoon (5 ml) smoked paprika
• 1 teaspoon (5 ml) ground cayenne (optional to taste)
Instructions
1. Heat oil over medium heat.
2. Add garlic and cook until slightly golden, about 1 minute.
3. Remove from heat promptly to prevent burning.
4. Stir in red chili flakes, chopped dried onion, minced dried garlic, soy sauce, sugar, toasted sesame seeds, kosher salt, smoked paprika, and ground cayenne.
5. Mix thoroughly.
6. Allow to cool completely.
7. Transfer to a mason jar or airtight container and refrigerate.
8. Stir well before using.