Introduction
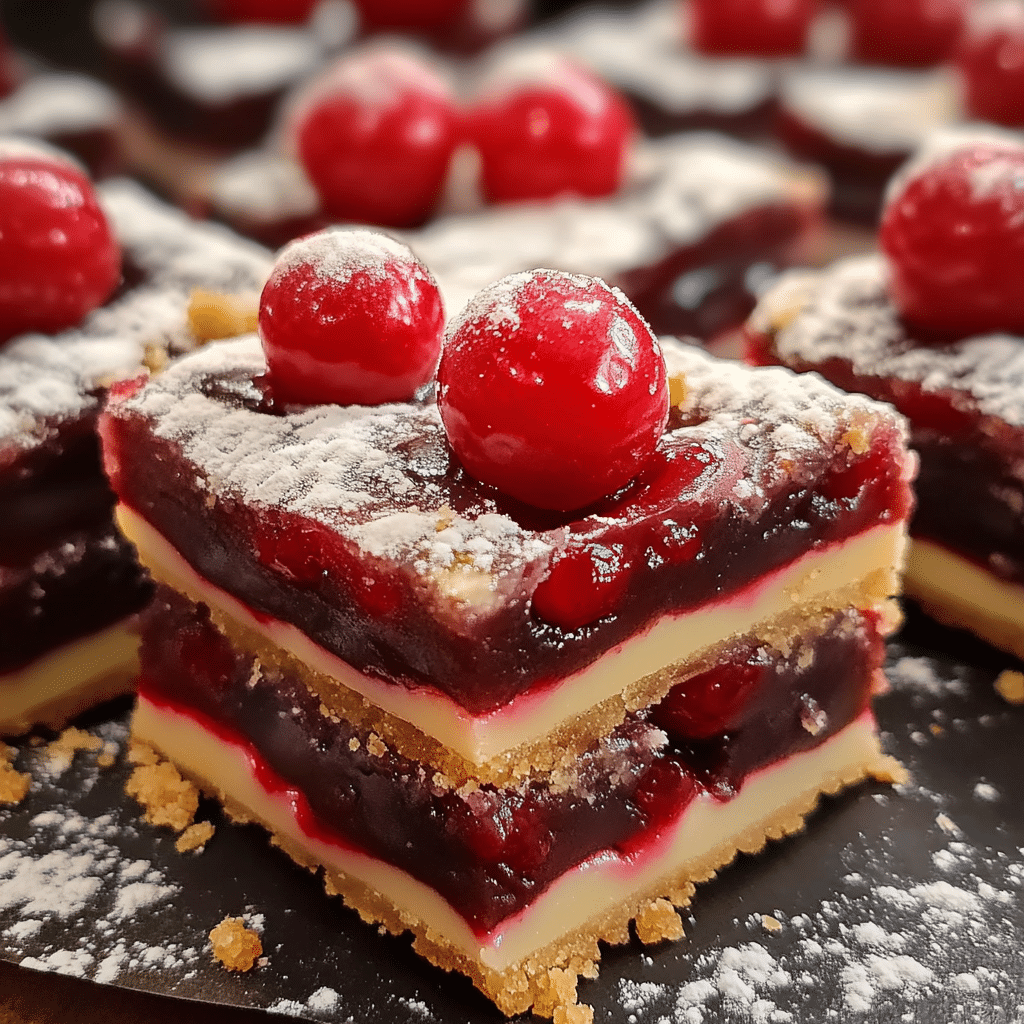
Christmas Cherry Bars are the quintessential holiday dessert, combining festive flavors with a delightful blend of textures. A buttery shortbread crust serves as the base, offering a rich and crumbly foundation for the vibrant cherry filling that steals the show. The topping, golden and slightly crisp, adds the perfect finishing touch, creating a dessert that’s as satisfying to eat as it is to look at.
These bars have become a holiday staple in my home. The first time I baked them, their cheerful red hue and irresistible aroma made them an instant crowd-pleaser. They’re ideal for Christmas gatherings, cookie exchanges, or as thoughtful homemade gifts for friends and family. Each bite is a little taste of holiday joy, with the tart cherries perfectly balanced by the sweetness of the crust and topping.
What I love most about Christmas Cherry Bars is how versatile they are. You can add a hint of almond extract to the filling for an extra layer of flavor or drizzle them with a simple glaze for a touch of elegance. They’re easy to slice and serve, making them a hassle-free addition to any dessert table. Whether you’re a seasoned baker or just starting out, these bars are simple to make and guaranteed to spread holiday cheer!
Perfect for:
- Christmas dessert platters
- Holiday gifting
- Festive potlucks and gatherings
- Sweet treats for family movie nights
- Baking with loved ones during the holidays
Why You’ll Love This Recipe
These Christmas Cherry Bars are bound to become a seasonal favorite, and here’s why:
- Festive and Beautiful: The vibrant cherry filling adds a festive touch that stands out on holiday dessert tables.
- Easy to Make: With straightforward ingredients and simple steps, this recipe is perfect for bakers of all levels.
- Crowd-Pleaser: Their irresistible combination of buttery crust and sweet cherry filling makes them a hit with everyone.
- Customizable: You can easily tweak the recipe with different fruits or toppings for variety.
- Great for Gifting: Wrapped in festive packaging, these bars make a thoughtful homemade gift.
- Perfect Texture Balance: The crisp crust, juicy filling, and crumbly topping create a delightful bite every time.
Preparation and Cooking Time
- Total Time: 1 hour
- Preparation Time: 20 minutes
- Baking Time: 40 minutes
- Servings: 12-16 bars
- Calories per serving: Approximately 150 calories
- Key Nutrients: Carbs: 25g, Fat: 6g, Protein: 2g
Ingredients
Gather the following ingredients to make your Christmas Cherry Bars:
For the Crust and Topping:
- 1 cup unsalted butter, softened
- 1/2 cup granulated sugar
- 2 cups all-purpose flour
- 1/2 teaspoon salt
For the Filling:
- 1 (21-ounce) can cherry pie filling
- 1 teaspoon almond extract
Ingredient Highlights
- Unsalted Butter: Ensures a rich, buttery crust and topping.
- Cherry Pie Filling: A convenient and vibrant option for a sweet and tart filling.
- Almond Extract: Adds a subtle nutty flavor that pairs perfectly with cherries.
Step-by-Step Instructions
Here’s how to make Christmas Cherry Bars:
Prepare the Crust and Topping:
- Preheat Oven: Preheat your oven to 350°F (175°C) and grease a 9×13-inch baking pan or line it with parchment paper for easy removal.
- Mix the Crust and Topping: In a large bowl, cream together the softened butter and sugar until light and fluffy. Gradually mix in the flour and salt until a crumbly dough forms.
- Form the Base: Press two-thirds of the crumbly mixture evenly into the bottom of the prepared pan to form the crust.
Add the Cherry Filling:
- Spread the Filling: In a small bowl, stir the almond extract into the cherry pie filling. Spread the filling evenly over the crust layer.
Add the Topping and Bake:
- Add Crumble Topping: Sprinkle the remaining crust mixture evenly over the cherry filling to create a crumbly topping.
- Bake: Bake in the preheated oven for 35-40 minutes or until the topping is golden brown and the filling is bubbly.
Cool and Serve:
- Cool Completely: Let the bars cool in the pan before slicing into squares or rectangles.
- Serve and Enjoy: Serve the bars as they are, or dust with powdered sugar for an extra festive touch.

How to Serve
Christmas Cherry Bars are versatile and can be served in several ways:
- On a Dessert Platter: Add these bars to a holiday dessert spread alongside cookies and other festive treats.
- Paired with Coffee or Tea: Enjoy them with a hot cup of coffee or tea for a delightful afternoon snack.
- As a Gift: Wrap the bars in decorative boxes or tins for a thoughtful holiday gift.
- Warm with Ice Cream: Serve the bars warm with a scoop of vanilla ice cream for a decadent dessert.
- Holiday Potluck: Bring them to potlucks or gatherings—they travel well and are always a hit.
Additional Tips
Here are some helpful tips to make your Christmas Cherry Bars shine:
- Use Homemade Filling: If preferred, make your own cherry filling for a more personalized touch.
- Chill the Dough: If the dough becomes too soft to handle, refrigerate it for 10-15 minutes before pressing into the pan.
- Cutting Clean Slices: Use a sharp knife and wipe it clean between cuts for perfectly neat bars.
- Add Nuts: Mix chopped almonds or pecans into the topping for extra crunch and flavor.
- Double the Recipe: For larger gatherings, double the recipe and bake in a larger pan.
- Add Zest: Add a touch of orange or lemon zest to the filling for a citrusy twist.
- Gluten-Free Option: Substitute the flour with a gluten-free baking mix to make these bars gluten-free.
- Experiment with Extracts: Try using vanilla or orange extract instead of almond extract for a different flavor.
- Decorative Touch: Drizzle melted white chocolate over the bars after cooling for a festive look.
- Room Temperature Serving: Let the bars come to room temperature for the best texture and flavor.
Recipe Variations
Here are 10 delicious variations of Christmas Cherry Bars:
- Mixed Berry Bars: Replace cherry pie filling with mixed berry filling for a medley of fruity flavors.
- Chocolate Cherry Bars: Drizzle melted dark chocolate over the bars for a decadent touch.
- Coconut Cherry Bars: Add shredded coconut to the topping mixture for added texture and flavor.
- Pineapple-Cherry Bars: Combine crushed pineapple with the cherry filling for a tropical twist.
- Cranberry Cherry Bars: Mix in some cranberry sauce for a tart holiday-inspired variation.
- Cheesecake Cherry Bars: Spread a thin layer of cream cheese over the crust before adding the cherry filling.
- Nutty Cherry Bars: Add a layer of chopped walnuts or pecans between the crust and filling.
- Apple-Cherry Bars: Combine cherry filling with diced apples for a fall-inspired version.
- Spiced Cherry Bars: Add a pinch of cinnamon and nutmeg to the crust for warm, spiced notes.
- Glazed Cherry Bars: Drizzle a simple powdered sugar glaze over the cooled bars for added sweetness.
Freezing and Storage
- Freezing: Wrap individual bars in plastic wrap and store them in a freezer-safe container for up to 2 months. Thaw at room temperature before serving.
- Storage: Store the bars in an airtight container at room temperature for up to 3 days or in the refrigerator for up to a week.
Special Equipment
Here are the tools you’ll need to make Christmas Cherry Bars, along with their uses:
- 9×13-Inch Baking Pan: Provides the perfect size for evenly baking the bars.
- Parchment Paper: Makes lifting and cutting the bars easier without sticking.
- Mixing Bowls: Used to prepare the crust, topping, and filling.
- Electric Mixer: Helps cream the butter and sugar quickly and efficiently.
- Measuring Cups and Spoons: Ensures precise measurements for perfect results.
- Rubber Spatula: Useful for spreading the filling evenly over the crust.
- Knife or Pastry Cutter: For cutting the bars into neat, even pieces.
- Cooling Rack: Allows the bars to cool evenly before slicing.
- Storage Container: Keeps the bars fresh and portable for storage or gifting.
- Offset Spatula (Optional): Helps spread the crust and topping layers evenly.
FAQ Section
- Can I use fresh cherries instead of pie filling?
Yes, you can use fresh or frozen cherries to make your own filling. Cook them with sugar and cornstarch until thickened before using. - Can I make these bars gluten-free?
Absolutely! Substitute the all-purpose flour with a gluten-free baking blend. - What other fillings can I use?
You can use blueberry, apple, or even raspberry pie filling for a different flavor. - How do I prevent the bars from becoming soggy?
Ensure the crust is evenly pressed and baked until firm before adding the filling. - Can I freeze the bars after baking?
Yes, freeze the fully baked and cooled bars for up to 2 months in an airtight container. - How long do these bars stay fresh?
They’ll stay fresh for up to 3 days at room temperature or a week in the refrigerator. - Can I add a glaze to these bars?
Yes, a powdered sugar glaze or melted white chocolate drizzle works wonderfully. - What can I use instead of almond extract?
Vanilla or orange extract makes a great substitute for almond extract. - Can I double the recipe?
Yes, simply double the ingredients and bake in a larger pan or two 9×13-inch pans. - Do I need to refrigerate these bars?
Refrigeration isn’t required, but it can extend freshness, especially in warmer climates.

Christmas Cherry Bars
- Total Time: 1 hour
Ingredients
Gather the following ingredients to make your Christmas Cherry Bars:
- For the Crust and Topping:
- 1 cup unsalted butter, softened
- 1/2 cup granulated sugar
- 2 cups all-purpose flour
- 1/2 teaspoon salt
- For the Filling:
- 1 (21-ounce) can cherry pie filling
- 1 teaspoon almond extract
Instructions
Prepare the Crust and Topping:
- Preheat Oven: Preheat your oven to 350°F (175°C) and grease a 9×13-inch baking pan or line it with parchment paper for easy removal.
- Mix the Crust and Topping: In a large bowl, cream together the softened butter and sugar until light and fluffy. Gradually mix in the flour and salt until a crumbly dough forms.
- Form the Base: Press two-thirds of the crumbly mixture evenly into the bottom of the prepared pan to form the crust.
Add the Cherry Filling:
- Spread the Filling: In a small bowl, stir the almond extract into the cherry pie filling. Spread the filling evenly over the crust layer.
Add the Topping and Bake:
- Add Crumble Topping: Sprinkle the remaining crust mixture evenly over the cherry filling to create a crumbly topping.
- Bake: Bake in the preheated oven for 35-40 minutes or until the topping is golden brown and the filling is bubbly.
Cool and Serve:
- Cool Completely: Let the bars cool in the pan before slicing into squares or rectangles.
- Serve and Enjoy: Serve the bars as they are, or dust with powdered sugar for an extra festive touch.
- Prep Time: 20 minutes
Nutrition
- Serving Size: 12-16 bars
- Calories: 150 kcal
- Fat: 6g
- Carbohydrates: 25g
- Protein: 2g
Conclusion
Christmas Cherry Bars are a delightful combination of buttery crust, sweet-tart cherry filling, and crumbly topping that perfectly captures the festive spirit. With their vibrant color and irresistible flavor, these bars are a wonderful addition to any holiday gathering. Whether you’re serving them as a dessert centerpiece or as a sweet treat alongside coffee or tea, they’re sure to impress family and friends alike.
These bars are incredibly easy to make and endlessly customizable. Add a hint of almond extract for extra depth, drizzle them with white chocolate for a touch of elegance, or swap in your favorite fruit preserves to suit your taste. They’re versatile enough to adapt to your holiday traditions while still maintaining their cheerful, crowd-pleasing appeal.
Give this recipe a try, and experience the joy of baking and sharing these festive bars. I can’t wait to see how your Christmas Cherry Bars turn out! Don’t forget to snap a photo and tag me on social media—I love seeing your delicious creations! Wishing you a season full of love, laughter, and plenty of holiday baking!

