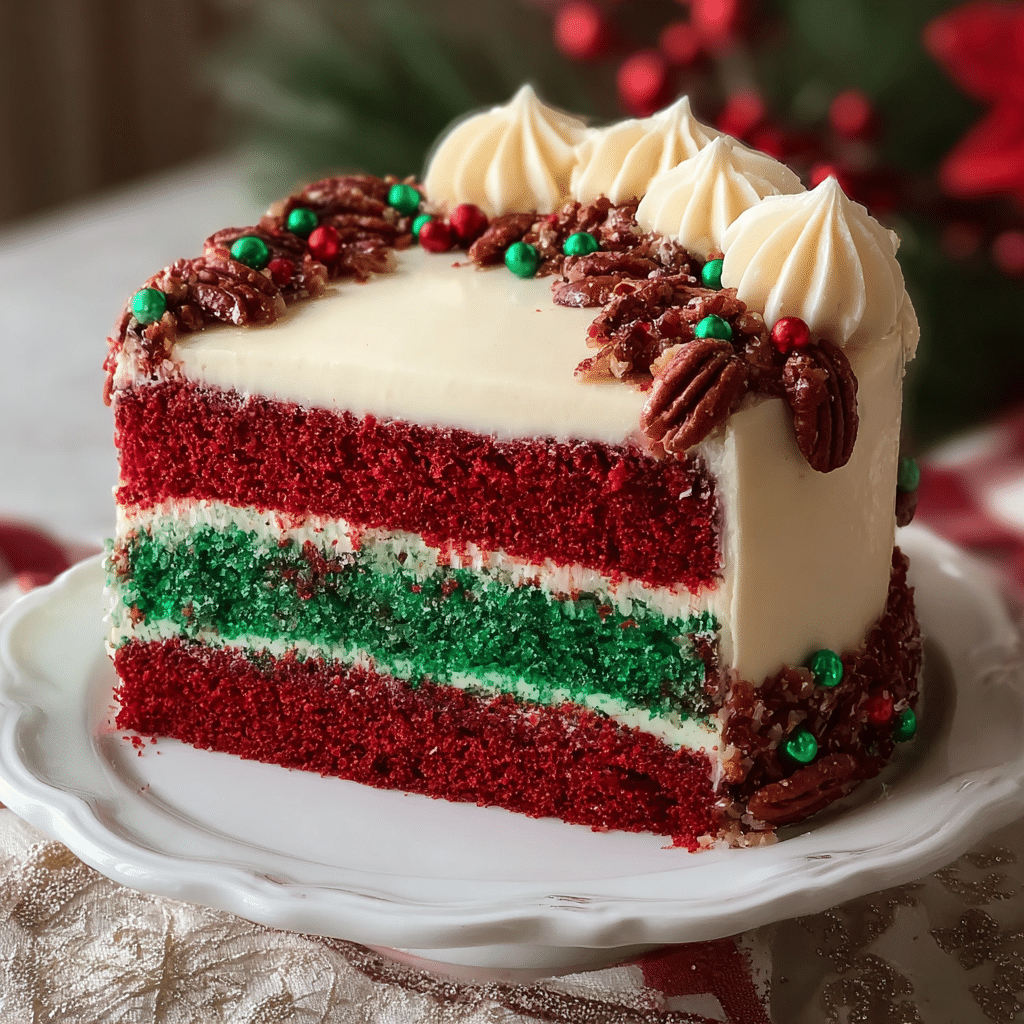
Christmas baking has a special kind of magic. The kitchen smells like sugar and vanilla, the oven warms the whole house, and every dessert feels like part of the celebration. This Christmas Red & Green Velvet Cake takes that festive feeling and turns it into a showstopping centerpiece: two colorful velvet layers—one red, one green—stacked with creamy frosting and finished with a crunchy pecan topping.
Every slice looks like a Christmas decoration on a plate: vivid red and green stripes, soft, tender crumb, and a snowy layer of frosting that ties it all together. It’s the kind of dessert that makes people stop and say, “Wow, what cake is that?” before they even take a bite.
Despite its dramatic appearance, this cake is surprisingly approachable. It starts from simple, familiar ingredients—all-purpose flour, butter, sugar, and eggs—and builds into a moist velvet cake using classic techniques: creaming butter and sugar, adding buttermilk for tenderness, and finishing with tangy cream cheese frosting. The result is a cake that looks impressive enough for a holiday table but still feels cozy and homemade.
Whether you’re baking for a family gathering, a holiday potluck, or just because you love Christmas desserts, this Christmas Red & Green Velvet Cake brings color, flavor, and fun to any celebration.
Core Ingredients for Making the Recipe
To prepare this festive velvet cake, you’ll use mostly pantry staples and a few special additions to get that classic velvet texture and holiday color. Here’s what you’ll need.
For the Cake Layers (Red & Green Velvet)
- 2 ½ cups all-purpose flour, spooned and leveled
- 2 cups granulated sugar
- 1 cup unsalted butter (2 sticks), softened to room temperature
- 4 large eggs, at room temperature
- 1 cup buttermilk, at room temperature
- ¼ cup sour cream, at room temperature
- 3 tablespoons unsweetened cocoa powder
- 1 ½ teaspoons baking soda
- 1 teaspoon baking powder
- 1 teaspoon fine salt
- 2 teaspoons vanilla extract
- 1 tablespoon white vinegar
- 2 teaspoons red gel food coloring
- 2 teaspoons green gel food coloring
Note: Gel food coloring is recommended because it gives intense color without thinning the batter. If you only have liquid coloring, you may need a bit more.
For the Creamy Frosting
- 16 ounces (450 g) cream cheese, softened
- ¾ cup unsalted butter (1 ½ sticks), softened
- 4–5 cups powdered sugar, sifted
- 2 teaspoons vanilla extract
- 2–3 tablespoons heavy cream or milk (as needed for consistency)
- Pinch of salt
For the Crunchy Pecan Topping
- 1 cup chopped pecans
- 2 tablespoons unsalted butter
- 2 tablespoons brown sugar, packed
- ½ teaspoon cinnamon (optional, for warmth)
- Pinch of salt
Step-by-Step

This cake comes together in three main stages: baking the colorful velvet layers, preparing the creamy frosting, and finishing with the pecan topping and assembly. Take your time and enjoy the process—this is a cake meant to be savored from start to finish.
1. Prepare Your Pans and Oven
- Preheat your oven to 350°F (175°C).
- Grease and flour two 9-inch round cake pans, or line the bottoms with parchment paper circles for easy release.
- Lightly grease the sides of the pans and dust them with flour, tapping out any excess. This will help the cakes release cleanly and keep the edges neat.
2. Mix the Dry Ingredients
- In a medium bowl, whisk together:
- 2 ½ cups all-purpose flour
- 3 tablespoons unsweetened cocoa powder
- 1 ½ teaspoons baking soda
- 1 teaspoon baking powder
- 1 teaspoon salt
- Set this bowl aside. This dry mixture will later be combined with the wet ingredients to form your velvet batter.
3. Cream the Butter and Sugar
- In a large mixing bowl, add:
- 1 cup softened unsalted butter
- 2 cups granulated sugar
- Using a hand mixer or stand mixer fitted with the paddle attachment, beat on medium speed for about 3–4 minutes, until the mixture is light, fluffy, and slightly pale in color.
- Scrape down the sides of the bowl as needed to ensure everything is evenly incorporated.
- This step builds air into the batter, which helps give the cake its soft, tender crumb.
4. Add the Eggs and Vanilla
- Crack the 4 large eggs into a small bowl or add them directly into the butter-sugar mixture, one at a time, beating well after each addition.
- After all the eggs are incorporated, add 2 teaspoons vanilla extract and mix again until combined.
- The mixture should look smooth and slightly glossy at this stage.
5. Incorporate the Buttermilk and Sour Cream
- In a small bowl or measuring cup, whisk together:
- 1 cup buttermilk
- ¼ cup sour cream
- With the mixer on low speed, alternate adding the dry ingredients and the buttermilk mixture to the creamed butter and sugar:
- Add about ⅓ of the dry ingredients, mix on low until just combined.
- Add ½ of the buttermilk-sour cream mixture, mix on low.
- Repeat with another ⅓ of the dry ingredients, then the remaining buttermilk mixture, and finally the last ⅓ of the dry mixture.
- Mix only until everything is just combined. Overmixing can make the cake dense instead of soft and velvety.
- Scrape down the bowl and gently fold any remaining pockets of flour into the batter by hand with a spatula.
6. Add Vinegar and Divide the Batter
- Add 1 tablespoon white vinegar to the batter and gently fold it in.
- The vinegar works with the baking soda to create a light, tender texture—classic for velvet cakes.
- Divide the batter evenly into two bowls. Try to get roughly the same amount in each so the layers bake evenly.
- If you want to be precise, you can weigh the bowls or the batter with a kitchen scale.
7. Color the Red and Green Batter
- To one bowl, add 2 teaspoons red gel food coloring. Gently fold it into the batter until the color is vivid and evenly distributed.
- To the second bowl, add 2 teaspoons green gel food coloring and fold until evenly colored.
- Adjust the coloring as needed, adding a bit more gel if you want a deeper shade.
- Keep in mind that the color will mute slightly after baking, so it’s okay if the raw batter looks a bit intense.
8. Bake the Cake Layers
- Pour the red batter into one prepared cake pan and the green batter into the other.
- Use a spatula to smooth the tops and spread the batter evenly to the edges.
- Bake in the preheated oven for 25–30 minutes, or until:
- A toothpick inserted into the center comes out with just a few moist crumbs (not wet batter), and
- The tops spring back lightly when gently touched.
- Remove the pans from the oven and let the cakes cool in the pans for about 10–15 minutes.
- Then, carefully run a knife around the edges to loosen, and invert each cake onto a wire rack. Remove the parchment if using.
- Allow the layers to cool completely before frosting. Frosting warm cake layers will melt the frosting and cause slipping.
Preparing the Creamy Frosting
A Christmas velvet cake practically demands a smooth, tangy, creamy frosting. This cream cheese frosting is rich but not overly sweet, and it pairs beautifully with the tender cake layers.
9. Beat the Cream Cheese and Butter
- In a large bowl, add:
- 16 ounces softened cream cheese
- ¾ cup softened unsalted butter
- Beat on medium speed until the mixture is completely smooth, creamy, and lump-free—about 2–3 minutes.
- Scrape down the sides of the bowl once or twice to make sure everything is well blended.
10. Add Vanilla, Salt, and Powdered Sugar
- Add 2 teaspoons vanilla extract and a pinch of salt to the bowl. Mix briefly.
- Sift 4 cups of powdered sugar to remove any lumps, then gradually add it to the cream cheese mixture on low speed.
- Once the sugar is incorporated, increase the mixer speed to medium and beat until the frosting is fluffy and smooth.
- If you prefer a sweeter or thicker frosting, add up to 1 additional cup of powdered sugar, a little at a time.
- If the frosting seems too thick, add 2–3 tablespoons of heavy cream or milk, 1 tablespoon at a time, until it reaches a spreadable, creamy consistency.
Making the Crunchy Pecan Topping
The pecan topping adds a lovely contrast to the soft cake and smooth frosting—a bit of crunch and a hint of caramel flavor that makes each bite feel special.
11. Toast and Candy the Pecans
- In a small skillet over medium heat, add:
- 1 cup chopped pecans
- 2 tablespoons unsalted butter
- 2 tablespoons brown sugar
- ½ teaspoon cinnamon (optional)
- Pinch of salt
- Stir continuously as the butter melts and the sugar dissolves, coating the pecans.
- Cook for about 3–5 minutes, until the nuts are fragrant and lightly toasted and the sugar mixture looks glossy.
- Spread the pecans in a single layer on a piece of parchment paper or a plate to cool completely.
- Once cooled, the pecans will firm up with a slightly crunchy, candied coating.
Assembling the Christmas Red & Green Velvet Cake
With your colorful layers cooled, frosting prepared, and pecans ready, it’s time to bring everything together into one festive, eye-catching cake.
12. Level the Cake Layers (If Needed)
- If the cakes have domed tops, you can use a serrated knife to gently trim off the rounded portion, creating flat, even surfaces.
- Save the trimmed pieces—crumble them and use them later as decoration on top of the cake for extra color and texture.
13. Frost the First Layer
- Place the green velvet layer on a serving plate or cake stand, cut side down if you leveled it.
- Add a generous scoop of cream cheese frosting on top.
- Use an offset spatula or knife to spread the frosting evenly over the surface, all the way to the edges.
- Aim for a layer of frosting that’s about ¼–½ inch thick.
14. Add the Red Layer and Crumb Coat
- Gently place the red velvet layer on top of the green layer, aligning the edges carefully.
- Press very lightly to secure the layers together.
- Apply a thin layer of frosting all over the sides and top of the cake. This is called a crumb coat—it traps any loose crumbs and creates a smooth base for your final layer of frosting.
- Chill the cake in the refrigerator for about 20–30 minutes to let the crumb coat set.
15. Frost the Cake Generously
- After chilling, remove the cake from the fridge.
- Spread a thicker layer of frosting over the top and sides of the cake, using long strokes to create a smooth finish.
- You can keep the look simple and sleek, or use your spatula to create rustic swirls and ridges for a more textured, snow-like appearance.
16. Decorate with Pecan Topping and Crumbs
- Once the cake is frosted, sprinkle the cooled, candied pecans around the top edge, the center, or across the entire top—whatever design you prefer.
- If you saved crumbs from trimming the cake layers, you can sprinkle red crumbs on one side and green crumbs on the other, creating a fun, festive pattern.
- For an extra holiday touch, you can add:
- Red and green sprinkles
- White chocolate shavings
- A dusting of powdered sugar for a snowy effect
Flavor Variations and Creative Twists
One of the joys of this cake is how many ways you can customize it while keeping the Christmas spirit intact.
Add a Hint of Citrus
- Add 1–2 teaspoons of orange zest to the cake batter or frosting for a bright, fresh note that pairs beautifully with the creamy texture.
- You can also add a tablespoon of orange juice to the frosting (reduce the cream slightly) for a subtle citrus twist.
Swap the Pecans
- If you prefer a different nut, replace the pecans with walnuts, almonds, or hazelnuts.
- For a nut-free version, use crushed pretzels or toasted coconut flakes for crunch instead.
Chocolate Lovers’ Version
- Add a handful of mini chocolate chips to the batter (divide between red and green) for little bursts of chocolate in every bite.
- Drizzle the finished cake with warm chocolate ganache for an extra indulgent finish.
Peppermint Holiday Twist
- Add ½ teaspoon peppermint extract to the frosting for a minty, candy-cane-inspired flavor.
- Decorate the top with crushed candy canes to enhance the Christmas theme.
Single-Color Option
- If you ever want a simpler version, you can make the entire cake red or green instead of splitting the batter.
- The method stays the same; you just use one color and bake in two pans.
How to Serve
This Christmas Red & Green Velvet Cake is meant to be the star of the dessert table. The best part? It’s as delicious as it is beautiful.
Serving Temperature
- Serve the cake slightly chilled or at cool room temperature.
- Chilling helps the frosting firm up and makes it easier to slice cleanly, while a little time at room temperature softens the cake for the perfect texture.
Slicing for Beautiful Layers
- Use a sharp, long knife and wipe it clean between cuts for neat slices that show off the red and green layers.
- Cut the cake into 12 slices for generous portions, or into smaller slices if serving a crowd with many dessert options.
Perfect Pairings
- Serve with:
- Hot coffee or espresso
- Spiced tea (like chai or cinnamon tea)
- Hot chocolate for a truly cozy, festive experience
- A small scoop of vanilla ice cream on the side can turn a slice into an even more indulgent holiday treat.
Tips & Variations
Getting the best result is all about a few simple habits and small details. Here are some helpful tips to make your cake baking smoother and more successful.
Use Room Temperature Ingredients
- For a soft, even crumb and smooth frosting, make sure your butter, eggs, cream cheese, sour cream, and buttermilk are at room temperature.
- This helps them blend more easily and prevents curdling or lumpiness.
Don’t Overmix the Batter
- Once you add the flour, mix on low speed and just until everything is combined.
- Overmixing can develop too much gluten and make the cake tough instead of tender.
Check for Doneness Carefully
- Oven temperatures can vary, so start checking your cakes a few minutes before the minimum time.
- The cakes are done when:
- The centers no longer look wet,
- The edges slightly pull away from the pan, and
- A toothpick comes out with a few moist crumbs, not raw batter.
Make Ahead for Easier Assembly
- You can bake the cake layers 1 day in advance. Once cooled, wrap them tightly in plastic wrap and store at room temperature or in the fridge.
- The frosting can also be made ahead and kept in the refrigerator. Let it soften slightly and re-whip before frosting the cake.
Storage Tips
- Once assembled, store the cake covered in the refrigerator because of the cream cheese frosting.
- For the best texture, enjoy within 3–4 days.
- Let slices sit at room temperature for about 15–20 minutes before serving for the best flavor and softness.
Final Thoughts
This Christmas Red & Green Velvet Cake is more than just a dessert—it’s a celebration of the season on a plate. The tender, moist layers bring that classic velvet texture, while the red and green colors make every slice feel festive and fun. The creamy frosting ties everything together with a tangy sweetness, and the crunchy pecan topping adds one final layer of texture and flavor.
What makes this cake especially charming is how it balances beauty and comfort. It looks like something from a bakery window, yet it’s built from simple ingredients and straightforward steps you can absolutely handle in your home kitchen. No fancy tools, no complicated techniques—just a bit of patience, a splash of food coloring, and a lot of holiday spirit.
Whether you’re serving it after Christmas dinner, bringing it to a party, or baking it just to make the season feel more special, this cake has a way of drawing people in. It invites conversation, smiles, and second slices. And once you’ve made it once, it just might become a new tradition—one that returns to your table year after year, along with the lights, music, and warmth of the holidays.
FAQ
Can I make this cake in a different pan size?
Yes. If you don’t have two 9-inch round pans, you can use:
- Two 8-inch pans (the layers will be slightly taller; increase baking time by a few minutes).
- A 9×13-inch pan, baking one color on the bottom and swirling the second color into the top, though you’ll lose the two-tone layer effect.
Always watch the cake closely near the end of the baking time and test with a toothpick for doneness.
Can I turn this into a three-layer cake?
Absolutely. You can:
- Divide the batter into three 8-inch pans and use one red layer, one green layer, and a third “swirled” layer with both colors.
- Bake time will be slightly shorter, so begin checking a bit earlier.
Just make sure not to overfill the pans—fill each no more than about ⅔ full.
What if I don’t have buttermilk?
If you don’t have buttermilk, you can make a quick substitute:
- Add 1 tablespoon of vinegar or lemon juice to a measuring cup, then fill to the 1-cup line with milk.
- Stir and let sit for 5–10 minutes until slightly thickened and curdled.
This homemade buttermilk will give a similar tangy flavor and tender texture.
Can I skip the cocoa powder?
Traditional velvet cakes use a small amount of cocoa powder for depth of flavor and that signature “velvet” taste. You can:
- Reduce the cocoa to 1–2 tablespoons if you want a milder chocolate flavor.
- If you omit it completely, the cake will still be tasty but less like classic velvet cake and more like a simple colored vanilla cake.
Do I have to use cream cheese frosting?
No, but it’s highly recommended because the tang balances the sweetness and richness of the cake. If you prefer, you can use:
- A vanilla buttercream
- A white chocolate frosting
- A light mascarpone frosting
Just make sure your frosting pairs well with the sweetness of the cake and the pecan topping.
Can I make this cake nut-free?
Yes. If you or your guests have nut allergies, you can:
- Omit the pecan topping entirely, or
- Replace it with:
- Festive sprinkles
- Crushed candy canes
- Toasted coconut
- Velvet cake crumbs in red and green
You’ll still have a beautiful, festive cake without the nuts.
Can I freeze the cake?
Yes, this cake freezes well, especially the layers:
- To freeze layers: Wrap each cooled layer tightly in plastic wrap, then in foil, and freeze for up to 2–3 months. Thaw overnight in the refrigerator before frosting.
- To freeze slices: Wrap individual slices in plastic and place in an airtight container or freezer bag. Thaw in the fridge or at room temperature.
How far in advance can I assemble the cake?
You can assemble the entire cake 1 day before serving:
- Frost and decorate the cake.
- Store it covered in the refrigerator.
- Before serving, let it sit at room temperature for about 20–30 minutes for the best texture and flavor.