There’s something timeless about a strawberry tart.
The buttery crumb of the pastry, the silky cream filling, and the glossy layer of fresh, juicy strawberries come together in a dessert that’s both simple and utterly beautiful. It’s the kind of treat that looks elegant on a celebration table but still feels like something made with love in a home kitchen.
This Delicious Homemade Strawberry Tart captures everything we love about classic European bakery tarts—crisp shortcrust pastry, a smooth and creamy vanilla filling, and sweet strawberries shining on top. Every slice delivers layers of texture: a delicate crunch from the crust, a velvety bite of cream, and the refreshing burst of fresh fruit.
Unlike complicated patisserie recipes, this tart is very approachable. The shortcrust pastry comes together with basic ingredients you likely already have in your pantry. The filling is a simple vanilla custard-style cream, and the topping is nothing more than strawberries brushed with a light glaze. With a bit of patience and chilling time, you can create a dessert that looks like it came from a pastry shop—yet every detail is yours from scratch.
Whether you are baking for a spring brunch, a summer picnic, a birthday, or just because you found a perfect box of strawberries at the market, this tart is a delicious way to celebrate the season.
Core Ingredients for Making the Recipe
To prepare this homemade strawberry tart, you’ll build three main parts:
- A shortcrust pastry shell (pâte sucrée style)
- A creamy vanilla filling
- A topping of fresh strawberries finished with a light glaze
Here’s what you’ll need.
Ingredients for the Shortcrust Pastry
- 250 g flour
- 120 g softened butter
- 80 g sugar
- 1 egg
- 2 g salt (about ½ teaspoon)
This dough creates a sweet, buttery crust that holds its shape, slices cleanly, and provides the perfect base for the soft filling and fruit.
Ingredients for the Creamy Vanilla Filling
- 500 ml whole milk
- 100 g sugar
- 4 egg yolks
- 40 g cornstarch
- 1–2 teaspoons vanilla extract or seeds from 1 vanilla bean
- 20 g butter (about 1 ½ tablespoons), softened
- Pinch of salt
This filling is essentially a smooth pastry cream: rich, silky, and full of vanilla aroma.
Ingredients for the Strawberry Topping
- 500–600 g fresh strawberries, hulled
- 2–3 tablespoons sugar (optional, if strawberries are very tart)
- 2 tablespoons strawberry or apricot jam, for glaze
- 1–2 tablespoons water or lemon juice, for thinning the glaze
Step-by-Step
Guide to Making the Recipe
We’ll start with the pastry shell, prepare the cream, and then assemble everything with fresh strawberries.
1. Making the Shortcrust Pastry
1. Cream the butter and sugar
In a mixing bowl, combine the 120 g softened butter and 80 g sugar. Beat with a hand mixer or wooden spoon until the mixture is pale and creamy. This step dissolves the sugar and incorporates air, which helps give the crust a delicate texture.
2. Add the egg and salt
Add the egg and 2 g salt to the butter mixture. Beat just until combined. The mixture may look slightly curdled at first; that’s fine. It will smooth out when you add the flour.
3. Incorporate the flour
Add the 250 g flour to the bowl. Using a spatula or your hands, gently mix until the dough comes together.
- You want to stop mixing as soon as no dry flour remains.
- The dough should feel soft but not sticky.
If the dough seems very dry and crumbly, you can add a teaspoon or two of cold water, but avoid overworking it.
4. Shape and chill the dough
Gather the dough into a flat disk, wrap it tightly in plastic wrap, and chill it in the refrigerator for at least 30 minutes.
- Chilling allows the butter to firm up, which helps the crust keep its shape in the oven.
- It also relaxes the gluten in the flour, giving you a more tender pastry.
2. Preparing the Tart Shell
1. Roll out the dough
Lightly flour your work surface and rolling pin. Remove the chilled dough from the fridge and let it sit for 5 minutes if it’s very hard.
- Roll the dough into a circle about 3–4 mm thick, large enough to fit a 24–26 cm (9–10 inch) tart pan with a removable bottom.
2. Line the tart pan
Carefully lift the rolled dough and lay it into the tart pan. Gently press it into the bottom and sides, taking care not to stretch it (stretching can cause shrinking while baking).
- Trim any excess dough from the edges.
- Patch any cracks with leftover pieces of dough.
3. Chill again
Place the lined tart pan in the refrigerator for another 15–20 minutes. This extra chill helps prevent the crust from sliding down the sides during baking.
4. Preheat the oven and dock the crust
Preheat your oven to 180°C / 350°F.
Using a fork, prick small holes all over the bottom of the dough. This helps steam escape and keeps the crust flat.
5. Blind-bake the crust
Line the tart shell with parchment paper and fill it with baking beans, dried rice, or uncooked beans to weigh it down.
- Bake for 12–15 minutes, until the edges start to look set.
- Carefully remove the parchment and weights.
- Return the crust to the oven and bake for another 8–10 minutes or until the entire shell is lightly golden.
Set the baked tart shell aside to cool completely. The shell must be cool before adding the cream, or the filling can become too soft.
3. Making the Creamy Vanilla Filling
While the crust is baking and cooling, you can prepare the pastry cream.
1. Heat the milk
In a medium saucepan, add the 500 ml milk and half of the 100 g sugar (50 g). If using a whole vanilla bean, split it lengthwise, scrape out the seeds, and add both seeds and pod to the milk.
- Heat gently over medium heat until the milk is steaming but not boiling.
- Remove from heat and let it sit while you prepare the yolk mixture.
2. Whisk yolks, sugar, and cornstarch
In a separate bowl, whisk together the 4 egg yolks, remaining 50 g sugar, 40 g cornstarch, and a pinch of salt until smooth and slightly lightened in color.
3. Temper the egg mixture
Slowly pour a splash of the hot milk into the egg mixture while whisking constantly. This gradually warms the yolks without scrambling them.
- Continue adding the milk little by little, whisking until all the milk is incorporated.
- If you used a vanilla pod, remove it now.
4. Cook the cream
Pour the egg-milk mixture back into the saucepan.
- Place over medium heat and cook, whisking constantly, until the mixture thickens and begins to bubble.
- Once it starts to bubble, cook for an additional 1–2 minutes to cook out the starch.
The cream should be smooth and thick enough to coat the back of a spoon.
5. Finish with butter and vanilla
Remove the pan from the heat. Stir in the 20 g butter and vanilla extract (if not using a vanilla bean earlier). Whisk until the butter is fully melted and the cream is glossy.
6. Cool the cream
To avoid a skin forming on top:
- Pour the pastry cream into a shallow dish.
- Press plastic wrap directly onto the surface.
- Let it cool to room temperature, then chill in the refrigerator until cold and set (about 1–2 hours).
4. Preparing the Strawberries and Glaze
1. Prep the strawberries
Rinse the fresh strawberries gently under cool water. Pat them dry with paper towels—excess water can make the tart soggy.
- Hull the strawberries and slice them in halves or thick slices, depending on the look you prefer.
If your strawberries are very tart, you can toss them with 2–3 tablespoons sugar and let them sit for 10–15 minutes. This macerates them slightly and brings out their juices.
2. Make the glaze
In a small saucepan, add the 2 tablespoons jam (strawberry or apricot both work well) and 1–2 tablespoons water or lemon juice.
- Warm the mixture over low heat, stirring, until it becomes smooth and slightly runny.
- Remove from heat and let cool a bit; it should be fluid but not hot when you brush it onto the fruit.
The glaze gives the strawberries a beautiful shine and helps keep them from drying out.
5. Assembling the Strawberry Tart
Now the fun part—bringing everything together.
1. Fill the tart shell with cream
Once the tart shell is completely cool and the pastry cream is chilled and thick:
- Give the cream a quick whisk to loosen it and make it smooth.
- Spoon or pipe the cream into the tart shell, spreading it evenly with a spatula.
- Aim for an even layer that comes near the top of the crust but leaves a small lip for the strawberries to sit in.
2. Arrange the strawberries
Starting from the outer edge, arrange the sliced strawberries on top of the cream:
- You can place them in concentric circles, overlapping slightly.
- Or create patterns—such as rings of halved berries, a spiral, or simple scattered slices for a more rustic look.
Take your time with this step; the strawberries are the visual star of the tart.
3. Brush with glaze
Use a pastry brush to gently brush the glaze over the strawberries.
- Make sure every piece gets a light coating.
- The glaze adds shine and a hint of sweetness while helping the fruit stay fresh-looking.
4. Chill before serving
Place the finished tart in the refrigerator for at least 30–60 minutes before serving.
- This allows the cream to firm slightly and the flavors to meld.
- It also makes it easier to slice cleanly.
Slice with a sharp knife, wiping between cuts for neat pieces.
Flavor Variations and Creative Twists
One of the best things about a homemade strawberry tart is how easily you can customize it. Once you master the basic method, you can create many variations with small tweaks.
1. Lemon Strawberry Tart
Add a bright citrus note:
- Mix the finely grated zest of 1 lemon into the shortcrust pastry along with the sugar.
- Add 1–2 tablespoons of lemon juice to the pastry cream after cooking (whisk it in along with the butter).
The result is a tart where each bite has a light, refreshing lemon lift that complements the strawberries beautifully.
2. Chocolate-Strawberry Tart
For chocolate lovers:
- Spread a thin layer of melted dark chocolate or chocolate ganache over the cooled tart shell before adding the pastry cream.
- Let the chocolate set, then continue with the recipe.
This creates a crisp chocolate barrier between the crust and the cream and adds a rich flavor that pairs perfectly with strawberries.
3. Mascarpone Strawberry Tart
For a slightly different filling that’s lighter and less custardy:
- Replace the pastry cream with a mixture of 250 g mascarpone, 200 ml whipped cream, 70–80 g powdered sugar, and vanilla.
- Beat until smooth and thick, then spread in the cooled tart shell.
This version is quicker (no cooking for the cream) and tastes like a cross between cheesecake and whipped cream.
4. Mixed Berry Tart
You’re not limited to strawberries alone:
- Combine strawberries with raspberries, blueberries, and blackberries for a colorful mixed berry tart.
- Arrange them in patterns or scatter them loosely over the cream.
5. Nutty Shortcrust
Add more complexity to the crust:
- Replace 40–50 g of the flour with finely ground almonds or hazelnuts.
- You’ll get a slightly richer flavor and a more delicate crumb.
How to Serve
This Delicious Homemade Strawberry Tart is impressively versatile and works in many settings.
1. As a dinner party dessert
Slice the tart into wedges and serve on small plates with:
- A dollop of lightly sweetened whipped cream, or
- A scoop of vanilla or strawberry ice cream.
A drizzle of extra glaze or a few fresh mint leaves on each plate adds a restaurant-style flourish.
2. For afternoon tea or coffee
Serve smaller, thinner slices with a cup of black tea, espresso, or cappuccino. The tart’s sweetness pairs nicely with more bitter drinks.
3. For celebrations
Dust the crust edges lightly with powdered sugar and garnish the center with a few whole strawberries and mint sprigs. It makes an eye-catching centerpiece for birthdays, Mother’s Day, or spring and summer gatherings.
4. As a chilled treat on hot days
Serve the tart well-chilled straight from the refrigerator. The cool, creamy filling and fresh fruit make it refreshing, almost like a fruit-and-cream icebox dessert.
Tips & Variations
Choose the Best Strawberries
- Look for ripe but firm berries with a natural shine and fresh green tops.
- Very soft strawberries can leak too much juice and make the tart soggy.
- If your berries are slightly underripe, the glaze and sugar will balance them, but truly flavorless berries won’t magically taste better—starting with good fruit makes all the difference.
Keep the Crust Crisp
- Blind-baking is essential. Skipping it will give you a pale, underbaked crust that can’t support the creamy filling.
- Let the crust cool completely before adding the cream.
- If you want extra insurance against sogginess, brush the cooled crust with a thin layer of melted white or dark chocolate and let it set before adding the cream.
Make the Cream in Advance
- The pastry cream can be prepared a day ahead and stored in the refrigerator.
- When ready to assemble, whisk it briefly to restore its smooth texture.
This makes the final assembly very quick, especially helpful if you’re hosting.
Don’t Overfill the Shell
It’s tempting to pile in a very thick layer of cream, but leaving a bit of space for the berries makes the tart easier to slice and keeps the balance between crust, cream, and fruit.
Adjust Sweetness to Your Taste
- If your strawberries are naturally very sweet, you can reduce the sugar in the glaze or even skip glazing some of the berries for a more natural look.
- If you prefer a less sweet dessert overall, reduce the sugar in the cream by 10–20 g and rely on the fruit for much of the sweetness.
Final Thoughts
This Delicious Homemade Strawberry Tart is a celebration of simple, honest ingredients: butter, sugar, flour, milk, eggs, and fresh strawberries. There’s no complicated decorating, no intricate techniques—just a few thoughtful steps that transform basic components into a dessert that tastes as lovely as it looks.
The crisp shortcrust pastry provides a sturdy yet tender foundation. The creamy vanilla filling brings comforting richness without heaviness, and the strawberries add brightness, freshness, and natural beauty. Every slice feels like a small celebration of the season and of home baking.
What makes this tart especially rewarding is that once you’ve tried it, you’ll have a versatile template for countless variations. With the same pastry and cream, you can create tarts with raspberries, peaches, apricots, or figs. You can change the flavor of the cream, enrich the crust with nuts, or add a hidden layer of chocolate or jam.
Yet even in its simplest form—with nothing more than vanilla cream and ripe strawberries—this tart is the kind of dessert that guests remember and request again. It proves that you don’t need elaborate ingredients or hours of effort to create something special. Sometimes, it’s the care you put into each layer that makes all the difference.
FAQ
Can I use store-bought pastry instead of making the shortcrust from scratch?
Yes. If you’re short on time, you can use a good-quality store-bought sweet shortcrust or pie crust. Blind-bake it according to the package instructions and continue with the filling and strawberries. The flavor and texture of homemade pastry are more special, but the tart will still be delicious with a ready-made crust.
Can I use frozen strawberries for this tart?
For best results, fresh strawberries are strongly recommended. Frozen strawberries release a lot of liquid as they thaw and don’t hold their shape well, which can make the tart soggy and less visually appealing. If fresh strawberries are unavailable, consider using a different fruit that freezes better for baking (like blueberries) or turning the frozen strawberries into a sauce to drizzle over individual slices.
How far in advance can I assemble the tart?
You can assemble the tart (with cream and strawberries) up to 4–6 hours before serving. Keep it covered in the refrigerator.
- The crust may soften slightly the longer it sits.
- For the best texture, many bakers like to bake the crust the day before, prepare the cream the same day, and assemble the tart a few hours before guests arrive.
Can I make mini strawberry tarts using this recipe?
Absolutely. Divide the dough among small tartlet pans, blind-bake them, and fill each with pastry cream and strawberries. The baking time for mini shells will be shorter—start checking at around 10–12 minutes. Mini tarts are perfect for buffets, tea parties, or dessert tables.
Can I reduce the sugar in the recipe?
Yes, within reason. You can:
- Reduce the sugar in the crust by about 10–15 g.
- Reduce the sugar in the pastry cream by 15–20 g if you prefer a less sweet filling.
Keep in mind that some sweetness is necessary for proper texture and flavor. If you reduce sugar significantly, the cream may taste bland and the crust can become less tender.
How do I store leftovers?
Cover any leftover tart tightly with plastic wrap or place it in an airtight container and refrigerate. It will keep well for up to 2 days. The crust will gradually soften, but the flavor remains lovely. For the best texture, enjoy the tart within the first day after assembling.
Can I flavor the cream with something other than vanilla?
Definitely. You can infuse the milk with:
- A cinnamon stick
- Strips of lemon or orange zest
- A spoonful of instant coffee (for a coffee cream)
Just strain any solids out before thickening the cream. This is an easy way to create your own signature variation of the tart.
Enjoy creating—and sharing—your Delicious Homemade Strawberry Tart!
Print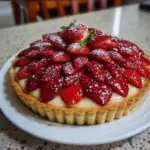
Delicious Homemade Strawberry Tart
Ingredients
- A shortcrust pastry shell (pâte sucrée style)
- A creamy vanilla filling
- A topping of fresh strawberries finished with a light glaze
Here’s what you’ll need.
Ingredients for the Shortcrust Pastry
- 250 g flour
- 120 g softened butter
- 80 g sugar
- 1 egg
- 2 g salt (about ½ teaspoon)
This dough creates a sweet, buttery crust that holds its shape, slices cleanly, and provides the perfect base for the soft filling and fruit.
Ingredients for the Creamy Vanilla Filling
- 500 ml whole milk
- 100 g sugar
- 4 egg yolks
- 40 g cornstarch
- 1–2 teaspoons vanilla extract or seeds from 1 vanilla bean
- 20 g butter (about 1 ½ tablespoons), softened
- Pinch of salt