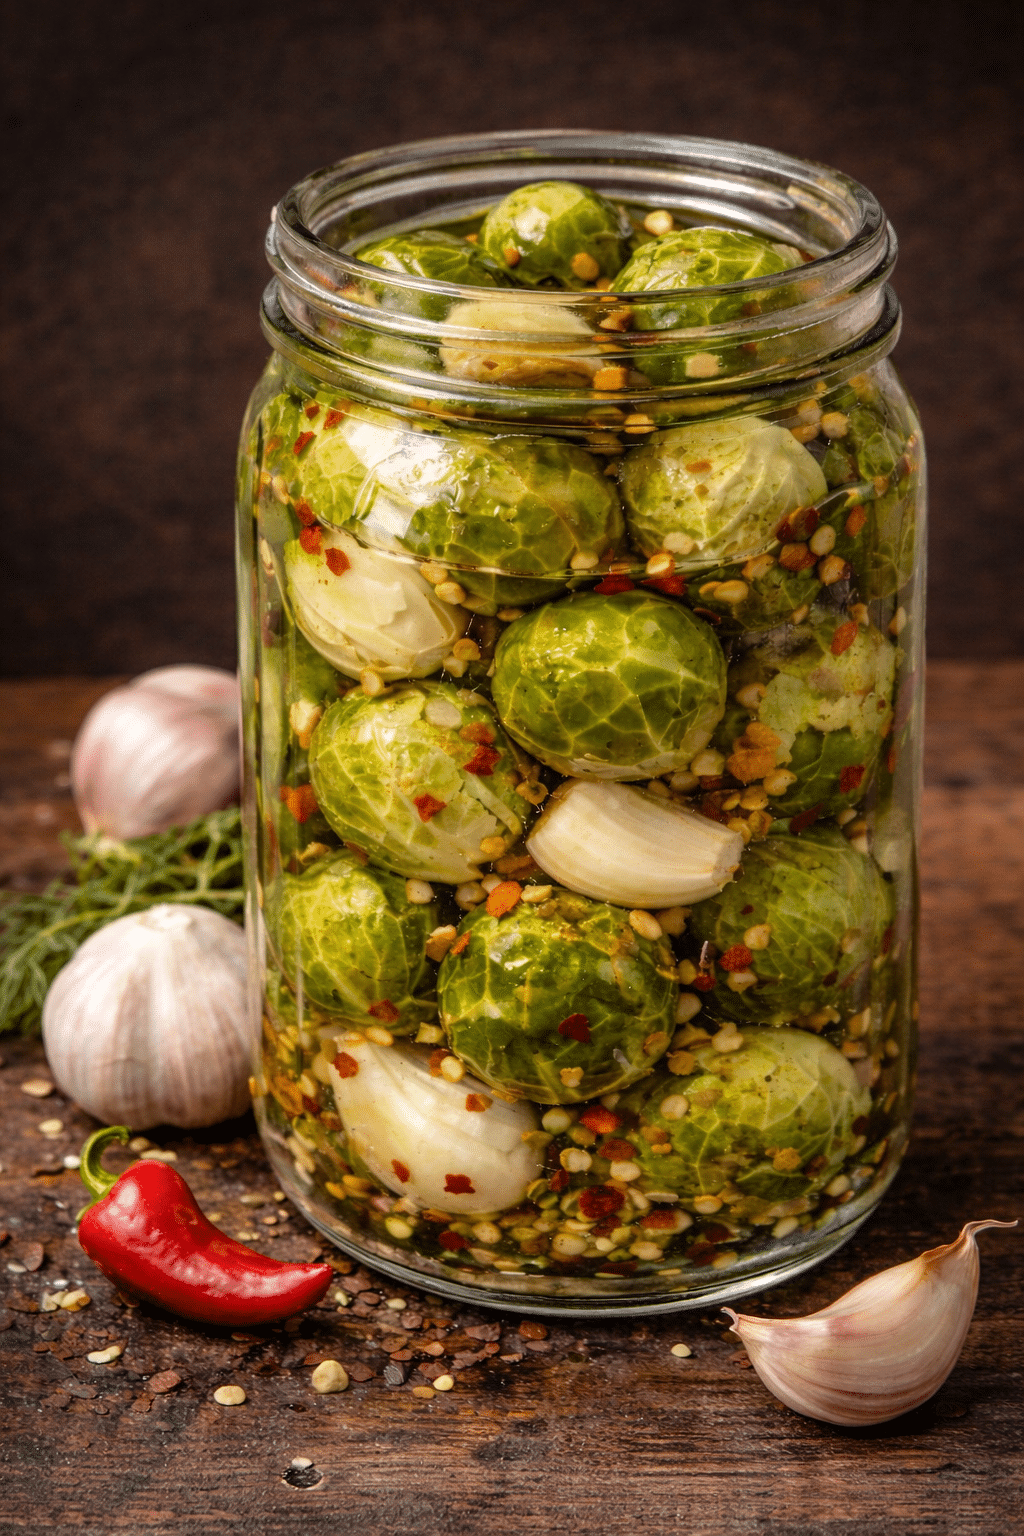
There’s something undeniably fun about opening a jar of homemade pickles — especially when they’re affectionately nicknamed “Frog Balls.” These pickled Brussels sprouts are bold, crunchy, tangy, and just the right amount of spicy. They’re the kind of snack that surprises people in the best way possible. One bite delivers a satisfying snap followed by garlicky warmth, dill-kissed brightness, and a gentle heat that lingers just enough to keep you reaching for another.
Whether you’re building a charcuterie board, stacking a burger sky-high, or simply craving a punchy, low-calorie snack straight from the jar, these pickled Brussels sprouts absolutely deliver. They transform an everyday vegetable into something crave-worthy and conversation-starting. If you love classic pickles but want something a little unexpected, this recipe is about to become a staple in your refrigerator.
WHY YOU WILL LOVE THIS RECIPE
- Incredibly crunchy texture with a satisfying snap
- Bold, tangy flavor with balanced spice
- Perfect for snacking, boards, and sandwiches
- Simple ingredients and easy steps
- Great make-ahead refrigerator pickle
- Naturally low in calories and fat
- A fun and unique way to enjoy Brussels sprouts
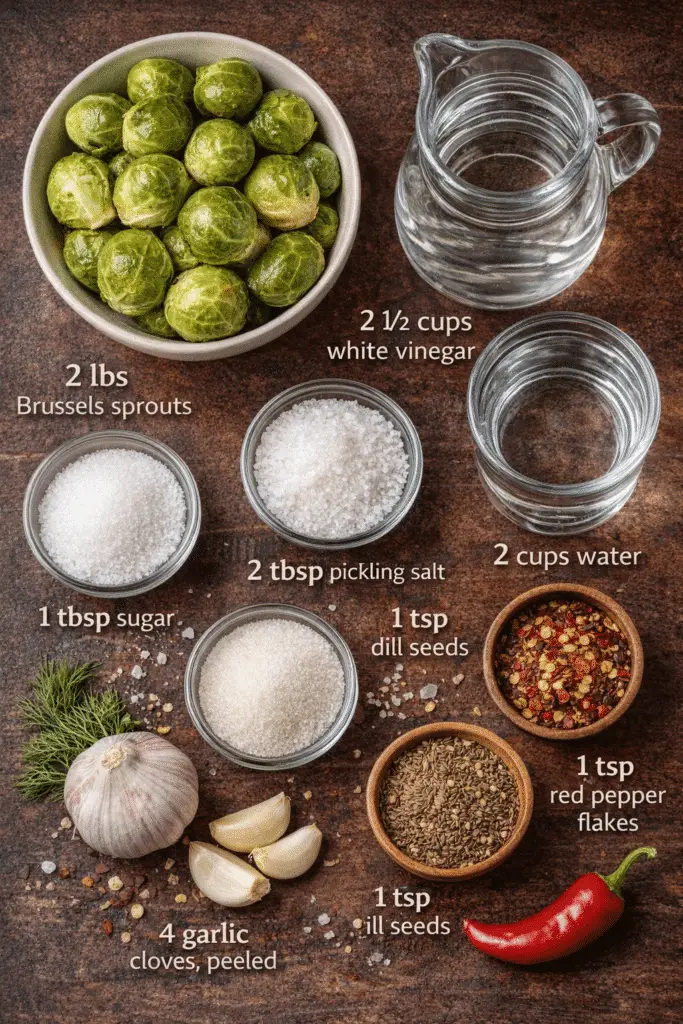
INGREDIENTS (WITH EXACT AMOUNTS)
• 2 lbs Brussels sprouts – The star of the recipe, providing hearty crunch and structure.
• 2 1/2 cups white vinegar – Brings sharp acidity that preserves and flavors the sprouts.
• 2 cups water – Dilutes the vinegar slightly for balanced tanginess.
• 2 tbsp pickling salt – Enhances flavor and helps properly brine the vegetables.
• 1 tbsp sugar – Adds subtle sweetness to round out the acidity.
• 4 garlic cloves, peeled – Infuses the brine with deep, savory warmth.
• 1 tsp dill seeds – Provides classic pickle aroma and herbal brightness.
• 1 tsp red pepper flakes – Adds gentle heat and bold character.
STEP-BY-STEP INSTRUCTIONS (DETAILED)
1️⃣ Trim Brussels sprouts and remove any loose outer leaves.
Start by rinsing the Brussels sprouts under cool running water. Trim the very bottom of each stem just enough to remove the dry end, being careful not to cut too much so the sprouts stay intact. Remove any loose or damaged outer leaves. This step ensures clean, firm sprouts that will hold their shape beautifully during blanching and pickling.
Uniform sizing matters here. If some sprouts are very large, you can trim slightly more from the stem so they’re closer in size to the rest. Even sizes help them blanch evenly and absorb the brine consistently.
2️⃣ Bring a large pot of water to a boil. Add Brussels sprouts and blanch for 3–4 minutes. Drain well.
Fill a large pot with water and bring it to a rolling boil over high heat. Carefully add the Brussels sprouts and let them blanch for 3–4 minutes. You’re not cooking them through — just softening them slightly and setting their bright green color.
Blanching is crucial for texture. It helps the sprouts stay crisp-tender rather than overly hard once pickled. After 3–4 minutes, immediately drain them thoroughly. Excess water can dilute your brine, so allow them to steam off and dry briefly before packing into jars.
3️⃣ Pack blanched sprouts into clean jars with garlic, dill seeds, and red pepper flakes.
Place the 4 garlic cloves directly into the jars first, dividing them evenly if using multiple jars. Sprinkle in the dill seeds and red pepper flakes. These aromatics should be dispersed throughout the jar so every bite carries balanced flavor.
Next, pack the blanched Brussels sprouts tightly into the jars. Don’t crush them, but arrange them snugly so they stay submerged once the brine is added. Proper packing ensures even pickling and prevents floating pieces.
4️⃣ In a saucepan, combine vinegar, water, pickling salt, and sugar. Bring to a boil, then simmer 5 minutes.
In a medium saucepan, combine the 2 1/2 cups white vinegar, 2 cups water, 2 tbsp pickling salt, and 1 tbsp sugar. Stir gently to help dissolve the salt and sugar before heating.
Bring the mixture to a full boil over medium-high heat. Once boiling, reduce slightly and let it simmer for 5 minutes. This allows the flavors to meld and ensures the salt and sugar are completely dissolved. The brine should smell sharp, slightly sweet, and pleasantly aromatic.
5️⃣ Pour hot brine over sprouts, leaving about 1/2 inch headspace.
Carefully pour the hot brine over the Brussels sprouts in each jar. Make sure the sprouts are completely submerged. Leave about 1/2 inch of headspace at the top of each jar to allow for expansion and proper sealing.
If you notice air bubbles trapped inside, gently tap the jars on the counter or use a clean utensil to release them. Removing air pockets ensures even pickling and prevents spoilage.
6️⃣ Seal jars and let cool completely. Refrigerate before serving.
Seal the jars tightly with clean lids. Allow them to cool completely at room temperature. As they cool, you may hear a soft popping sound — this is normal.
Once fully cooled, transfer the jars to the refrigerator. For best flavor, let the Brussels sprouts pickle for at least 24–48 hours before serving. The longer they sit, the deeper and more developed the flavor becomes.
VARIATIONS & CUSTOMIZATIONS
Extra Heat
If you love bold spice, increase the red pepper flakes slightly or let the jars sit longer before opening. The heat intensifies as they pickle.
Milder Version
For a gentler flavor, slightly reduce the red pepper flakes. The sprouts will still be tangy and garlicky without much heat.
Finely Chopped for Relish
After pickling, chop the sprouts finely and use them as a tangy relish on burgers or hot dogs. It adds crunch and acidity in every bite.
Charcuterie Board Star
Serve them whole alongside cured meats and cheeses. Their acidity cuts through rich flavors beautifully.
Cocktail Garnish
These pickled Brussels sprouts make an unexpected and impressive garnish for savory cocktails.
FAQ
How long do these pickled Brussels sprouts last?
Stored in the refrigerator, they can last several weeks as long as they remain submerged in brine. Always use clean utensils when removing sprouts to maintain freshness.
Do I have to blanch the Brussels sprouts?
Yes, blanching helps soften the texture slightly and sets their color. Skipping this step may result in overly firm sprouts that don’t absorb flavor as well.
When are they ready to eat?
They can technically be eaten after cooling, but the flavor improves significantly after 24–48 hours. Waiting allows the brine to fully penetrate.
Why leave headspace in the jar?
Leaving about 1/2 inch headspace allows for expansion and helps ensure a proper seal. It also prevents overflow when sealing.
Can I use different jar sizes?
Yes, just make sure the sprouts are tightly packed and fully submerged in brine. Smaller jars are convenient for gifting or portion control.
NUTRITION & TIME TABLE
| Category | Amount |
|---|---|
| Prep Time | 15 minutes |
| Cooking Time | 10 minutes |
| Total Time | 25 minutes |
| Calories | 60 kcal |
| Protein | 2 g |
| Carbohydrates | 11 g |
| Fat | 0 g |

Frog Balls (Pickled Brussels Sprouts)
Description
Crunchy, tangy, and lightly spicy pickled Brussels sprouts that make the perfect bold snack or burger topper. Easy to prepare and packed with flavor in every bite.
Ingredients
• 2 lbs Brussels sprouts
• 2 1/2 cups white vinegar
• 2 cups water
• 2 tbsp pickling salt
• 1 tbsp sugar
• 4 garlic cloves, peeled
• 1 tsp dill seeds
• 1 tsp red pepper flakes
Instructions
1. Trim Brussels sprouts and remove any loose outer leaves.
2. Bring a large pot of water to a boil. Add Brussels sprouts and blanch for 3–4 minutes. Drain well.
3. Pack blanched sprouts into clean jars with garlic, dill seeds, and red pepper flakes.
4. In a saucepan, combine vinegar, water, pickling salt, and sugar. Bring to a boil, then simmer 5 minutes.
5. Pour hot brine over sprouts, leaving about 1/2 inch headspace.
6. Seal jars and let cool completely. Refrigerate before serving.