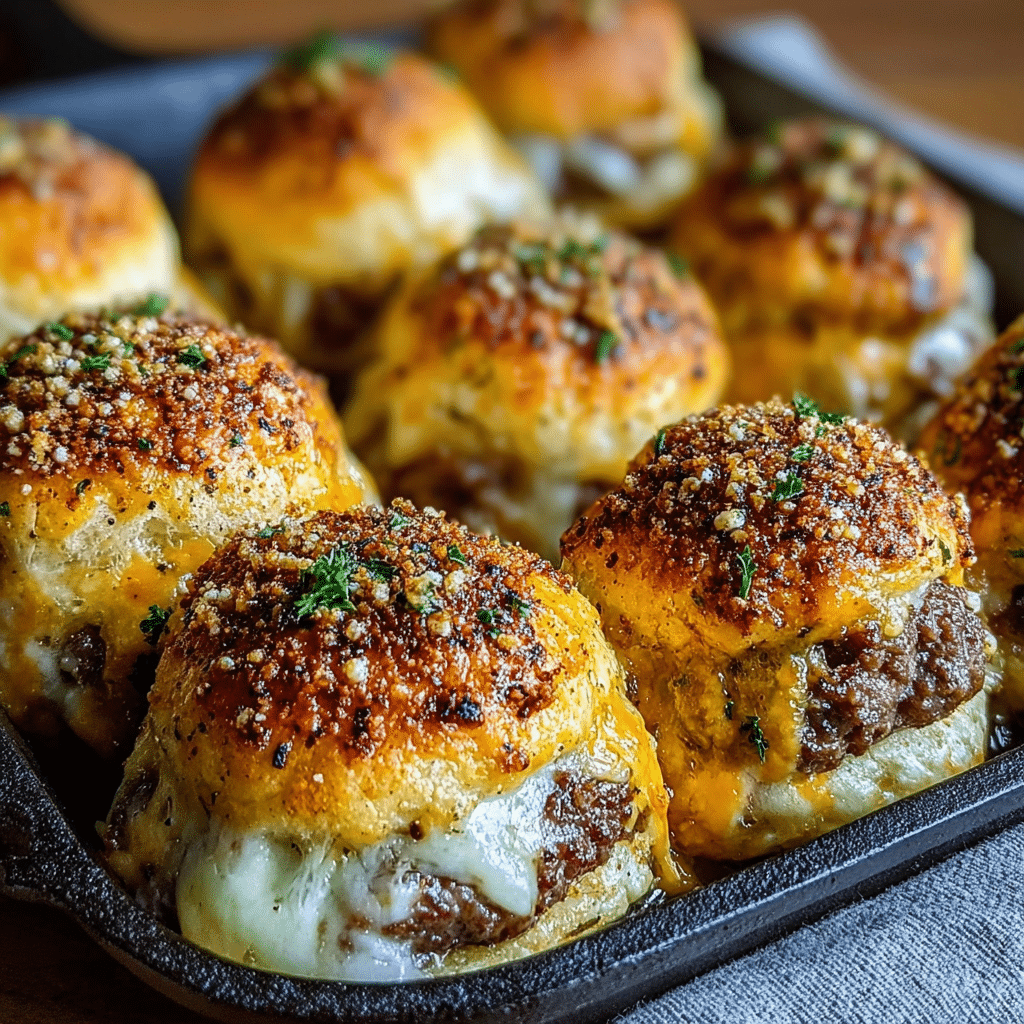
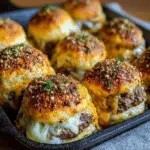
They take everything people love about a classic cheeseburger—the juicy seasoned beef, melty cheese, sautéed onions, and buttery bun—and wrap it all up into a golden, bite-sized “bomb” brushed with rich garlic parmesan butter. Each one is soft on the outside, cheesy and savory on the inside, and perfect for dipping, sharing, or devouring straight off the tray.
What makes these Garlic Parmesan Cheeseburger Bombs so special is the way they deliver big, bold burger flavor in a fun, hand-held form. You get the satisfaction of a cheeseburger, but in an appetizer-sized package that’s ideal for game nights, parties, family movie evenings, or even as a playful dinner option. They’re easy enough to make on a weeknight, but impressive enough to serve to guests.
Unlike building individual burgers with buns, toppings, and sauces, these bombs keep everything contained in a warm, pillowy dough. The ground beef is cooked with onions and spices, mixed with gooey cheese, then wrapped and baked until the dough turns golden and the cheese melts into the meat. A final generous brush of garlic parmesan butter adds irresistible aroma and flavor that’ll have everyone reaching for “just one more.”
If you’re looking for a snack or meal that’s comforting, fun, and guaranteed to disappear quickly, Garlic Parmesan Cheeseburger Bombs might just become your new favorite recipe.
Core Ingredients for Making the Recipe
To prepare these savory Garlic Parmesan Cheeseburger Bombs, you’ll need a few basic ingredients for the beef filling, the dough, and the finishing garlic parmesan butter. Here’s what you’ll need:
For the Cheeseburger Filling
This is the flavorful, juicy center that makes each bomb taste like a mini cheeseburger.
- 1 tbsp olive oil or butter
For sautéing the onions and starting the beef mixture. - 1 small onion, finely chopped
Adds sweetness and classic burger flavor. - 500 g (1.1 lbs) ground beef (80/20 preferred)
The ideal fat ratio for a juicy, flavorful filling. - 2 cloves garlic, minced
For extra depth and savory aroma. - 1 tsp salt (or to taste)
- ½ tsp black pepper
- 1 tsp Worcestershire sauce
Gives that classic “burger” umami flavor. - ½ tsp smoked paprika or regular paprika (optional)
Adds a gentle smoky warmth. - 1–1½ cups shredded cheese
Cheddar, mozzarella, or a blend—enough to make the filling rich and melty. - 2 tbsp ketchup (optional)
- 1 tbsp mustard (optional)
To mirror traditional cheeseburger flavors inside the filling.
For the Dough
You can use store-bought dough for convenience or homemade dough if you prefer.
- 1–2 cans refrigerated biscuit dough or
- 1 large ball of pizza dough (about 500 g / 1 lb)
Either works well as the “bun” around the filling. - All-purpose flour (for dusting)
To prevent sticking while shaping.
For the Garlic Parmesan Butter (Topping)
This buttery coating is what gives these bombs their signature garlic parmesan finish.
- 4 tbsp unsalted butter, melted
- 2–3 cloves garlic, minced (or 1 tsp garlic powder)
- 2 tbsp grated parmesan cheese
- 1 tbsp chopped fresh parsley (or 1 tsp dried parsley)
- Pinch of salt
Optional for Serving
- Pickles, sliced, to serve on the side
- Ketchup, mustard, burger sauce, or garlic aioli for dipping
- Extra grated parmesan for sprinkling
Step-by-Step
Guide to Making the Recipe
1. Prepare the Cheeseburger Filling
Start by making the heart of the recipe: the savory cheeseburger filling.
- Heat the oil or butter
In a large skillet over medium heat, add 1 tbsp olive oil or butter. - Cook the onions
Add the finely chopped onion and cook for 3–4 minutes, stirring occasionally, until the onion becomes soft and translucent. This gives your filling a gentle sweetness and classic burger aroma. - Add the beef
Add the 500 g (1.1 lbs) ground beef to the skillet. Break it up with a spoon or spatula and cook until browned and no pink remains. - Season the mixture
Stir in the minced garlic, salt, black pepper, Worcestershire sauce, and paprika (if using). Cook for another 1–2 minutes so the garlic softens and the spices bloom in the heat. - Optional: Add burger-style sauces
For an extra cheeseburger feel, stir in ketchup and mustard. These condiments give a familiar tang and sweetness without being overwhelming. - Remove from heat and cool slightly
Take the pan off the heat and let the mixture cool for a few minutes. A slightly cooled filling is easier to work with and won’t melt the dough prematurely. - Stir in the cheese
Once the beef mixture is warm rather than hot, fold in the shredded cheese until evenly distributed. The cheese may begin to melt slightly, creating a rich, savory filling that will become perfectly gooey once baked inside the dough.
Set the filling aside while you prepare the dough.
2. Prepare the Dough
You can use refrigerated biscuit dough or pizza dough depending on what you have on hand.
- If using biscuit dough:
- Separate the biscuits and lightly flatten each one with your fingers or a rolling pin to form small circles, about 3–4 inches in diameter.
- If using pizza dough:
- Lightly flour your work surface.
- Roll out the dough into a large rectangle or circle, about ¼ inch thick.
- Cut into equal portions—12–16 pieces depending on how large you want your bombs. Each piece should be roughly palm-sized.
The goal is to have dough portions that can comfortably wrap around a spoonful of filling.
3. Assemble the Cheeseburger Bombs
Now comes the fun part: turning the filling and dough into little “bombs.”
- Spoon the filling
Place one flattened dough piece in your hand or on the work surface. Add about 1–2 tablespoons of the cheeseburger filling into the center. Don’t overfill, or the bombs may burst during baking. - Shape into a bomb
Gently pull the edges of the dough up and over the filling, pinching them together at the top to seal. Make sure there are no gaps or holes—this keeps the cheese from leaking out and ensures a neat, round shape. - Seal and smooth
Once sealed, flip the dough ball seam-side down and gently roll it between your hands to smooth it into a round bomb shape. - Place on baking tray
Line a baking sheet or baking dish with parchment paper. Place each cheeseburger bomb seam-side down, leaving a little space between them for expansion.
Repeat with the remaining dough and filling until you’ve used everything.
4. Bake the Cheeseburger Bombs
- Preheat the oven
Preheat your oven to 375°F (190°C). If your dough package suggests a specific temperature, you can follow that as a guide. - Optional: Egg wash for shine
For a glossy, golden finish, whisk one egg with a tablespoon of water and brush the tops of the bombs lightly. This step is optional but makes them look bakery-perfect. - Bake
Place the tray in the preheated oven and bake for 15–20 minutes, or until the bombs are puffed and golden brown. The exact time can vary depending on your oven and the type of dough you’re using. - Check for doneness
The tops should be beautifully golden, and the bottoms lightly browned. If they look pale, give them a few more minutes.
5. Make the Garlic Parmesan Butter
While the bombs are baking, prepare the finishing touch.
- Melt the butter
In a small bowl, add 4 tbsp unsalted butter and melt it in the microwave or over low heat on the stove. - Add the flavor
Stir in the minced garlic, parmesan cheese, parsley, and a pinch of salt. Mix until everything is combined into a fragrant, savory butter mixture.
This garlic parmesan butter is what turns simple cheeseburger bombs into a next-level appetizer with loads of flavor.
6. Finish and Serve
- Brush with garlic parmesan butter
As soon as the bombs come out of the oven, while they’re still hot, brush the tops generously with the garlic parmesan butter. Let some of it drip down the sides for extra flavor. - Optional: Extra sprinkle
Sprinkle a little more grated parmesan or parsley on top if desired. - Cool slightly
Allow the bombs to cool for about 5–10 minutes. This lets the filling settle and makes them easier to handle while still warm and melty inside.
Now they’re ready to serve—golden, garlicky, cheesy, and irresistible.
Flavor Variations and Creative Twists
The beauty of Garlic Parmesan Cheeseburger Bombs lies in how easily you can customize them. With just a few tweaks, you can create new versions that suit different tastes and occasions.
1. Bacon Cheeseburger Bombs
Stir crispy cooked bacon pieces into the beef and cheese mixture. Bacon adds smoky richness and even more savory depth.
2. Spicy Jalapeño Cheeseburger Bombs
Add finely chopped jalapeños or a pinch of red pepper flakes to the filling for a spicy kick. You can also use pepper jack cheese instead of cheddar.
3. Mushroom Swiss Bombs
Swap cheddar for Swiss cheese and add sautéed mushrooms to the filling. This gives a gourmet burger twist inside each bomb.
4. BBQ Cheeseburger Bombs
Replace the ketchup and mustard in the filling with BBQ sauce. Use smoked cheddar or gouda to complement the BBQ flavors.
5. Pickle Lovers’ Bombs
Add a small slice of pickle inside each bomb with the filling or serve lots of pickles on the side. The tangy crunch pairs perfectly with the rich beef and cheese.
6. Pizza Cheeseburger Fusion
Stir in a spoonful of pizza sauce and some Italian seasoning, and top the baked bombs with a little extra cheese. It’s a fun mash-up of pizza and cheeseburger in one bite.
How to Serve
Garlic Parmesan Cheeseburger Bombs are incredibly flexible when it comes to serving. They can be:
- Party appetizers
Arrange them on a large platter with small bowls of dipping sauces—ketchup, mustard, burger sauce, garlic mayo, or ranch. - Main meal
Serve 2–4 bombs per person with a side salad, fries, or roasted veggies for a filling dinner. - Game day snack
Set them out warm in the center of the table so everyone can grab one during the game.
Dipping Sauce Ideas
- Classic ketchup and mustard
- Spicy mayo or sriracha mayo
- Garlic aioli
- Ranch dressing
- BBQ sauce
Serving them warm is ideal, but they’re still delicious at room temperature, which makes them great for buffets or potlucks.
Tips & Variations
A few simple tips can help ensure your Garlic Parmesan Cheeseburger Bombs turn out perfectly every time.
1. Don’t overfill the bombs
It’s tempting to pile in the filling, but too much can cause leakage or make them hard to seal. A tablespoon or two of filling is usually enough.
2. Seal the dough well
Pinch the seams firmly and place the bombs seam-side down on the baking sheet. This helps keep the cheese from escaping during baking.
3. Let the filling cool slightly
If the filling is too hot when you wrap it, it can soften the dough too much and make it tricky to shape. Warm—not steaming hot—is ideal.
4. Use freshly shredded cheese
Pre-shredded cheese often has anti-caking agents that affect melt quality. Shredding your own cheese makes the filling creamier and more melty.
5. Adjust garlic intensity
If you love garlic, use fresh minced garlic in both the filling and butter. If you prefer a milder flavor, use garlic powder instead for a softer, more subtle taste.
6. Make them mini or jumbo
For bite-sized party snacks, make smaller bombs using less filling and dough. For a hearty main dish, make them larger—just adjust the baking time so the dough cooks through.
Final Thoughts
Garlic Parmesan Cheeseburger Bombs are a true celebration of everything we love about comfort food: warm dough, melty cheese, savory beef, and the unbeatable aroma of garlic and butter.
They transform a familiar flavor—the classic cheeseburger—into something playful and shareable, perfect for casual gatherings, family dinners, or special occasions. With simple ingredients and straightforward steps, you can create a dish that feels fun, impressive, and deeply satisfying.
Whether you’re feeding a crowd or just making a fun dinner at home, these bombs bring excitement to the table in every bite. They’re proof that comfort food doesn’t have to be complicated to be memorable—sometimes all it takes is a bit of creativity and a generous brush of garlic parmesan butter.
FAQ
Can I make these ahead of time?
Yes. You can assemble the cheeseburger bombs and refrigerate them (covered) for a few hours before baking. When ready to bake, brush with egg wash (if using) and bake as directed, adding a few extra minutes if they’re cold from the fridge.
Can I freeze Garlic Parmesan Cheeseburger Bombs?
Absolutely. Once baked and cooled, place them on a tray to freeze individually, then transfer to a freezer-safe bag or container. Reheat in the oven at 350°F (175°C) until warmed through. For best texture, brush with a little extra garlic butter after reheating.
Can I use a different type of meat?
Yes. You can use ground turkey, chicken, or a mix of beef and sausage. Just be sure to cook the meat thoroughly and drain any excess grease before mixing in the cheese.
What type of dough works best?
Refrigerated biscuit dough, pizza dough, or even crescent roll dough can all work. Biscuit dough gives a more “bread-like” bite, while pizza dough is chewier. Choose based on the texture you prefer.
Can I make them without garlic?
If you’re not a fan of garlic, you can skip it in the butter and use plain melted butter with parsley and parmesan instead. You’ll still get lots of flavor from the beef, cheese, and herbs.
How do I keep the bottoms from getting too dark?
Use parchment paper and avoid placing the tray on the very bottom rack of the oven. If your oven runs hot, you can also reduce the temperature slightly and bake a bit longer to ensure even browning.
Garlic Parmesan Cheeseburger Bombs are the kind of snack that turn a casual gathering into an instant event.
Ingredients
For the Cheeseburger Filling
This is the flavorful, juicy center that makes each bomb taste like a mini cheeseburger.
- 1 tbsp olive oil or butter
For sautéing the onions and starting the beef mixture. - 1 small onion, finely chopped
Adds sweetness and classic burger flavor. - 500 g (1.1 lbs) ground beef (80/20 preferred)
The ideal fat ratio for a juicy, flavorful filling. - 2 cloves garlic, minced
For extra depth and savory aroma. - 1 tsp salt (or to taste)
- ½ tsp black pepper
- 1 tsp Worcestershire sauce
Gives that classic “burger” umami flavor. - ½ tsp smoked paprika or regular paprika (optional)
Adds a gentle smoky warmth. - 1–1½ cups shredded cheese
Cheddar, mozzarella, or a blend—enough to make the filling rich and melty. - 2 tbsp ketchup (optional)
- 1 tbsp mustard (optional)
To mirror traditional cheeseburger flavors inside the filling.
For the Dough
You can use store-bought dough for convenience or homemade dough if you prefer.
- 1–2 cans refrigerated biscuit dough or
- 1 large ball of pizza dough (about 500 g / 1 lb)
Either works well as the “bun” around the filling. - All-purpose flour (for dusting)
To prevent sticking while shaping.
For the Garlic Parmesan Butter (Topping)
This buttery coating is what gives these bombs their signature garlic parmesan finish.
- 4 tbsp unsalted butter, melted
- 2–3 cloves garlic, minced (or 1 tsp garlic powder)
- 2 tbsp grated parmesan cheese
- 1 tbsp chopped fresh parsley (or 1 tsp dried parsley)
- Pinch of salt
Optional for Serving
- Pickles, sliced, to serve on the side
- Ketchup, mustard, burger sauce, or garlic aioli for dipping
- Extra grated parmesan for sprinkling