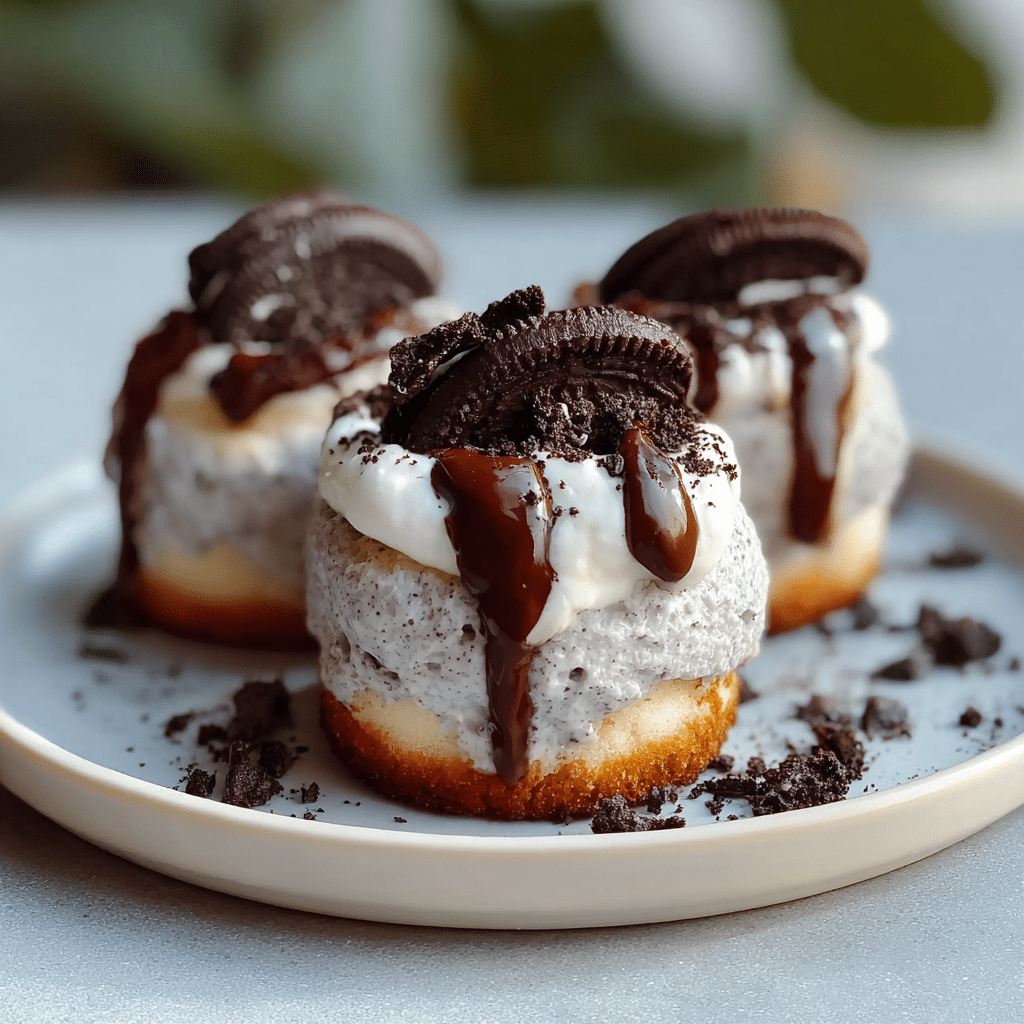
Soft layered mini cakes filled and coated with cookies & cream frosting — bite-sized indulgence!
Yield: 6 mini cakes · Method: No-bake, chill to set · Time: 25 minutes prep + about 2 hours chill
Mini Oreo Cream Cakes are the kind of dessert that look impressively fancy but are secretly very easy to make.
Instead of fussing with cake batter and ovens, you build soft, layered mini cakes using ladyfinger biscuits and a rich cookies & cream frosting made with cream cheese, heavy cream, and crushed Oreo cookies.
Each mini cake has layers of tender ladyfingers that soak up the cream, turning them into a soft, mousse-like texture, while the crushed Oreos add that classic chocolate crunch in every bite. The outside is coated with a generous blanket of cookies & cream frosting and decorated with extra cookie crumbs, making them look like tiny showstopper cakes on your dessert table.
What makes these Mini Oreo Cream Cakes so special is their combination of texture and flavor. You get the familiar taste of Oreo cookies — chocolaty, slightly bitter, and deeply comforting — blended with fluffy, lightly sweetened cream and tangy cream cheese. The ladyfingers keep everything light and airy, and because the cakes are chilled instead of baked, they taste cool, creamy, and refreshing.
They’re an ideal dessert for birthdays, family gatherings, or any time you want something that feels “bakery level” without hours of work. You can make them ahead, chill them, and bring them out right when you’re ready to impress. Whether you’re serving adults with coffee or kids at a party, these bite-sized cakes always disappear quickly.
Core Ingredients for Making the Recipe
To create these indulgent Mini Oreo Cream Cakes, you only need a handful of simple ingredients. Each one plays a role in building layers of flavor and structure.
For the Mini Cakes
- Ladyfinger biscuits – about 18–24 pieces (depending on size)
- These form the soft, cake-like layers. They soak up moisture from the cream and turn fluffy and tender.
- Crushed Oreo cookies – about 20 standard sandwich cookies
- Used both in the base mixture and in the frosting. They add that signature cookies & cream taste and a delicate crunch.
- 3 tablespoons unsalted butter, melted
- Helps bind some of the crushed Oreos into a firm base layer if you choose to add a crumb base for extra structure.
- 2–3 tablespoons milk (optional, for softening ladyfingers)
- A light dip helps soften the ladyfingers so they blend seamlessly with the cream layers.
For the Cookies & Cream Frosting / Filling
- 1 1/2 cups (360 ml) cold heavy cream
- Whipped into soft peaks, this is what makes the frosting light, fluffy, and mousse-like.
- 8 oz (225 g) cream cheese, softened
- Adds richness, structure, and a subtle tang that balances the sweetness of the cookies.
- 3/4 cup powdered sugar
- Sweetens the cream and cream cheese without any graininess.
- 1 teaspoon vanilla extract
- Deepens the flavor and enhances the cookies & cream profile.
- Pinch of salt
- A small amount brings out all the flavors and keeps the sweetness from feeling too heavy.
- 6–8 Oreo cookies, finely crushed
- Folded into the cream cheese mixture to create that speckled cookies & cream look and texture.
For Decoration (Optional but Recommended)
- Extra Oreo cookies, halved or quartered, for topping
- A handful of finely crushed Oreos for sprinkling around the sides and on top
- Optional drizzle of melted chocolate or chocolate sauce for a more dramatic look
With these simple ingredients, you’ll build mini desserts that have all the charm of a bakery creation but are easy enough for a relaxed afternoon in the kitchen.
Step-by-Step

1. Prepare Your Molds
You’ll need either:
- 6 small round molds (about 3 inches / 7–8 cm in diameter),
- or a muffin tin lined with parchment strips or sturdy cupcake liners to make it easier to lift the cakes out.
Lightly grease the inside of each mold or line with acetate strips or parchment so the cakes release neatly once chilled. Set aside.
2. Make the Oreo Crumb Base (Optional but Delicious)
This step gives your mini cakes a firmer, more dessert-like base.
- Place about 8–10 Oreo cookies in a food processor or in a zip-top bag and crush them into fine crumbs.
- Transfer the crumbs to a small bowl and stir in the melted butter until the mixture resembles damp sand.
- Divide the crumb mixture evenly among the 6 molds, pressing it firmly into the bottom of each one to create a thin base.
- Place the molds in the refrigerator while you prepare the cream mixture so the base can firm up.
If you’d like to skip the crumb base, you can start directly with ladyfingers as the first layer.
3. Whip the Heavy Cream
- Pour the cold heavy cream into a mixing bowl.
- Using a hand mixer or stand mixer, whip the cream on medium-high speed until soft peaks form.
- The cream should be thick and hold its shape, but not grainy or separated.
- Set aside in the refrigerator while you prepare the cream cheese mixture.
4. Prepare the Cream Cheese Cookies & Cream Mixture
- In a separate large bowl, add the softened cream cheese.
- Beat on medium speed until smooth and free of lumps.
- Add the powdered sugar, vanilla extract, and pinch of salt. Beat again until everything is fully combined and creamy.
- Gently fold in 6–8 crushed Oreo cookies using a spatula. You should see speckles of cookie pieces throughout the cream cheese mixture.
5. Combine the Two Mixtures
- Take the whipped cream out of the refrigerator.
- Add about one-third of the whipped cream to the cream cheese mixture and fold gently. This lightens the mixture and makes it easier to combine without deflating the cream.
- Add the remaining whipped cream in two more additions, folding carefully each time until fully incorporated.
- The final mixture should be thick, fluffy, and smooth — similar to a light cookies & cream mousse.
6. Prepare the Ladyfingers and Additional Oreo Pieces
- Break or slice the ladyfingers into pieces that fit your chosen molds. They don’t have to be perfect; they’ll be covered by cream.
- For an even softer texture, pour 2–3 tablespoons of milk into a shallow dish and lightly dip each ladyfinger for 1–2 seconds. Do not soak too long, or they’ll become mushy.
- Crush the remaining Oreo cookies into rough chunks — not too fine — to add some texture between layers.
7. Layer the Mini Cakes
Now the fun part: assembling the layers.
- Remove your molds with the crumb base from the refrigerator.
- Spoon a small layer of the cookies & cream mixture over the base, spreading it out evenly.
- Arrange a layer of ladyfinger pieces on top of the cream, pressing gently so they sink slightly into the mixture.
- Sprinkle a few crushed Oreo bits over the ladyfingers for extra flavor and crunch.
- Add another layer of the cream mixture, smoothing it gently with the back of a spoon or spatula.
Repeat the layers (ladyfingers → crushed Oreos → cream) until your molds are nearly full, finishing with a smooth layer of cream on top.
You want the final top layer to look neat, since this will be the “frosting” surface of your mini cakes.
8. Chill to Set
- Cover the molds loosely with plastic wrap or foil.
- Refrigerate for at least 2 hours, or until the cakes feel firm and the layers have set.
- For the best texture, you can chill them overnight. The ladyfingers will soften further, and the flavors will meld beautifully.
9. Unmold and Decorate
- Once well chilled, gently run a thin knife around the inside edge of each mold (if not using parchment or acetate).
- Carefully lift or push each mini cake out and transfer to a serving plate.
- Smooth the sides with a spatula if needed, then press a handful of finely crushed Oreo crumbs gently onto the sides for a “cake crumb coat” effect.
- Top each mini cake with:
- A swirl or dollop of extra cream (if you have some left),
- A halved or quartered Oreo cookie,
- And an optional drizzle of melted chocolate or chocolate sauce.
Your Mini Oreo Cream Cakes are now ready to serve — soft, creamy, and absolutely irresistible.
Flavor Variations and Creative Twists
One of the reasons these cakes are so fun is how easily you can customize them. Once you master the basic method, you can create all kinds of variations.
1. Double Chocolate Mini Cakes
For chocolate lovers:
- Add 2 tablespoons of unsweetened cocoa powder to the cream cheese mixture for a deeper chocolate flavor.
- Use chocolate-coated ladyfingers or briefly dip the ladyfingers in chocolate milk instead of plain milk.
- Finish with a chocolate ganache drizzle for a rich, glossy topping.
2. Mint Cookies & Cream Cakes
If you adore the chocolate–mint combination:
- Add 1/4 teaspoon peppermint extract (start with a small amount, it’s strong!) to the cream cheese mixture.
- Use mint-flavored Oreo-style cookies if available.
- Decorate the top with a sprinkle of crushed peppermint candies or a small mint leaf.
3. Berry & Oreo Mini Cakes
For a fruity twist:
- Add a thin layer of fresh raspberries or sliced strawberries in the middle of the cake layers.
- The tartness of the berries cuts through the sweetness and gives a fresh, juicy element.
- Garnish the top with a small berry alongside the Oreo piece for a pop of color.
4. Nutty Crunch Oreo Cakes
To add a slight crunch and nutty flavor:
- Fold 2–3 tablespoons of finely chopped toasted hazelnuts, almonds, or pecans into the cream mixture.
- Sprinkle a few on top of each cake along with the Oreo crumbs.
- The nuts add complexity and make the dessert feel a bit more “grown-up.”
5. Coffee Cookies & Cream Cakes
For a more sophisticated dessert that pairs beautifully with espresso:
- Dissolve 1–2 teaspoons of instant coffee or espresso powder in the milk used to dip the ladyfingers.
- You can also add 1 teaspoon of coffee directly to the cream cheese mixture.
- The subtle coffee note deepens the chocolate flavor and gives the cakes a tiramisu-like twist.
How to Serve
These Mini Oreo Cream Cakes are incredibly flexible in how and when you serve them.
- Chilled dessert:
Serve them straight from the refrigerator for a cool, refreshing treat. The cream will be firm, the layers neat, and the texture mousse-like and silky. - With hot drinks:
They are wonderful alongside coffee, espresso, hot chocolate, or black tea. The cold, creamy layers contrast beautifully with a warm drink. - For parties and gatherings:
Place each mini cake on its own small dessert plate, maybe with a drizzle of chocolate sauce and a few extra crumbs or fresh berries on the side. They look elegant and “individual,” perfect for special occasions. - Casual snack-style serving:
If you’ve made them in a muffin tin or smaller molds, you can serve them directly in their liners for a more relaxed vibe, like a fancy cupcake with a creamy interior.
Because they are rich, one mini cake is usually enough for one person — though don’t be surprised if someone asks for seconds.
Tips & Variations
A few smart tips will help you get perfect Mini Oreo Cream Cakes every time.
- Use cold heavy cream.
Cold cream whips better and holds its structure. If your kitchen is warm, chill the mixing bowl and beaters for a few minutes before whipping. - Soften the cream cheese properly.
Let the cream cheese sit at room temperature for 20–30 minutes before using. This prevents lumps and ensures a smooth filling. - Fold gently.
When combining the whipped cream with the cream cheese mixture, fold with a spatula in slow, sweeping motions. This keeps the mixture light and airy. - Don’t over-soak the ladyfingers.
A quick dip in milk is enough. If they absorb too much liquid, they can break apart and become mushy, making the cakes difficult to slice cleanly. - Chill long enough.
Resist the temptation to rush the chilling step. The layers need time to firm up so the cakes hold their shape when unmolded. Two hours is the minimum; overnight is even better. - Adjust sweetness to taste.
Oreos are already sweet, so if you prefer a less sugary dessert, reduce the powdered sugar slightly (for example, from 3/4 cup down to 1/2 cup). The cream cheese tang will still keep the flavor balanced. - Get creative with shapes.
Instead of round molds, you can use square rings, a loaf pan (cut into rectangles), or even small jars for a parfait-style version of the dessert. The basic components remain the same.
Final Thoughts
Mini Oreo Cream Cakes are a celebration of everything people love about cookies & cream: the contrast of dark chocolate cookie pieces with smooth, sweet cream. By layering that classic flavor combination with soft ladyfinger biscuits, you get a dessert that feels luxurious but doesn’t demand advanced baking skills or complicated techniques.
There’s no need to bake, decorate with intricate piping, or worry about towering cakes collapsing. Instead, you assemble, chill, and enjoy. It’s the kind of recipe that’s perfect for busy days, last-minute dessert needs, or whenever you want something that looks special without spending hours in the kitchen.
These mini cakes are also incredibly adaptable. You can keep them classic with simple cookies & cream or play with coffee, mint, berries, or nuts to create your own signature version. No matter how you tweak them, the core experience stays the same: a cool, creamy, melt-in-your-mouth dessert with just the right amount of crunch.
Whether you’re treating your family, surprising guests, or simply indulging yourself after a long day, Mini Oreo Cream Cakes deliver comfort, fun, and a touch of elegance in every bite. It’s a dessert you’ll come back to again and again — because once you realize how easy they are, you’ll always find an excuse to make them.
FAQ
Can I make these Mini Oreo Cream Cakes ahead of time?
Yes, they are perfect for making ahead. In fact, they often taste even better the next day because the flavors have more time to meld and the layers set more firmly. You can prepare them up to 24 hours in advance, keep them covered in the refrigerator, and decorate them just before serving.
Can I use a different type of cookie instead of Oreo cookies?
Absolutely. While Oreo-style cookies give the classic cookies & cream flavor, you can experiment with:
- Chocolate sandwich cookies from other brands,
- Vanilla sandwich cookies for a lighter taste,
- Or flavored varieties like mint or caramel.
Just keep the overall quantity the same so the texture of the cream mixture stays balanced.
Do I have to use ladyfingers, or can I substitute them?
Ladyfingers are ideal because they’re light and absorb moisture well, but you can substitute:
- Thin slices of plain sponge cake,
- Soft chocolate cake layers,
- Or even graham crackers or digestive biscuits for a slightly different structure.
If you use something denser than ladyfingers, you may want to skip dipping them in milk so they don’t become too heavy.
Can I freeze Mini Oreo Cream Cakes?
Yes, you can freeze them, although the texture will be slightly different once thawed. To freeze:
- Chill the cakes until fully set.
- Wrap each mini cake tightly in plastic wrap, then place them in a freezer-safe container.
- Freeze for up to 1 month.
When ready to serve, thaw in the refrigerator for several hours or overnight. The cream will soften again, but may be a little less airy than when freshly chilled.
How can I make these cakes a bit lighter or less rich?
If you’d like a lighter version:
- Use reduced-fat cream cheese instead of full-fat (but avoid fat-free, which can be watery).
- Reduce the powdered sugar slightly.
- Use fewer Oreos in the cream mixture and more on top as a garnish for flavor without overwhelming richness.
You’ll still get that delicious cookies & cream experience, just with a slightly lighter feel.