Introduction
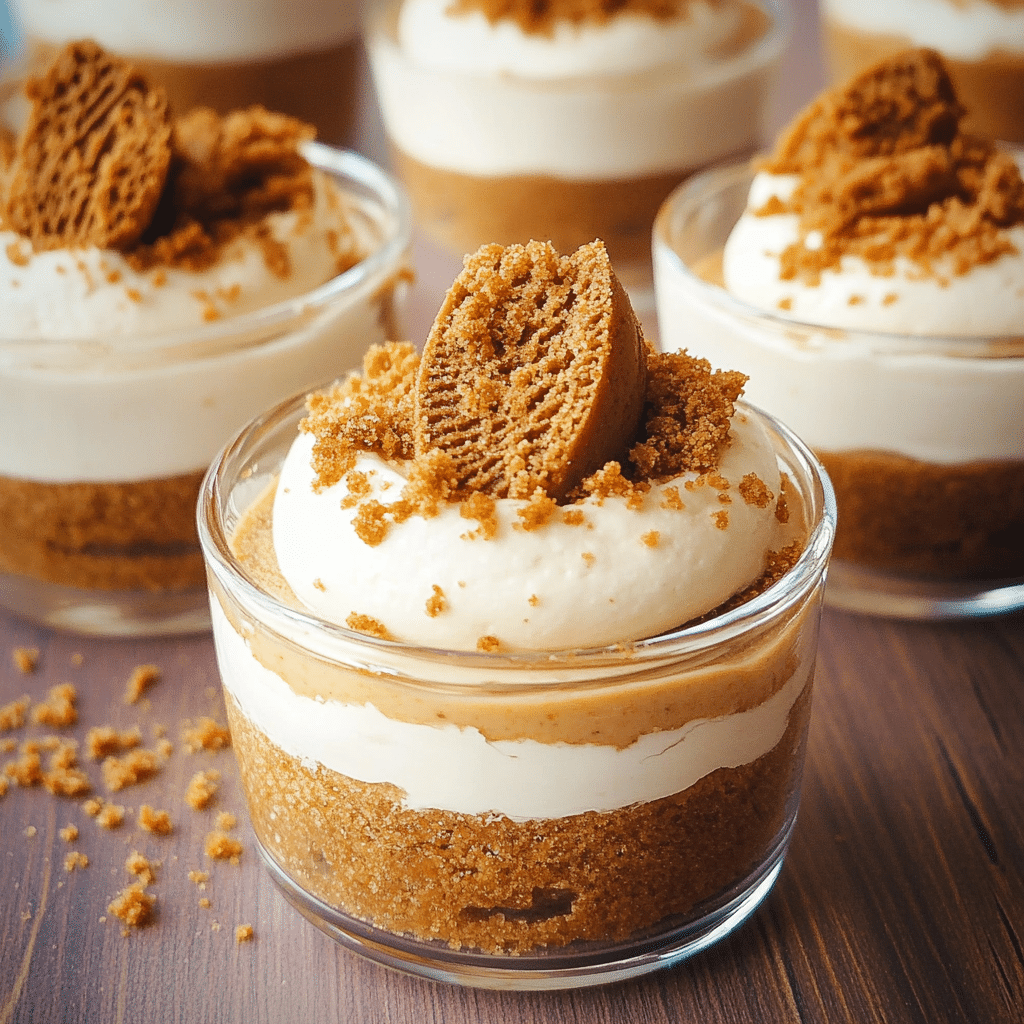
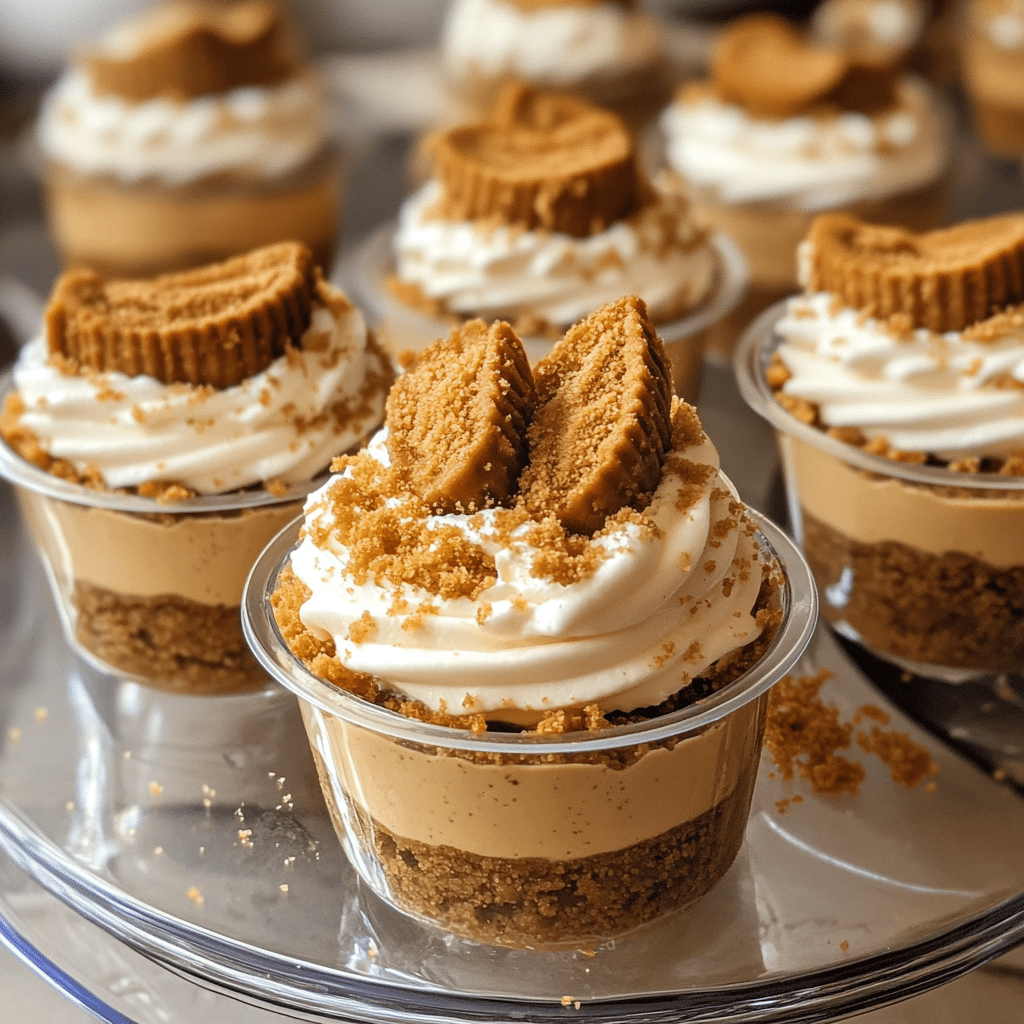
No-Bake Biscoff Cheesecake Cups are the ultimate dessert for anyone who craves something sweet, rich, and easy to make. These little treats combine the smooth, creamy texture of cheesecake with the irresistible caramelized flavor of Biscoff cookies. With no oven required, you can whip up these cups in a flash, making them the perfect choice for last-minute gatherings or when you want to indulge in a luxurious dessert without the hassle.
I first tried these Biscoff Cheesecake Cups at a friend’s party, and they were an instant hit! The combination of the crunchy, spiced cookie crust and the creamy, velvety cheesecake filling is a match made in dessert heaven. I love how the Biscoff cookies add a unique, warm flavor that you just can’t get from traditional graham crackers. Plus, making them in individual cups means they’re perfect for portion control and super easy to serve at parties or family gatherings.
What I appreciate most about this dessert is how versatile it is. You can easily adapt it with different toppings like chocolate shavings, whipped cream, or even a drizzle of caramel sauce. Whether you’re hosting a casual get-together or celebrating a special occasion, these No-Bake Biscoff Cheesecake Cups will steal the show and leave everyone wanting more!
Perfect for:
- Casual get-togethers
- Special celebrations
- Dessert parties
- Last-minute treats
- Cookie lovers
Why You’ll Love This Recipe
Here’s why No-Bake Biscoff Cheesecake Cups will quickly become a favorite:
- No-Bake Convenience: The best part? No need to heat up your oven! These cheesecake cups are simple to make and don’t require any baking, making them perfect for warm weather or when you’re short on time.
- Perfectly Balanced Flavor: The blend of creamy, tangy cheesecake and sweet, spiced Biscoff cookies creates a delightful contrast that’s both indulgent and refreshing.
- Individual Servings: These cheesecake cups are served in individual portions, making them perfect for parties, gatherings, or personal indulgence.
- Customizable Toppings: Top them with extra Biscoff cookie crumbs, whipped cream, or even a drizzle of caramel sauce for an added touch of sweetness.
- Make-Ahead Dessert: These cups can be prepared a day or two in advance, giving you more time to relax and enjoy your event.
Preparation and Cooking Time
- Total Time: 30 minutes (plus chilling time)
- Preparation Time: 20 minutes
- Chilling Time: 2-3 hours
- Servings: 6-8 servings
- Calories per serving: Approximately 350-400 calories
- Key Nutrients: Protein: 5g, Carbs: 40g, Fat: 25g
Ingredients
Gather these simple ingredients to make your No-Bake Biscoff Cheesecake Cups:
- 12 Biscoff cookies, crushed
- 4 tablespoons unsalted butter, melted
- 8 oz cream cheese, softened
- 1 cup heavy cream
- ½ cup powdered sugar
- 1 teaspoon vanilla extract
- ½ teaspoon ground cinnamon
- ¼ teaspoon ground ginger (optional)
- 1 tablespoon Biscoff spread (cookie butter)
- Extra Biscoff cookies for garnish
Ingredient Highlights
- Biscoff Cookies: These spiced cookies are the star of the dessert, adding a rich, caramelized flavor to both the crust and the topping.
- Cream Cheese: This creamy cheese forms the base of the cheesecake filling, giving it a smooth texture and a tangy flavor that balances the sweetness of the Biscoff.
- Heavy Cream: Whipping the heavy cream adds lightness and fluffiness to the cheesecake filling, making it rich and creamy without being too heavy.
- Biscoff Spread: This spread, also known as cookie butter, is optional but adds an extra layer of caramelized flavor to the cheesecake filling, intensifying the overall taste.
Step-by-Step
Instructions
Here’s how to make No-Bake Biscoff Cheesecake Cups:
Prepare the Biscoff Crust:
- Crush the Cookies: Place the Biscoff cookies in a food processor or a plastic bag and crush them until they become fine crumbs.
- Mix with Butter: In a medium bowl, combine the crushed cookies with the melted butter and stir until the mixture is well combined and resembles wet sand.
- Spoon into Cups: Divide the crust mixture evenly among serving cups or small mason jars, pressing the crumbs down firmly to form a base. Set aside.
Make the Cheesecake Filling:
- Whip the Cream Cheese: In a large mixing bowl, beat the softened cream cheese with an electric mixer until smooth and creamy.
- Add Powdered Sugar and Spices: Mix in the powdered sugar, vanilla extract, ground cinnamon, and ginger (if using) until the mixture is well incorporated.
- Add Biscoff Spread: Stir in the Biscoff spread until fully combined with the cream cheese mixture, adding depth of flavor.
- Whip the Heavy Cream: In a separate bowl, whip the heavy cream until stiff peaks form.
- Fold the Whipped Cream into the Cream Cheese Mixture: Gently fold the whipped cream into the cream cheese mixture, being careful not to deflate the whipped cream. The filling should be light and airy.
Assemble the Cheesecake Cups:
- Fill the Cups: Spoon the cheesecake filling over the prepared Biscoff crusts, smoothing the top with a spatula.
- Chill the Cheesecake Cups: Cover the cups with plastic wrap or lids and refrigerate for at least 2-3 hours, or overnight, to allow the filling to firm up and the flavors to meld together.
Garnish and Serve:
- Garnish with Crushed Biscoff Cookies: Just before serving, crumble additional Biscoff cookies over the top of the cheesecake cups for extra texture and flavor. You can also add whipped cream or a drizzle of caramel sauce for a decadent finish.
- Serve and Enjoy: Enjoy your chilled, creamy No-Bake Biscoff Cheesecake Cups as a delightful dessert for any occasion!
How to Serve
Here are some fun ways to serve your No-Bake Biscoff Cheesecake Cups:
- As a Party Favor: Serve the cheesecake cups in small mason jars for a cute, portable dessert that guests can take home.
- With Whipped Cream: Add a dollop of freshly whipped cream on top for a light, creamy contrast to the rich cheesecake filling.
- With a Caramel Drizzle: Drizzle caramel sauce over the top for an extra layer of sweetness and a beautiful finish.
- For Special Occasions: These individual servings make a perfect dessert for birthdays, holiday gatherings, or any special celebration.
- With Fresh Fruit: For a refreshing twist, pair the cheesecake cups with fresh berries like raspberries, strawberries, or blueberries.
Additional Tips
Here are some tips to make your No-Bake Biscoff Cheesecake Cups even better:
- Chill Longer for Best Results: If possible, refrigerate the cheesecake cups overnight. This allows the flavors to deepen and the texture to firm up.
- Use Room Temperature Ingredients: Make sure your cream cheese and Biscoff spread are softened to room temperature to ensure a smooth, lump-free filling.
- Don’t Overmix the Whipped Cream: When folding the whipped cream into the cream cheese mixture, be gentle to maintain the light, airy texture.
- Adjust the Sweetness: Taste the cheesecake filling before assembling and adjust the amount of powdered sugar if you prefer a sweeter or less sweet filling.
- Make It Dairy-Free: Use dairy-free cream cheese and whipped cream alternatives to make this dessert suitable for those with dairy restrictions.
Recipe Variations
Here are 10 variations you can try for No-Bake Biscoff Cheesecake Cups:
- Chocolate Biscoff Cheesecake: Add melted chocolate to the cheesecake filling for a chocolatey twist on this dessert.
- Biscoff and Banana Cheesecake Cups: Top the cheesecake filling with sliced bananas for a fruity variation.
- Peanut Butter Biscoff Cheesecake: Add peanut butter to the filling for a sweet and savory contrast.
- Biscoff and Caramel Cheesecake: Swirl in some caramel sauce into the filling before assembling for an extra layer of sweetness.
- Coconut Biscoff Cheesecake: Mix shredded coconut into the crust or filling for a tropical flavor.
- Biscoff and Raspberry Cheesecake: Add fresh raspberries on top or in the filling for a tart contrast to the sweet cheesecake.
- Pumpkin Biscoff Cheesecake: Add pureed pumpkin and a pinch of cinnamon to the filling for a fall-inspired variation.
- Biscoff and Chocolate Ganache Cheesecake: Top the cheesecake with a layer of rich chocolate ganache for an indulgent treat.
- Nutella Biscoff Cheesecake: Add a spoonful of Nutella to the filling for a hazelnut twist.
- Biscoff and Espresso Cheesecake: Mix a little instant espresso powder into the cheesecake filling for a coffee-flavored dessert.
Freezing and Storage
- Freezing: You can freeze these cheesecake cups for up to a month. Simply cover tightly and freeze before adding the garnish. Let them thaw in the fridge before serving.
- Storage: Store the cheesecake cups in an airtight container in the fridge for up to 4 days. They’re best enjoyed within the first couple of days for optimal texture and flavor.
Special Equipment
Here are some special equipment items to make preparing your No-Bake Biscoff Cheesecake Cups easier:
- Food Processor: A food processor is perfect for crushing the Biscoff cookies into fine crumbs.
- Electric Mixer: An electric mixer is essential for whipping the cream cheese and heavy cream to the right consistency.
- Serving Cups or Mason Jars: These individual-sized containers are perfect for serving the cheesecake cups in a fun and easy-to-serve way.
- Spatula: Use a spatula to smooth the cheesecake filling and create an even layer in the cups.
- Whisk: A whisk is helpful for mixing the powdered sugar and spices into the cream cheese without lumps.
Frequently Asked Questions
- Can I make this ahead of time?
Yes, these cheesecake cups can be made a day or two in advance and stored in the fridge until ready to serve. - Can I use a different type of cookie for the crust?
Yes! You can use any cookie you like, such as graham crackers, Oreos, or even chocolate chip cookies, for a different flavor profile. - Can I use a different type of spread?
Yes, you can substitute the Biscoff spread with other cookie butters, such as Speculoos or even Nutella, for a unique twist. - How long do these cheesecake cups last?
These cheesecake cups can be stored in the fridge for up to 4 days. They may also be frozen for longer storage. - Can I use a store-bought crust?
Absolutely! You can use a pre-made cookie crust for convenience, but the homemade Biscoff crust will give it an extra flavor boost.
No-Bake Biscoff Cheesecake Cups
- Total Time: 30 minutes
Ingredients
Gather these simple ingredients to make your No-Bake Biscoff Cheesecake Cups:
- 12 Biscoff cookies, crushed
- 4 tablespoons unsalted butter, melted
- 8 oz cream cheese, softened
- 1 cup heavy cream
- ½ cup powdered sugar
- 1 teaspoon vanilla extract
- ½ teaspoon ground cinnamon
- ¼ teaspoon ground ginger (optional)
- 1 tablespoon Biscoff spread (cookie butter)
- Extra Biscoff cookies for garnish
Instructions
Prepare the Biscoff Crust:
- Crush the Cookies: Place the Biscoff cookies in a food processor or a plastic bag and crush them until they become fine crumbs.
- Mix with Butter: In a medium bowl, combine the crushed cookies with the melted butter and stir until the mixture is well combined and resembles wet sand.
- Spoon into Cups: Divide the crust mixture evenly among serving cups or small mason jars, pressing the crumbs down firmly to form a base. Set aside.
Make the Cheesecake Filling:
- Whip the Cream Cheese: In a large mixing bowl, beat the softened cream cheese with an electric mixer until smooth and creamy.
- Add Powdered Sugar and Spices: Mix in the powdered sugar, vanilla extract, ground cinnamon, and ginger (if using) until the mixture is well incorporated.
- Add Biscoff Spread: Stir in the Biscoff spread until fully combined with the cream cheese mixture, adding depth of flavor.
- Whip the Heavy Cream: In a separate bowl, whip the heavy cream until stiff peaks form.
- Fold the Whipped Cream into the Cream Cheese Mixture: Gently fold the whipped cream into the cream cheese mixture, being careful not to deflate the whipped cream. The filling should be light and airy.
Assemble the Cheesecake Cups:
- Fill the Cups: Spoon the cheesecake filling over the prepared Biscoff crusts, smoothing the top with a spatula.
- Chill the Cheesecake Cups: Cover the cups with plastic wrap or lids and refrigerate for at least 2-3 hours, or overnight, to allow the filling to firm up and the flavors to meld together.
Garnish and Serve:
- Garnish with Crushed Biscoff Cookies: Just before serving, crumble additional Biscoff cookies over the top of the cheesecake cups for extra texture and flavor. You can also add whipped cream or a drizzle of caramel sauce for a decadent finish.
- Serve and Enjoy: Enjoy your chilled, creamy No-Bake Biscoff Cheesecake Cups as a delightful dessert for any occasion!
- Prep Time: 20 minutes
Nutrition
- Serving Size: 6-8 servings
- Calories: 350-400 kcal
- Fat: 25g
- Carbohydrates: 40g
- Protein: 5g
Conclusion
No-Bake Biscoff Cheesecake Cups are a delightful dessert that combines creamy, indulgent cheesecake filling with the unique flavor of Biscoff cookies. The simple yet delicious combination of buttery cookies and smooth cheesecake is elevated with a variety of optional toppings, making it easy to customize to your taste. Perfect for any occasion, these individual servings are great for sharing and ensure everyone gets a sweet, satisfying treat.
The no-bake method makes these cheesecake cups incredibly easy to prepare, leaving you with minimal effort and maximum flavor. Whether you’re hosting a casual get-together or celebrating a special event, these cheesecake cups will be a hit with your guests. Their rich, creamy texture and delicious flavor are guaranteed to impress.
I can’t wait to see how your No-Bake Biscoff Cheesecake Cups turn out! Be sure to snap a photo and tag me on Instagram—I’d love to see your sweet creations. Don’t forget to leave a comment and share how you made them your own!
