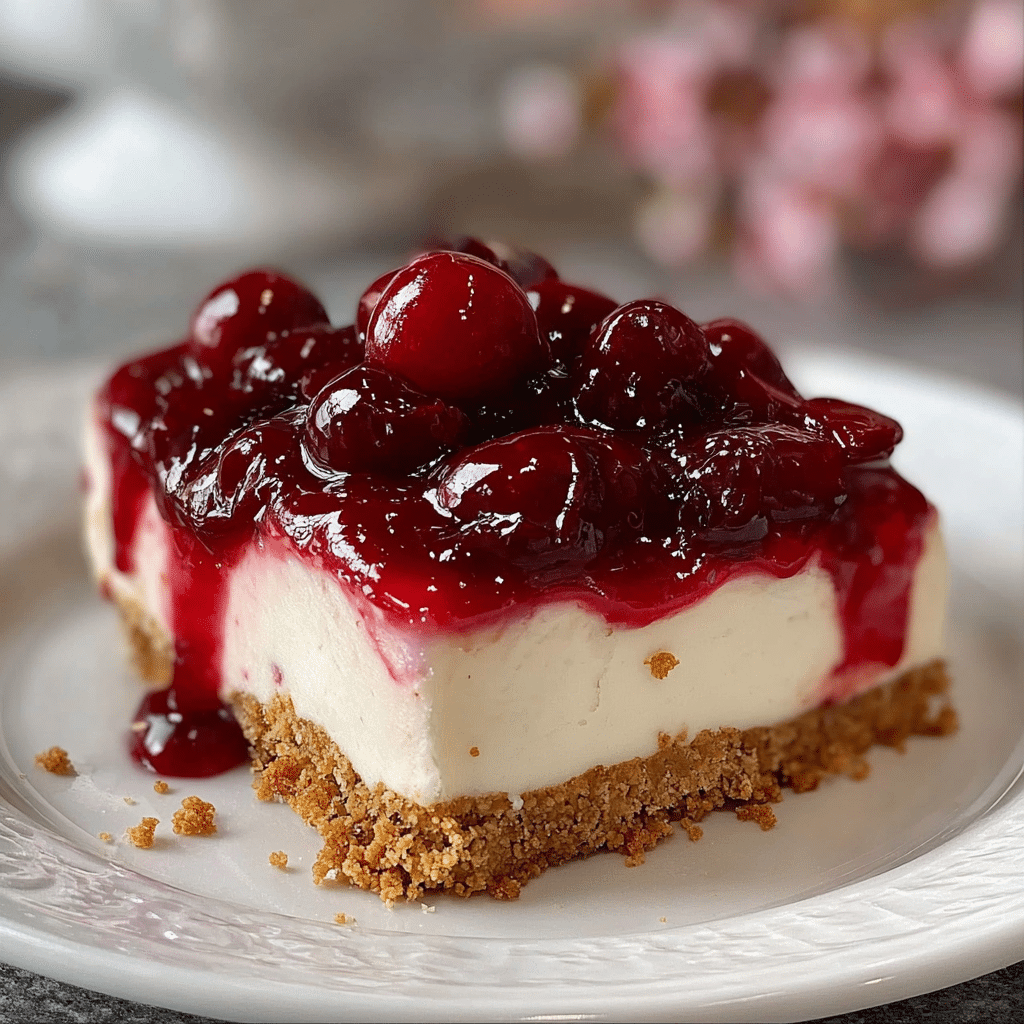
There are desserts that comfort, desserts that impress, and then there are desserts that do both effortlessly. No-Bake Cherry Cheesecake belongs firmly in that last category. Creamy, smooth, lightly tangy, and topped with a glossy layer of sweet-tart cherries, this dessert feels luxurious while remaining wonderfully simple to prepare. No oven. No complicated steps. Just pure, classic cheesecake flavor in its easiest and most elegant form.
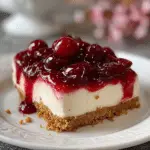
This cheesecake is a celebration of contrast. A buttery, crumbly graham cracker crust forms the foundation, providing structure and a subtle crunch. Above it sits a silky cream cheese filling—cool, rich, and perfectly balanced between sweet and tangy. Finally, the vibrant cherry topping crowns the dessert, adding color, brightness, and a fruity finish that makes every bite feel complete.
What truly sets No-Bake Cherry Cheesecake apart is its accessibility. You don’t need advanced baking skills, special equipment, or hours of active work. The refrigerator does most of the magic, allowing the cheesecake to set gently into a firm yet creamy texture. This makes it an ideal recipe for beginners, busy home cooks, and anyone who wants a reliable dessert that always delivers.
This dessert is also deeply nostalgic. For many, cherry cheesecake recalls family gatherings, holiday tables, and classic diners where a slice of cheesecake felt like the ultimate treat. This no-bake version honors that tradition while making it easier than ever to recreate at home.
Whether you’re preparing dessert for a celebration, a potluck, or simply treating yourself after a long day, No-Bake Cherry Cheesecake is a recipe you’ll come back to again and again. It’s cool, creamy, visually stunning, and endlessly satisfying—proof that sometimes the simplest desserts are the most unforgettable.
Why You’ll Love This Recipe
There are countless reasons this No-Bake Cherry Cheesecake earns a permanent place in your recipe collection.
First, it’s incredibly easy. There’s no baking, no worrying about cracks, water baths, or overcooking. If you can mix, press, and chill, you can make this cheesecake successfully every time.
Second, the texture is exceptional. The filling is smooth, creamy, and light without being airy or mousse-like. It holds its shape beautifully when sliced, yet melts softly on the tongue.
Third, it’s make-ahead friendly. In fact, this cheesecake tastes even better after several hours in the refrigerator. That makes it perfect for entertaining, holidays, or planning ahead.
Another reason to love this recipe is its versatility. You can change the topping, adjust the sweetness, or modify the crust while keeping the same creamy base. It’s a dessert that adapts easily to your preferences.
Finally, it’s a crowd-pleaser. Cherry cheesecake has a timeless appeal that spans generations. Whether you’re serving kids, adults, or guests with different tastes, this dessert rarely disappoints.
Preparation and Chilling Time
One of the biggest advantages of this recipe is how little active time it requires.
- Preparation Time: 25–30 minutes
- Chilling Time: 4–6 hours (overnight recommended)
- Total Time: About 5–6½ hours
Most of this time is hands-off, allowing the cheesecake to set slowly and evenly.
Ingredients
For the Graham Cracker Crust
- 2 cups graham cracker crumbs
- 1/2 cup unsalted butter, melted
- 1/4 cup granulated sugar
For the No-Bake Cheesecake Filling
- 16 oz (450 g) cream cheese, softened
- 1 cup powdered sugar
- 1 teaspoon vanilla extract
- 1 cup heavy whipping cream
For the Cherry Topping
- 1 can (21 oz / 595 g) cherry pie filling
Step-by-Step
 Instructions

1. Prepare the Crust
In a medium bowl, combine the graham cracker crumbs and granulated sugar. Pour in the melted butter and mix until the crumbs are evenly moistened and resemble wet sand.
Press the mixture firmly into the bottom of a 9-inch springform pan or pie dish. Use the bottom of a glass or measuring cup to pack the crust tightly and evenly. Place the crust in the refrigerator to chill while you prepare the filling.
2. Whip the Cream
In a large mixing bowl, whip the heavy whipping cream until stiff peaks form. This step adds lightness and structure to the cheesecake filling. Set the whipped cream aside.
3. Make the Cheesecake Filling
In another bowl, beat the softened cream cheese until completely smooth and creamy. Add the powdered sugar and vanilla extract, mixing until fully combined and silky.
Gently fold the whipped cream into the cream cheese mixture using a spatula. Fold slowly and carefully to maintain the airy texture while creating a smooth, uniform filling.
4. Assemble the Cheesecake
Remove the crust from the refrigerator and spoon the cheesecake filling over it. Spread the filling evenly, smoothing the top with a spatula.
5. Chill Until Set
Cover the cheesecake loosely and refrigerate for at least 4–6 hours, or overnight for best results. This chilling time allows the filling to firm up and develop its signature creamy texture.
6. Add the Cherry Topping
Just before serving, spread the cherry pie filling evenly over the top of the cheesecake. The glossy cherries add color, sweetness, and a beautiful finishing touch.
7. Slice and Serve
Carefully remove the cheesecake from the pan, slice with a sharp knife, and serve chilled.
Flavor Variations and Creative Twists
While classic cherry topping is timeless, this cheesecake base is wonderfully adaptable.
You can replace the cherry topping with blueberry, strawberry, raspberry, or mixed berry pie filling for a different flavor profile. Each fruit brings its own balance of sweetness and acidity.
For a chocolate twist, drizzle melted chocolate over the cheesecake before adding the cherry topping, or use a chocolate cookie crust instead of graham crackers.
If you enjoy citrus flavors, add a tablespoon of lemon juice or lemon zest to the filling. This brightens the cheesecake and enhances the cream cheese’s natural tang.
You can also experiment with a nut-based crust, such as crushed pecans or almonds mixed with butter, for added texture and richness.
How to Serve
No-Bake Cherry Cheesecake is best served cold, straight from the refrigerator. Its cool, creamy texture is especially refreshing after a rich meal.
For a clean presentation, wipe the knife between slices to create smooth, sharp edges. Serve each slice with a dollop of whipped cream if desired.
This cheesecake pairs beautifully with coffee, tea, or even a light dessert wine. It’s equally suited for casual family dinners and more formal gatherings.
Tips & Variations
Use full-fat cream cheese for the best texture and flavor. Reduced-fat versions can result in a softer, less stable filling.
Make sure all ingredients are at room temperature before mixing. This helps prevent lumps in the filling.
Be patient with the chilling process. Cutting too early can cause the cheesecake to lose its shape.
If you prefer a firmer cheesecake, you can reduce the whipped cream slightly or add a small amount of gelatin, though the classic version sets beautifully on its own.
Final Thoughts
No-Bake Cherry Cheesecake is the definition of effortless elegance. It combines classic flavors, a luxurious texture, and a stress-free method into one unforgettable dessert. Every bite offers creamy richness, buttery crunch, and fruity brightness—all without ever turning on the oven.
This recipe is perfect for beginners, busy schedules, warm weather, and anyone who loves timeless desserts with modern convenience. It’s reliable, adaptable, and always impressive.
Whether you’re making it for a holiday, a celebration, or simply because you’re craving something sweet and comforting, No-Bake Cherry Cheesecake delivers every time. It’s a dessert that proves you don’t need complexity to create something truly special.
Frequently Asked Questions
Can I make No-Bake Cherry Cheesecake ahead of time?
Yes. This cheesecake is ideal for making ahead and can be prepared up to 24 hours in advance.
Can I freeze no-bake cheesecake?
Yes, you can freeze it without the topping. Thaw in the refrigerator before adding the cherry layer and serving.
Can I reduce the sugar?
You can slightly reduce the powdered sugar, but keep in mind it affects both sweetness and structure.
Can I use homemade cherry topping?
Absolutely. A homemade cherry compote works beautifully and allows you to control sweetness.
No-Bake Cherry Cheesecake – A Dreamy, Creamy Dessert Delight
Ingredients
For the Graham Cracker Crust
-
- 2 cups graham cracker crumbs
-
- 1/2 cup unsalted butter, melted
-
- 1/4 cup granulated sugar
For the No-Bake Cheesecake Filling
-
- 16 oz (450 g) cream cheese, softened
-
- 1 cup powdered sugar
-
- 1 teaspoon vanilla extract
-
- 1 cup heavy whipping cream
For the Cherry Topping
-
- 1 can (21 oz / 595 g) cherry pie filling
Instructions
Start by placing the graham crackers into a food processor and pulse until fine crumbs form. If you don’t have a food processor, place the crackers in a sealed plastic bag and crush them using a rolling pin until finely ground.
Transfer the crumbs to a mixing bowl. Add the granulated sugar and stir to combine. Pour in the melted butter and mix thoroughly until all the crumbs are evenly coated and resemble wet sand.
Press the mixture firmly into the bottom of a 9-inch springform pan or pie dish. Use the bottom of a glass or measuring cup to press the crust tightly and evenly. This step is important to ensure the crust holds together when slicing.
Place the crust in the refrigerator to chill for at least 20–30 minutes while you prepare the filling.
In a large mixing bowl, pour in the cold heavy whipping cream. Using a hand mixer or stand mixer fitted with the whisk attachment, beat the cream on medium-high speed until stiff peaks form.
Stiff peaks mean the cream holds its shape when the whisk is lifted. Be careful not to overwhip, as this can cause the cream to become grainy. Set the whipped cream aside in the refrigerator.
In a separate large bowl, add the softened cream cheese. Beat on medium speed until completely smooth and creamy, scraping down the sides of the bowl as needed.
Add the powdered sugar and vanilla extract. Continue mixing until the mixture is silky, smooth, and free of lumps. Take your time here—this step ensures a perfectly creamy cheesecake texture.
Remove the whipped cream from the refrigerator. Using a spatula, gently fold the whipped cream into the cream cheese mixture.
Fold slowly in a circular motion, lifting from the bottom of the bowl to keep the filling light and airy. Continue folding until fully combined and smooth, with no streaks remaining.
Remove the chilled crust from the refrigerator. Spoon the cheesecake filling over the crust and spread it evenly using a spatula.
Smooth the top as much as possible for a clean, professional finish. Gently tap the pan on the counter once or twice to remove any air bubbles.
Cover the cheesecake loosely with plastic wrap or foil and place it in the refrigerator.
Allow it to chill for at least 4–6 hours, but overnight is highly recommended for the best texture and clean slices. The filling will firm up as it chills while remaining creamy.
Just before serving, remove the cheesecake from the refrigerator. Spoon the cherry pie filling evenly over the top of the cheesecake.
Use the back of a spoon to gently spread the cherries, allowing some of the sauce to naturally drip toward the edges for a beautiful presentation.
Carefully release the cheesecake from the springform pan. For clean slices, use a sharp knife and wipe it clean between each cut.
Serve the cheesecake chilled, optionally garnished with whipped cream or fresh cherries.