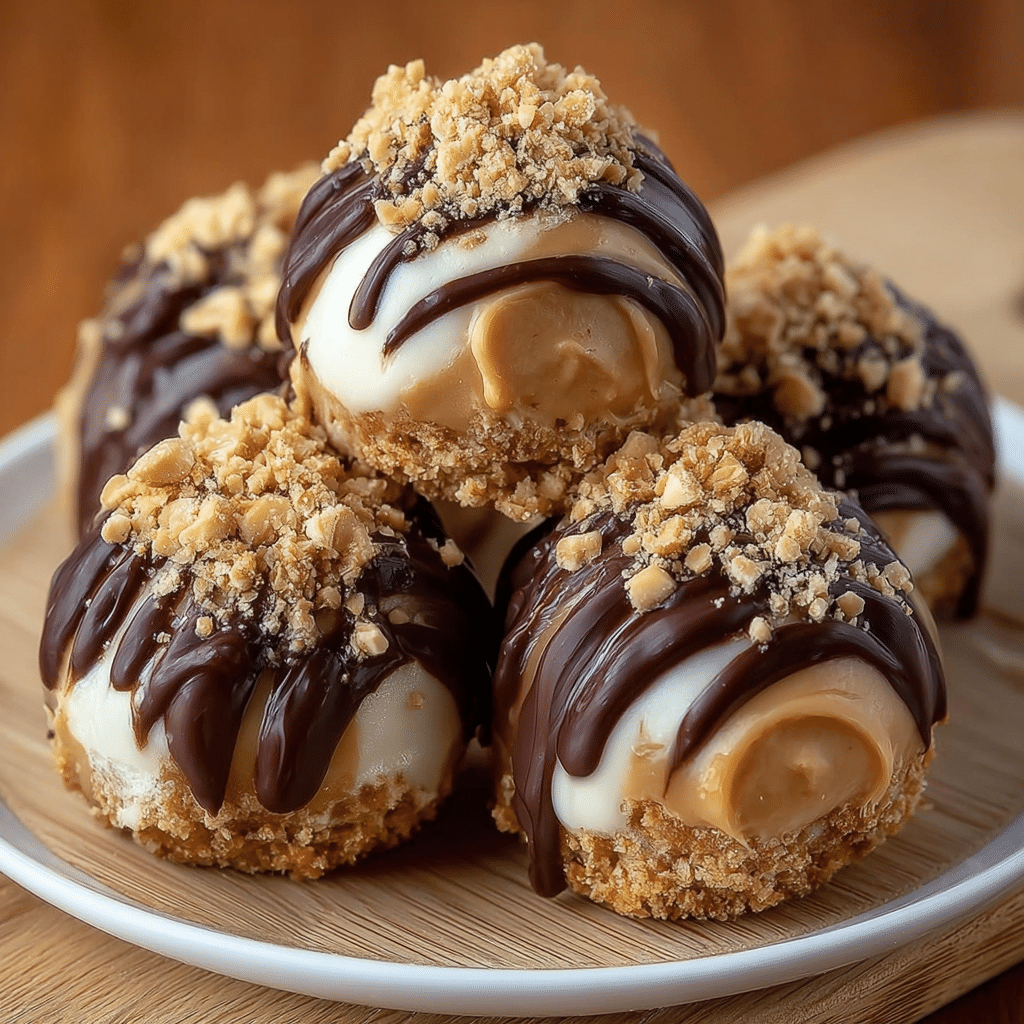
Sometimes you want a dessert that feels indulgent and satisfying, but without turning on the oven or spending hours in the kitchen. That’s where these No-Bake Peanut Butter Cheesecake Balls come in—a creamy, bite-sized treat that combines the tang of cheesecake, the richness of peanut butter, and the buttery crunch of graham crackers in one irresistible bite.
Each ball is a little flavor bomb: smooth, velvety cheesecake filling infused with peanut butter, shaped into poppable pieces and rolled in a buttery graham cracker mixture. You can enjoy them plain, chill them for a firmer texture, or dip them in chocolate for an even more decadent dessert that tastes like a cross between a peanut butter cup and cheesecake.
What makes these cheesecake balls especially appealing is just how simple and flexible they are. There’s no baking, no water bath, no worrying about cracks or oven temperatures. With a bowl, a spoon, and a bit of chilling time, you get a dessert that looks impressive but is surprisingly easy to put together. They’re perfect for parties, dessert platters, lunchbox treats, or those moments when you just need a sweet bite straight from the fridge.
Whether you’re a peanut butter lover, a cheesecake fan, or just someone who appreciates no-fuss desserts, these No-Bake Peanut Butter Cheesecake Balls are the kind of recipe that quickly becomes a favorite. Once you’ve tried them, you’ll find yourself making them for everything—from casual movie nights to special celebrations.
Core Ingredients for Making the Recipe
To prepare these creamy, no-bake Peanut Butter Cheesecake Balls, you’ll need just a handful of everyday ingredients, most of which you may already have in your pantry or fridge. The recipe is built around three simple components: the graham cracker mixture, the creamy cheesecake-peanut butter filling, and optional toppings for extra flair.
For the Graham Cracker Mixture
This mixture adds a buttery, slightly crunchy texture and warm flavor that complements the peanut butter filling. It’s used both inside the mixture and as a coating for the balls.
- 1 ½ cups (about 150 g) graham cracker crumbs
- 6 tablespoons unsalted butter, melted
- 2 tablespoons granulated sugar
For the Peanut Butter Cheesecake Filling
This is the heart of the recipe: creamy, tangy, and rich with peanut butter flavor.
- 8 oz (225 g) cream cheese, softened to room temperature
- 1/2 cup creamy peanut butter (not natural with separated oil, if possible)
- 1/2 cup powdered sugar, sifted
- 1 teaspoon vanilla extract
- Pinch of salt (optional, to balance sweetness and enhance flavor)
Optional Add-Ins
These are not required, but they add texture and personality if you want to customize the recipe.
- 1/4 cup mini chocolate chips or finely chopped chocolate
- 1/4 cup finely chopped peanuts (for added crunch in the filling)
For Optional Chocolate Coating or Drizzle
If you want a more indulgent, candy-like result, you can coat or drizzle the cheesecake balls in chocolate.
- 1 cup chocolate chips or chopped chocolate (milk, dark, or semi-sweet)
- 1 teaspoon coconut oil or neutral oil (to help the chocolate melt smoothly)
You can leave them simply rolled in graham cracker crumbs for a lighter dessert or go all-in with a full chocolate coating. Either way, you get a beautiful, crowd-pleasing treat.
Step-by-Step

These No-Bake Peanut Butter Cheesecake Balls come together in a series of simple steps: mix, chill, roll, and optionally coat in chocolate. Here’s how to make them from start to finish.
1. Prepare the Graham Cracker Mixture
In a medium bowl, combine the graham cracker crumbs, granulated sugar, and melted butter.
Stir until the mixture looks like moist sand and the crumbs are evenly coated with butter. The texture should hold together when you press a bit between your fingers. If it feels too dry and crumbly, you can add an extra teaspoon or two of melted butter until it just comes together.
Once mixed, set aside about 1/2 cup of this crumb mixture in a separate small bowl. You’ll use it later to roll the cheesecake balls in, giving them a lovely, slightly crunchy outer layer. Keep the rest of the crumb mixture nearby—you’ll fold some into the filling to add flavor and texture.
2. Make the Peanut Butter Cheesecake Filling
In a large mixing bowl, add the softened cream cheese. Beat it with a hand mixer (or a sturdy whisk) until smooth, creamy, and free of lumps. Properly softened cream cheese is key here—it should be easy to spread, not cold and solid.
Add the peanut butter to the bowl and beat again until the mixture is fully blended, creamy, and uniform in color. Scrape down the sides of the bowl as needed to make sure no streaks of plain cream cheese remain.
Next, add the powdered sugar, vanilla extract, and a pinch of salt if you’re using it. Beat on low speed at first to avoid a sugar cloud, then increase to medium speed until the mixture is silky, light, and slightly thickened.
At this stage, the filling should taste like a smooth peanut butter cheesecake—sweet, tangy, and rich, but still spoonable. If you want it slightly sweeter, you can add an extra tablespoon or two of powdered sugar. If you prefer it less sweet, the existing amount provides a nice balance once combined with the buttery crumbs and any chocolate you might add later.
3. Fold in the Graham Cracker Mixture and Optional Add-Ins
Take about 1 cup of the graham cracker mixture (not the reserved 1/2 cup you set aside for rolling) and gently fold it into the peanut butter cheesecake filling. Use a spatula to combine, turning the mixture over until the crumbs are evenly distributed.
This step gives the cheesecake balls more body and a subtle crunch, while reinforcing that classic cheesecake “crust” flavor inside each bite.
If you’re using mini chocolate chips or chopped peanuts, fold them in at this point as well. They add delightful pops of texture and flavor without overpowering the creamy filling.
4. Chill the Mixture
Once everything is well combined, cover the bowl tightly with plastic wrap or a reusable lid.
Place the bowl in the refrigerator for at least 1–2 hours, or until the mixture is firm enough to scoop and roll into balls without sticking too much to your hands. The chilling time allows the butter in the crumb mixture to firm up and the cream cheese mixture to thicken, which makes shaping the balls much easier.
If you’re in a hurry, you can speed things up by placing the bowl in the freezer for about 20–30 minutes, but keep an eye on it so it doesn’t freeze solid. You want it firm, not rock hard.
5. Shape the Cheesecake Balls
Once the mixture has chilled and firmed up, remove it from the refrigerator.
Using a small cookie scoop or a tablespoon, scoop portions of the mixture and roll them between your palms to form balls about 1 to 1.5 inches in diameter. Try to keep them roughly the same size so they chill and serve evenly.
If the mixture starts to stick to your hands, you can lightly dust your palms with powdered sugar or chill the bowl again briefly between batches.
Continue rolling until all the mixture is used. You should end up with a tray of smooth, rounded cheesecake balls, ready for their final finishing touches.
6. Roll in Graham Cracker Crumbs
Remember the reserved 1/2 cup of graham cracker mixture from earlier? Pour it into a shallow dish or small bowl.
Take each cheesecake ball and gently roll it in the crumb mixture, pressing lightly so the crumbs adhere to the surface and form an even coating. This not only enhances the appearance but also reinforces that cheesecake-with-a-crust flavor in every bite.
Once coated, place the balls on a parchment-lined tray or plate. At this point, you can serve them as they are or move on to the optional chocolate coating for a richer, candy-like treat.
7. Optional: Coat or Drizzle with Chocolate
If you’d like to add a chocolate shell or drizzle, place the chocolate and coconut oil in a microwave-safe bowl.
Microwave in short 20–30 second bursts, stirring between each, until the chocolate is fully melted and smooth. Alternatively, you can melt the chocolate over a double boiler on the stove.
To coat the balls fully, use a fork or dipping tool:
- Drop one cheesecake ball into the melted chocolate.
- Gently roll it around to coat completely.
- Lift it out with the fork, letting excess chocolate drip back into the bowl.
- Place it on a parchment-lined tray to set.
For a lighter touch, you can simply drizzle chocolate over the crumb-coated balls using a spoon or piping bag. This adds visual appeal and a hint of chocolate flavor without fully covering them.
Once coated or drizzled, return the tray to the refrigerator for about 20–30 minutes, or until the chocolate is set and the balls are firm.
8. Chill and Serve
After the final chill, your No-Bake Peanut Butter Cheesecake Balls are ready to enjoy.
Serve them straight from the refrigerator for the best texture: cool, creamy, and firm enough to hold their shape, with a satisfying bite that gives way to a lush, silky center.
Flavor Variations and Creative Twists
One of the strengths of this recipe is how easily you can tailor it to your taste or the occasion. By changing the coating, mixing in different flavors, or adjusting the sweetness, you can create endless variations while keeping the same basic method.
1. Chocolate Lover’s Version
If you want a richer, more indulgent dessert, lean into chocolate:
- Use chocolate graham crackers or chocolate wafer crumbs in place of regular graham crackers.
- Fold in extra mini chocolate chips into the filling.
- Fully coat each cheesecake ball in dark or semi-sweet chocolate.
This turns the dessert into something that tastes like a cross between a peanut butter cup, a truffle, and cheesecake.
2. Crunchy Peanut Twist
Love texture? Try these adjustments:
- Use crunchy peanut butter instead of creamy.
- Fold in extra chopped roasted peanuts into the filling.
- After dipping in chocolate, sprinkle the tops with a few chopped peanuts for a decorative and crunchy finish.
This version is ideal for peanut lovers who enjoy a bit of bite in each piece.
3. Salted Peanut Butter Cheesecake Balls
For a more sophisticated flavor profile, add a touch of salt:
- Use a slightly salted peanut butter or add an extra pinch of fine sea salt to the filling.
- After coating with chocolate, sprinkle the tops with flaky sea salt.
The contrast between sweet cheesecake, rich peanut butter, and salty crunch creates a memorable dessert that feels grown-up yet still comforting.
4. Nut-Free Variation
If you need a peanut-free version, you can swap the peanut butter for another spread:
- Use sunflower seed butter, cookie butter (speculoos), or tahini instead of peanut butter.
- Adjust the sweetness slightly depending on how sweet or bitter your chosen spread is.
This allows you to accommodate allergies or preferences while keeping the silky cheesecake texture.
5. Festive Holiday Version
You can also dress these cheesecake balls up for holidays or special occasions:
- Add a touch of cinnamon or pumpkin pie spice to the filling for a fall-inspired treat.
- Use colored sprinkles or crushed candy canes to decorate the tops of chocolate-coated balls for Christmas.
- Roll the balls in colored sanding sugar or edible glitter for birthdays or themed parties.
The basic recipe becomes a blank canvas you can decorate for any season.
How to Serve
These No-Bake Peanut Butter Cheesecake Balls are wonderfully flexible when it comes to serving.
As a Party Dessert
Arrange the chilled balls on a pretty platter or tiered stand. Mix and match versions—some just crumb-coated, some drizzled with chocolate, some fully coated—for a visually appealing dessert spread. Guests can pick them up easily with their fingers or with small cocktail picks.
They’re ideal for:
- Potlucks
- Birthday parties
- Holiday dessert tables
- Casual get-togethers
Because they are bite-sized, they feel indulgent without being overwhelming.
As a Sweet Snack
Keep a small container of these in the refrigerator for quick treats.
They’re perfect when you want something sweet after a meal or need a mid-afternoon pick-me-up. The combination of cream cheese, peanut butter, and a bit of sugar makes them more satisfying than a plain candy, and one or two pieces are often enough to feel indulgent.
As a Gift
These cheesecake balls also make a charming homemade gift.
Place a few in small candy cups, nestle them into a decorative box or tin, and add a ribbon. Because they need refrigeration, they’re best gifted to friends, family, or coworkers who can store them quickly—but they make a lovely surprise for neighbors, teachers, or hosts.
Tips & Variations
To get the best results from your No-Bake Peanut Butter Cheesecake Balls, a few simple tips can make a big difference.
1. Use Room-Temperature Cream Cheese
Softened cream cheese is much easier to beat until smooth. If your cream cheese is too cold, you risk small lumps that are hard to remove. Let it sit at room temperature for about 30 minutes before mixing.
2. Choose the Right Peanut Butter
For the smoothest filling, use standard creamy peanut butter rather than natural peanut butter where the oil separates. Natural peanut butter can make the mixture too oily or loose. If you must use natural, stir it very well and be prepared to add a little extra powdered sugar or graham crumbs to help thicken the mixture.
3. Adjust Sweetness to Taste
Because both the powdered sugar and graham cracker crumbs add sweetness, you’re free to tweak the sugar amount.
- For a less sweet dessert, reduce the powdered sugar slightly and rely more on the natural sweetness of the graham crackers and chocolate coating.
- For a sweeter result, add an extra tablespoon or two of powdered sugar to the filling and taste as you go.
4. Don’t Skip Chilling
Chilling is crucial. If you try to roll the mixture before it’s firm, it will be sticky and difficult to shape. Let the fridge do the work—chilling makes the mixture more manageable and helps the balls hold their shape.
5. Work in Batches
If your kitchen is warm or you’re making a large batch, you may find that the balls soften as you roll them. You can:
- Work with half the mixture at a time, keeping the rest in the refrigerator.
- Place rolled balls in the fridge while you work on the next batch to keep everything firm.
6. Store Properly
Because the filling contains cream cheese, always store the cheesecake balls in the refrigerator. Keep them in an airtight container to prevent them from absorbing other odors.
Final Thoughts
No-Bake Peanut Butter Cheesecake Balls are a celebration of simplicity, flavor, and convenience. They bring together the best parts of cheesecake—creamy, tangy richness—and the comfort of peanut butter, all wrapped in a sweet, buttery graham cracker coating.
There’s no oven to preheat, no complex techniques to master, and no long list of special ingredients. With just a few pantry staples and some chill time, you can create a dessert that feels polished and special, yet friendly and approachable enough for any day of the week.
They’re the kind of treat that fits just about any situation: a few bites after dinner, a tray at a party, a sweet homemade gift, or a stash in the fridge for those moments when you want something cozy and satisfying.
Most of all, these cheesecake balls prove that comfort doesn’t have to be complicated. A bowl, a spoon, a little patience while they chill—and in return, you’re rewarded with bites of creamy peanut butter cheesecake that feel indulgent, nostalgic, and incredibly easy to love.
FAQ
Can I make these cheesecake balls ahead of time?
Yes, you can—and they’re actually ideal for making ahead. Once rolled and coated (with crumbs or chocolate), store the cheesecake balls in an airtight container in the refrigerator. They’ll keep well for 3–4 days, and the flavor often improves as they sit and the ingredients meld together.
Can I freeze No-Bake Peanut Butter Cheesecake Balls?
Absolutely. These cheesecake balls freeze beautifully.
Place them on a tray in a single layer and freeze until firm. Then transfer them to a freezer-safe bag or container. They can be frozen for up to 2–3 months.
To serve, let them thaw in the refrigerator for a few hours or overnight. You can also enjoy them slightly frozen for a firmer, more chilled treat.
Can I use a different type of cookie instead of graham crackers?
Yes, you can substitute the graham cracker crumbs with other crushed cookies. Some great options include:
- Digestive biscuits
- Vanilla wafer cookies
- Chocolate graham crackers
- Biscoff or speculoos cookies
Keep the overall crumb amount the same and adjust the sugar slightly depending on how sweet your chosen cookie is.
Can I make this recipe gluten-free?
Yes. To make these cheesecake balls gluten-free, simply use gluten-free graham crackers or another gluten-free cookie in place of regular graham crackers. Check any additional ingredients (such as chocolate or add-ins) to ensure they are certified gluten-free.
Can I skip the chocolate coating?
Definitely. The chocolate coating is completely optional. The cheesecake balls are delicious simply rolled in the graham cracker mixture. Without chocolate, they taste lighter but still rich and satisfying, making them a great everyday dessert or snack.
Can I use crunchy peanut butter?
Yes, crunchy peanut butter works well and adds extra texture. If you enjoy small pieces of peanut in each bite, crunchy peanut butter is a great choice. You can also combine creamy peanut butter with chopped peanuts for balance.
Can I reduce the fat or use low-fat cream cheese?
You can use reduced-fat cream cheese if you’d like a slightly lighter dessert, but avoid fat-free cream cheese, as it doesn’t set as well and can give the filling a watery or rubbery texture. Reduced-fat cream cheese will still yield a creamy filling, though it may be a bit softer than full-fat.
Do I need special equipment to make this recipe?
No special equipment is required. A hand mixer makes the filling smoother and quicker to prepare, but you can also use a sturdy whisk and some patience. For shaping, a small cookie scoop helps keep the balls uniform in size, but a simple tablespoon works just fine.