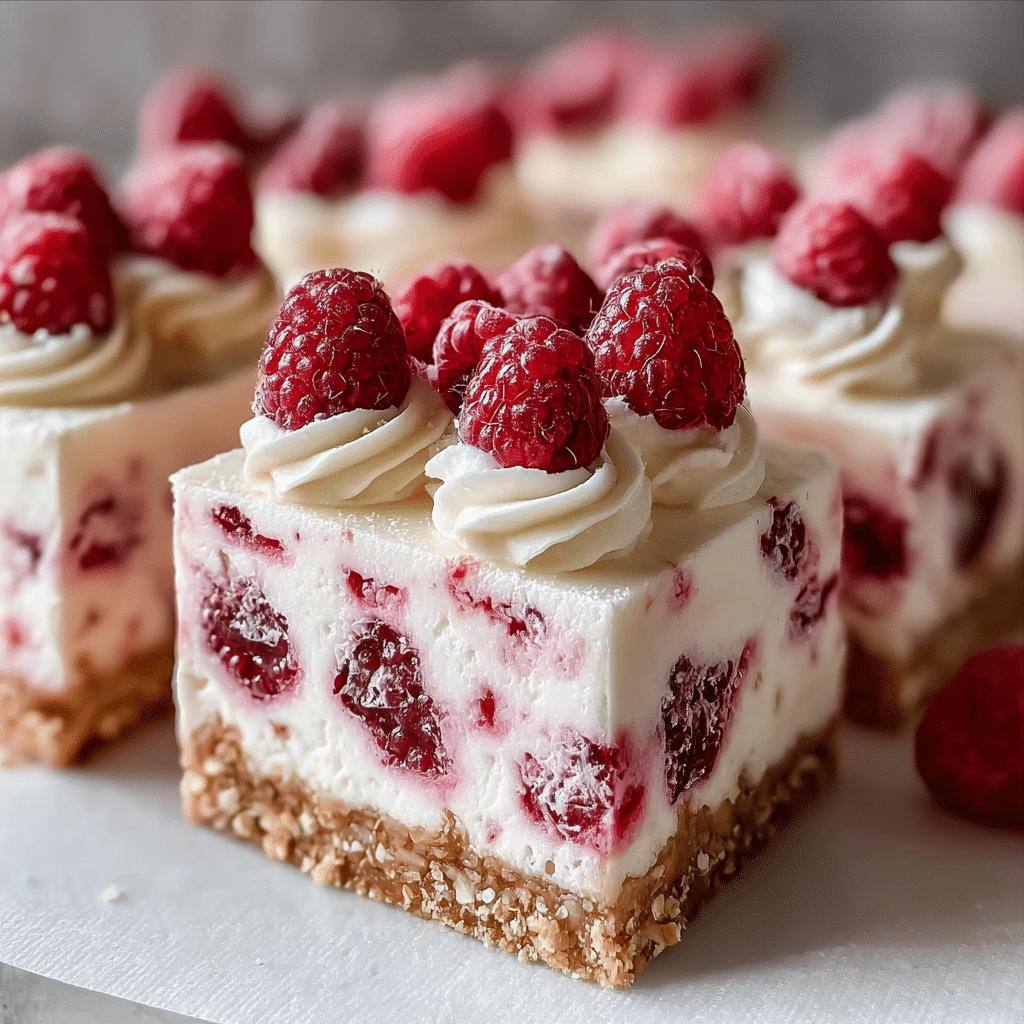
No-Bake Raspberry Cream Dream Bars are the kind of dessert that feels luxurious and effortless at the same time.
They combine a buttery, cookie-style base with a smooth, cloud-like cream filling and a vibrant raspberry layer that adds brightness, color, and a perfectly balanced tang.
The best part? There’s no oven required, making them ideal for warm days, busy schedules, or whenever you want an impressive dessert without the stress of baking.
These bars are elegant enough for celebrations, holidays, and special gatherings, yet simple enough to prepare for a quiet weekend treat.
Each bite delivers contrast: crisp meets creamy, sweet meets tart, rich meets refreshing.
If you love desserts that feel indulgent but light, nostalgic yet modern, these raspberry cream bars are about to become a favorite in your kitchen.
Why You’ll Love These No-Bake Raspberry Cream Dream Bars
There are many reasons this recipe deserves a permanent spot in your dessert rotation:
- No baking required – perfect for summer or when you want to keep the kitchen cool
- Make-ahead friendly – ideal for parties and events
- Beautiful layers – a dessert that looks as good as it tastes
- Balanced sweetness – the raspberries cut through the richness of the cream
- Beginner-friendly – no special techniques or equipment needed
Whether you’re hosting guests or simply craving something creamy and fruity, these bars deliver comfort and elegance in every square.
Preparation Time & Chilling Time
- Active preparation time: 30–40 minutes
- Chilling time: 4–6 hours (or overnight for best results)
- Total time: About 5–6 hours including chilling
While the bars need time to set in the refrigerator, the hands-on work is minimal, making this a low-effort, high-reward dessert.
Core Ingredients for Making the Recipe
To prepare these No-Bake Raspberry Cream Dream Bars, you’ll need simple, easy-to-find ingredients that work together to create rich layers and vibrant flavor.
For the Crust
- 2 cups graham cracker crumbs (or digestive biscuits)
- ½ cup unsalted butter, melted
- 2 tablespoons granulated sugar
For the Cream Layer
- 2 cups heavy whipping cream, cold
- 12 oz (340 g) cream cheese, softened
- ¾ cup powdered sugar
- 1 teaspoon vanilla extract
- 1 tablespoon lemon juice (optional, for brightness)
For the Raspberry Layer
- 2 cups fresh or frozen raspberries
- ¼ cup granulated sugar
- 1 tablespoon lemon juice
- 2 teaspoons cornstarch + 2 tablespoons water
Optional Garnishes
- Fresh raspberries
- White chocolate shavings
- Mint leaves
Step-by-Step

Step 1: Prepare the Crust
Start by lining a 9×13-inch baking dish with parchment paper, leaving some overhang on the sides for easy removal later.
In a medium bowl, combine the graham cracker crumbs, melted butter, and sugar.
Mix until the crumbs are evenly coated and resemble wet sand.
Press the mixture firmly into the bottom of the prepared dish, creating an even layer.
Use the bottom of a glass or measuring cup to smooth and compact the crust.
Place the crust in the refrigerator to chill while you prepare the filling.
Step 2: Make the Raspberry Layer
In a small saucepan, add the raspberries, sugar, and lemon juice.
Cook over medium heat, stirring gently, until the raspberries break down and release their juices.
In a small bowl, whisk together the cornstarch and water.
Pour this slurry into the raspberry mixture and continue cooking for 2–3 minutes until thickened.
Remove from heat and allow the raspberry sauce to cool completely.
It should be thick, glossy, and spreadable.
Step 3: Prepare the Cream Filling
In a large mixing bowl, beat the softened cream cheese until smooth and fluffy.
Add the powdered sugar, vanilla extract, and lemon juice.
Beat again until fully combined and silky.
In a separate bowl, whip the cold heavy cream until stiff peaks form.
Gently fold the whipped cream into the cream cheese mixture in batches, using a spatula and light motions to keep the filling airy.
Step 4: Assemble the Bars
Remove the crust from the refrigerator.
Spread half of the cream filling evenly over the chilled crust, smoothing the top with a spatula.
Spoon the cooled raspberry layer over the cream filling and gently spread it into an even layer.
Top with the remaining cream mixture, smoothing carefully to preserve the layers beneath.
Step 5: Chill Until Set
Cover the dish and refrigerate for at least 4–6 hours, or preferably overnight.
This chilling time allows the layers to firm up and the flavors to meld beautifully.
Step 6: Slice and Serve
Once fully chilled, lift the bars out using the parchment overhang.
Slice into squares using a sharp knife, wiping the blade between cuts for clean edges.
Garnish with fresh raspberries or white chocolate shavings if desired.
Flavor Variations and Creative Twists
One of the joys of this recipe is how adaptable it is.
Here are a few ways to make it your own:
Berry Mix Dream Bars
Replace half the raspberries with strawberries or blueberries for a mixed-berry flavor.
Chocolate Raspberry Bars
Add a thin layer of melted dark or white chocolate on top of the crust before spreading the cream layer.
Lemon Raspberry Cream Bars
Increase the lemon juice slightly and add lemon zest to the cream filling for a brighter citrus note.
Almond Crust Variation
Swap graham crackers for crushed almond cookies or shortbread for a nuttier base.
How to Serve
These No-Bake Raspberry Cream Dream Bars are incredibly versatile when it comes to serving.
Serve them chilled straight from the refrigerator for a refreshing, creamy dessert on warm days.
They pair beautifully with coffee, tea, or a glass of cold milk.
For special occasions, plate each bar individually with a drizzle of raspberry sauce and a few fresh berries on the side.
If you want an extra-indulgent presentation, add a dollop of whipped cream and a sprinkle of white chocolate curls.
Tips & Variations for Best Results
- Use cold cream when whipping to achieve stiff peaks
- Let the raspberry layer cool fully before assembling to avoid melting the cream
- Chill overnight for the cleanest slices and best texture
- Line the pan with parchment for easy removal
- Don’t overmix the cream filling—gentle folding keeps it light and fluffy
Storage & Make-Ahead Instructions
These bars store exceptionally well, making them perfect for planning ahead.
- Refrigerator: Store in an airtight container for up to 4 days
- Freezer: Freeze individual bars wrapped tightly for up to 2 months
- To serve from frozen: Thaw in the refrigerator overnight
The texture remains creamy and smooth, even after freezing.
Final Thoughts
No-Bake Raspberry Cream Dream Bars are proof that stunning desserts don’t need complicated techniques or hours in the kitchen.
With their crisp base, airy cream filling, and vibrant raspberry layer, they deliver elegance, freshness, and comfort in every bite.
This recipe is ideal for anyone who loves desserts that feel special yet approachable.
Whether you’re preparing them for guests or enjoying a quiet treat at home, these bars bring a sense of indulgence without effort.
Once you try them, they’re bound to become one of those recipes you return to again and again—reliable, beautiful, and irresistibly delicious.
Frequently Asked Questions (FAQ)
Can I use frozen raspberries?
Yes, frozen raspberries work perfectly. There’s no need to thaw them first.
Can I make these bars ahead of time?
Absolutely. They taste even better the next day once fully chilled.
Can I reduce the sugar?
Yes. You can slightly reduce the sugar in both the cream and raspberry layers without affecting texture.
What can I use instead of graham crackers?
Digestive biscuits, vanilla wafers, or shortbread cookies all work well.
Do these bars need to stay refrigerated?
Yes. Because of the cream filling, they should be kept chilled until serving.

No-Bake Raspberry Cream Dream Bars
Ingredients
For the Crust
- 2 cups graham cracker crumbs (or digestive biscuits)
- ½ cup unsalted butter, melted
- 2 tablespoons granulated sugar
For the Cream Layer
- 2 cups heavy whipping cream, cold
- 12 oz (340 g) cream cheese, softened
- ¾ cup powdered sugar
- 1 teaspoon vanilla extract
- 1 tablespoon lemon juice (optional, for brightness)
For the Raspberry Layer
- 2 cups fresh or frozen raspberries
- ¼ cup granulated sugar
- 1 tablespoon lemon juice
- 2 teaspoons cornstarch + 2 tablespoons water
Optional Garnishes
- Fresh raspberries
- White chocolate shavings
- Mint leaves