1️⃣ INTRODUCTION
There’s something incredibly satisfying about transforming simple garlic cloves into a bold, tangy, flavor-packed condiment that elevates almost anything it touches. Pickled garlic is one of those small kitchen projects that delivers big rewards — crunchy, zesty cloves infused with warm spices and just the right balance of heat and sweetness. Once you try homemade pickled garlic, it’s hard to go back to store-bought versions.
The magic happens when fresh garlic meets a hot vinegar brine infused with peppercorns, mustard seeds, and a hint of chili heat. After a short rest in the refrigerator, the sharp bite of raw garlic mellows into something pleasantly tangy and aromatic. Whether tucked into sandwiches, tossed into salads, or served alongside grilled meats, these vibrant cloves add a punch of flavor that instantly brightens every bite.
2️⃣ WHY YOU WILL LOVE THIS RECIPE
- Bold, tangy flavor with a subtle spicy kick
- Quick and simple to prepare
- Ready in just 24 hours
- Perfect for meal prep and long-lasting storage
- Adds instant flavor to countless dishes
- Naturally dairy-free and gluten-free
- Beautifully aromatic and visually appealing
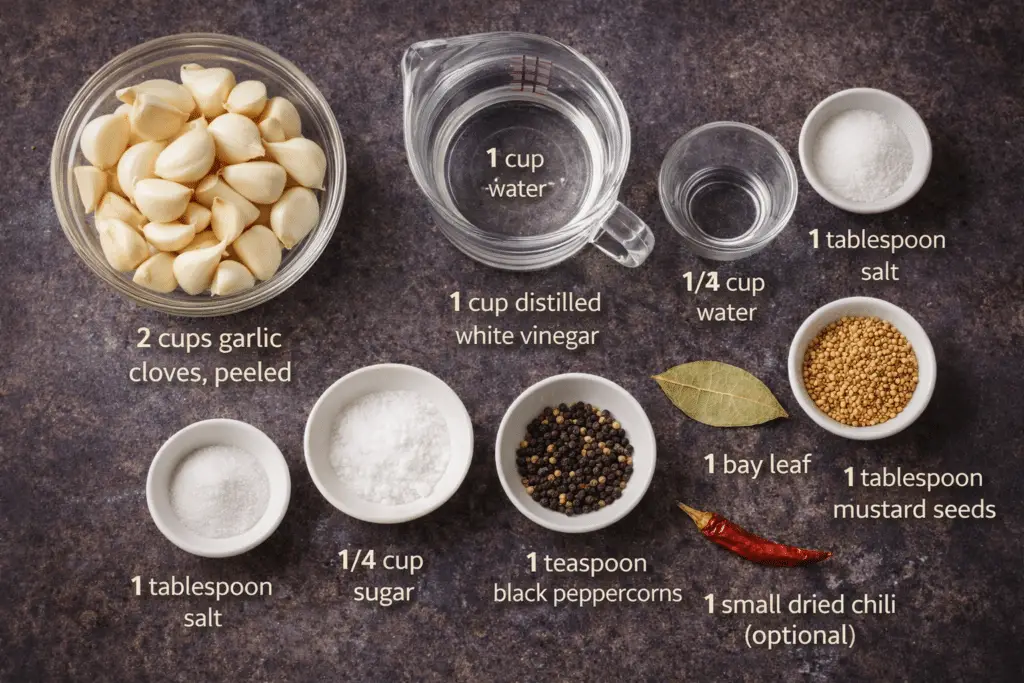
3️⃣ INGREDIENTS (WITH EXACT AMOUNTS)
• 2 cups garlic cloves, peeled – The star of the recipe, offering bold flavor that mellows beautifully when pickled.
• 1 cup distilled white vinegar – Provides the essential acidity for preservation and tangy flavor.
• 1/2 cup water – Balances the vinegar’s sharpness for a smoother brine.
• 1/4 cup sugar – Adds subtle sweetness to round out the acidity.
• 1 tablespoon salt – Enhances flavor and helps preserve the garlic.
• 1 teaspoon red pepper flakes – Brings gentle heat and visual appeal.
• 1 teaspoon black peppercorns – Adds earthy, aromatic spice.
• 1 bay leaf – Infuses a subtle herbal depth into the brine.
• 1 tablespoon mustard seeds – Contributes mild pungency and texture.
• 1 small dried chili (optional for extra heat) – Boosts the spice level for those who enjoy extra kick.
4️⃣ STEP-BY-STEP INSTRUCTIONS (DETAILED)
1. Prepare the Garlic
Begin by peeling the 2 cups garlic cloves, peeled carefully to keep them intact. Fresh, firm cloves work best for pickling, as they maintain a pleasant crunch. Trim away any tough root ends if necessary. Once peeled, transfer the cloves into a thoroughly cleaned and dry glass jar or heat-safe container. Make sure the jar is large enough to allow the brine to fully cover the garlic later on.
2. Make the Pickling Solution
In a small saucepan, combine 1 cup distilled white vinegar, 1/2 cup water, 1/4 cup sugar, and 1 tablespoon salt. Place the saucepan over medium heat. Stir occasionally to help dissolve the sugar and salt evenly. As the mixture heats, you’ll notice the sugar disappearing into the liquid — this is important for a balanced, uniform brine.
Bring the mixture to a gentle boil. Avoid rapid boiling, which can cause too much evaporation and alter the liquid ratio. Once you see steady bubbles forming across the surface, you’re ready for the next step.
3. Add the Spices
Carefully add 1 teaspoon red pepper flakes, 1 teaspoon black peppercorns, 1 tablespoon mustard seeds, 1 bay leaf, and 1 small dried chili (optional for extra heat) directly into the boiling brine. Reduce the heat slightly and allow the mixture to simmer for about 5 minutes.
This simmering stage is crucial. It allows the spices to bloom, releasing their essential oils and infusing the liquid with complex flavors. You’ll begin to smell the warm, spicy aroma developing — a sign that everything is coming together beautifully.
4. Pickling Process
Once the brine has simmered and the spices have infused, remove the saucepan from heat. Carefully pour the hot pickling solution over the garlic cloves in the jar. The liquid should completely submerge the garlic. If necessary, gently press the cloves down with a clean spoon to remove air pockets and ensure even exposure to the brine.
Submerging the garlic fully is essential for proper pickling. Any exposed pieces may discolor or develop uneven flavor. The hot liquid will begin the pickling process immediately, slightly softening the cloves while preserving their crunch.
5. Seal and Let It Sit
Tightly seal the jar with a lid. Allow it to cool at room temperature for 1–2 hours. As it cools, the garlic will continue absorbing the brine’s flavor. You may notice the garlic slightly changing color — this is completely normal.
After cooling, transfer the jar to the refrigerator. The garlic will be ready to enjoy after 24 hours, though the flavor deepens significantly after several days. The longer it marinates, the more complex and mellow the taste becomes.
6. Serve and Enjoy
Once pickled, your garlic cloves are ready to use in countless ways. Enjoy them straight from the jar for a tangy snack, slice them into salads for a punch of flavor, or add them to sandwiches and wraps. They pair beautifully with grilled meats, roasted vegetables, and charcuterie boards.
Store the jar in the refrigerator and always use clean utensils when removing cloves to maintain freshness.
5️⃣ VARIATIONS & CUSTOMIZATIONS
Extra Mild Version
If you prefer less heat, simply omit the 1 small dried chili (optional for extra heat). The garlic will still be flavorful and aromatic without the extra spice.
Sweeter Profile
For a slightly sweeter pickle, allow the garlic to marinate a few extra days. The sugar flavor becomes more pronounced over time as the cloves absorb the brine.
Heavier Spice Infusion
Let the brine simmer for the full 5 minutes without shortening the time. This enhances the depth of the mustard seeds and peppercorns.
Rustic Presentation
Serve the garlic cloves whole with visible peppercorns and mustard seeds for a beautiful, artisanal look on charcuterie boards.
Sliced Pickled Garlic
After 24 hours, slice a few cloves thinly and use them as a topping for burgers or grain bowls for even flavor distribution.
6️⃣ FAQ
How long does pickled garlic last in the refrigerator?
When stored properly in a sealed jar in the refrigerator, pickled garlic can last up to 2–3 weeks. Always ensure the cloves remain submerged in brine to maintain quality and safety.
Why did my garlic turn slightly blue or green?
Garlic can naturally react with acids and trace minerals, causing harmless color changes. This is a normal chemical reaction and does not affect flavor or safety.
Can I use pre-peeled garlic?
Yes, as long as it is fresh and firm. Avoid garlic that appears soft or has a strong odor before pickling.
Is it safe to store at room temperature?
This recipe is designed for refrigerator storage. Keep the jar chilled to ensure safety and preserve freshness.
Can I reuse the brine?
It’s best not to reuse the brine for another batch, as its acidity and flavor balance may change after the first use.
7️⃣ NUTRITION & TIME TABLE
| Category | Details |
|---|---|
| Prep Time | 20 minutes |
| Cooking Time | 5 minutes |
| Total Time | 25 minutes |
| Calories | 50 kcal |
| Protein | 0 g |
| Carbohydrates | 12 g |
| Fat | 0 g |

Pickled Garlic
Description
Bold, tangy, and perfectly spiced pickled garlic that adds vibrant flavor to any dish. Quick to prepare and ready in just 24 hours.
Ingredients
• 2 cups garlic cloves, peeled
• 1 cup distilled white vinegar
• 1/2 cup water
• 1/4 cup sugar
• 1 tablespoon salt
• 1 teaspoon red pepper flakes
• 1 teaspoon black peppercorns
• 1 bay leaf
• 1 tablespoon mustard seeds
• 1 small dried chili (optional for extra heat)
Instructions
1. Peel the garlic cloves and place them into a clean glass jar.
2. In a saucepan, combine vinegar, water, sugar, and salt. Bring to a boil, stirring until dissolved.
3. Add red pepper flakes, black peppercorns, mustard seeds, bay leaf, and optional dried chili. Simmer for 5 minutes.
4. Pour the hot brine over the garlic, ensuring it is fully submerged.
5. Seal the jar and let cool at room temperature for 1–2 hours.
6. Refrigerate for at least 24 hours before serving.