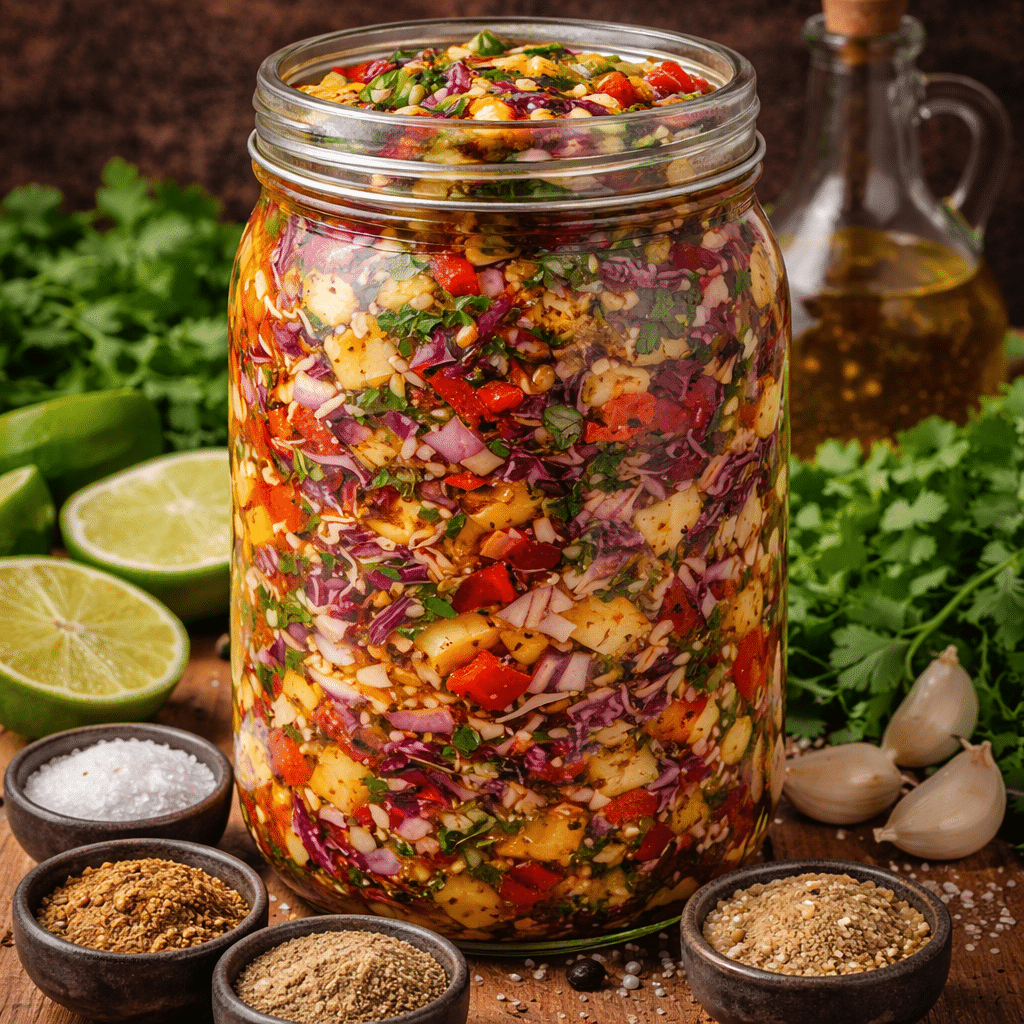
Bright, crunchy, tangy, and just a little spicy—Pickled Taco Vegetables are the kind of condiment that completely transforms a taco night. Imagine crisp cabbage, sweet pineapple, fiery jalapeños, and fragrant cilantro all soaking in a vibrant citrus-vinegar brine. Every bite delivers a burst of acidity, sweetness, and heat that wakes up your taste buds.
The beauty of Pickled Taco Vegetables lies in their bold contrast of flavors and textures. The crunch of cabbage, the juicy sweetness of pineapple, and the punchy spices combine into something irresistibly fresh. Whether piled high on fish tacos, spooned onto grilled meats, or tucked into burrito bowls, these colorful pickled vegetables add the finishing touch that makes a meal unforgettable. And once you have a few jars ready in the fridge, taco night suddenly becomes a lot more exciting.
Why You Will Love This Recipe
• Bright, bold flavors that elevate tacos instantly
• Sweet pineapple balances the acidity of the pickling brine
• Crunchy texture adds contrast to soft tortillas and fillings
• Great for meal prep since jars keep for months
• Naturally vibrant and colorful for beautiful taco presentation
• Works with fish tacos, chicken tacos, carnitas, or vegetarian dishes
• Easy batch recipe that yields multiple jars for future meals
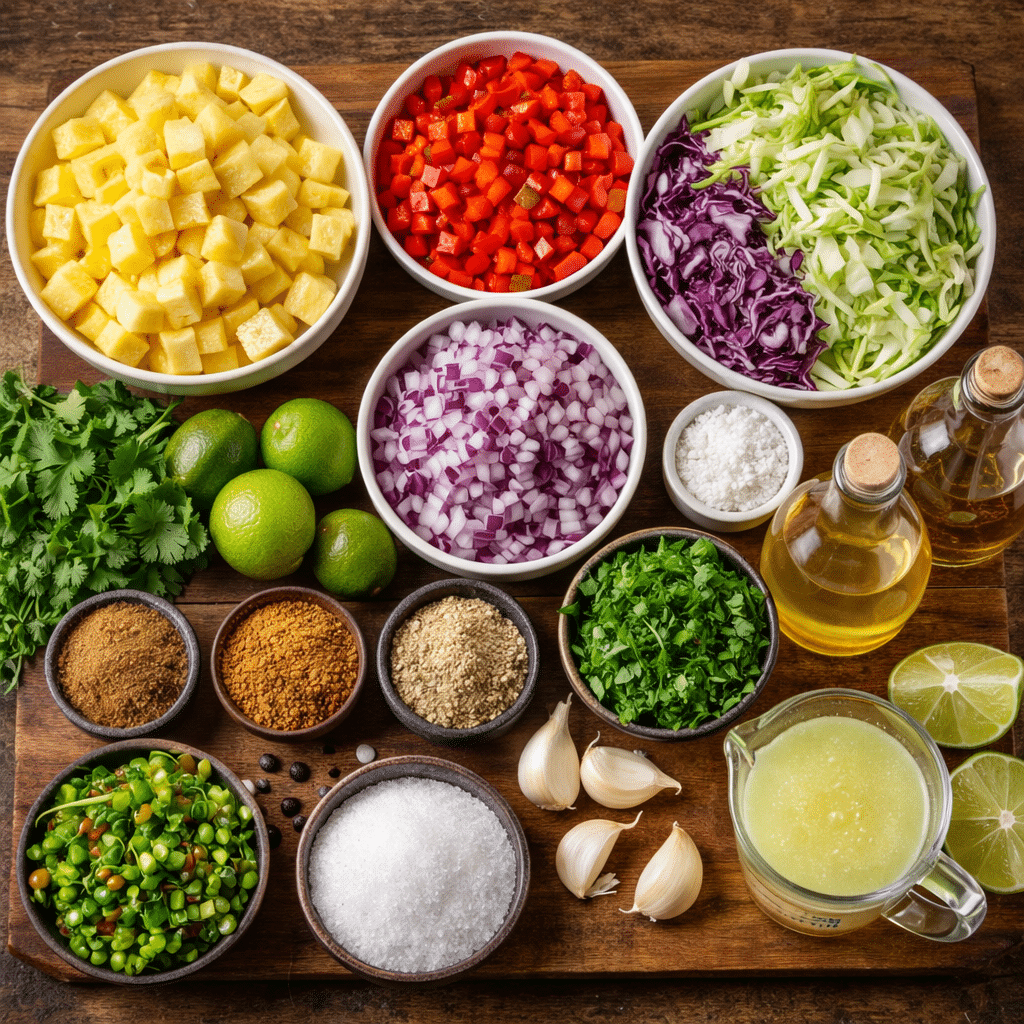
Ingredients
• 2 ripe pineapples, cleaned and cut into small pieces – Adds natural sweetness and juicy texture that balances the tangy brine.
• 2 large red bell peppers, cleaned and cut into small pieces – Provides mild sweetness and bright color.
• 1 small head red cabbage, shredded – Brings a crisp texture and vibrant purple hue.
• 1 medium head green cabbage, shredded – Adds crunchy structure and mild earthy flavor.
• 1 large red onion, diced – Introduces sharpness and aromatic bite.
• 6 jalapenos, seeded, stemmed and minced (more or less depending on how hot you like it) – Adds adjustable heat and depth of flavor.
• 1 cup fresh cilantro, coarsely chopped – Contributes fresh herbal brightness.
• 6 medium garlic cloves, minced – Infuses the mixture with savory aromatic flavor.
• 1/2 cup fresh lime juice, about 6 limes – Provides citrus acidity that enhances the pickling liquid.
• 3 cups cider vinegar – Adds tangy depth and mild sweetness to the brine.
• 3 cups white vinegar – Creates the classic sharp pickling acidity.
• 2 cups water – Balances the strength of the vinegar.
• 1/2 cup granulated sugar – Softens the acidity and highlights the pineapple sweetness.
• 2 tablespoons pickling salt – Preserves the vegetables and enhances flavor.
• 1 tablespoon ground cumin – Adds warm, earthy spice often found in Mexican cooking.
• 2 teaspoons ground coriander – Introduces subtle citrusy spice notes.
Step-by-Step

1. Prepare the Jars
Begin by filling a large pot or canner with water and bringing it to a boil. Carefully place eight 1-pint jars into the boiling water to sanitize them.
Allow the jars to remain in the water at a gentle boil until you’re ready to fill them. Keeping them hot prevents cracking and ensures proper sterilization for safe storage.
2. Mix the Vegetables
In a very large mixing bowl, combine the pineapple pieces, chopped red bell peppers, shredded red cabbage, shredded green cabbage, diced red onion, minced jalapeños, chopped cilantro, and minced garlic.
Toss everything together thoroughly. The goal is to distribute the ingredients evenly so each jar gets a balanced mixture of sweetness, crunch, herbs, and heat.
You’ll notice how colorful and fragrant the mixture already is.
3. Prepare the Pickling Liquid
In a medium saucepan, combine the fresh lime juice, cider vinegar, white vinegar, water, granulated sugar, pickling salt, ground cumin, and ground coriander.
Bring the mixture to a full boil over medium-high heat. Stir occasionally until the sugar and salt dissolve completely.
Once boiling, reduce the heat and allow it to simmer briefly. This helps the spices bloom and fully infuse the liquid with flavor.
4. Fill the Jars
Using jar tongs, carefully remove the hot sterilized jars from the boiling water.
Place a canning funnel over each jar and fill them with the vegetable mixture, leaving about one inch of space at the top.
Use the handle of a wooden spoon to gently press the vegetables down. This packs the mixture tightly while still allowing the pickling liquid to circulate.
Continue filling until all eight jars are evenly packed.
5. Add the Pickling Liquid
Bring the pickling liquid back to a gentle boil if needed.
Using a ladle, pour the hot liquid into each jar, again leaving about one inch of headspace.
Use the handle of a wooden spoon to poke around the edges of the jar. This releases trapped air bubbles and ensures the brine reaches every corner of the vegetables.
6. Sanitize the Lids
Place the jar lids in a small strainer or sieve.
Dip them into the boiling water for about 30 seconds to sanitize them. This quick step helps ensure a proper seal.
Carefully remove them and place them onto the jars.
7. Seal the Jars
Place the lids on each jar and twist the bands until they are finger-tight.
Return the sealed jars to the boiling water bath and process them for 10 minutes.
This final step ensures the jars seal properly and makes the pickled taco vegetables shelf-stable.
8. Cool and Store
Remove the jars carefully and place them on a towel or cooling rack.
Allow them to sit undisturbed until the lids pop, indicating a proper seal.
Store the sealed jars at room temperature for up to six months.
9. Serve
When ready to use, simply open a jar and drain the vegetables.
These Pickled Taco Vegetables are especially delicious spooned over fish tacos, but they also shine on shrimp tacos, grilled chicken tacos, carnitas, or even nachos.
Have you ever had tacos that felt like they were missing something? A scoop of these crunchy, tangy pickled vegetables might be exactly what they needed.
Pro Tips for Perfect Results
1. Cut vegetables evenly
Uniform pieces help the pickles absorb the brine evenly and improve the texture in every jar.
2. Pack jars firmly but not tightly
Too loose and the vegetables float; too tight and the brine can’t circulate.
3. Always leave one inch of headspace
This prevents overflow and helps jars seal correctly during processing.
4. Don’t skip removing air bubbles
Trapped air can interfere with proper sealing and shorten shelf life.
5. Taste your jalapeños first
Some peppers are much hotter than others, so adjusting the amount keeps the spice level balanced.
Variations & Customizations
If you enjoy extra heat, you can add a few additional jalapeños to the mixture. This intensifies the spicy kick while still balancing nicely with the sweetness of pineapple.
For a milder version, reduce the jalapeños slightly. The flavor will remain vibrant without overwhelming heat.
You can also chop the vegetables slightly finer if you prefer a topping that spreads more easily across tacos.
Some people enjoy letting the jars rest for a week before opening them. This allows the spices and vinegar to fully infuse the vegetables, creating even deeper flavor.
These Pickled Taco Vegetables are also fantastic beyond tacos. Try them over rice bowls, grilled meats, or even layered into sandwiches for a bright, tangy crunch.
Storage & Make Ahead
Once sealed properly, jars of Pickled Taco Vegetables can be stored at room temperature for up to six months.
After opening, keep the jar refrigerated and use within 2–3 weeks for the best flavor and texture.
Because the vegetables are fully pickled, freezing is not recommended. Freezing can soften the cabbage and change the texture significantly.
For reheating dishes that include the pickled vegetables, it’s best to add them after heating so they keep their crisp texture and bright flavor.
FAQ
How long do pickled taco vegetables need to sit before eating?
Technically, they can be eaten within 24 hours. However, waiting 3–5 days allows the vegetables to absorb more of the brine and spices. The flavor becomes deeper and more balanced over time.
What tacos go best with pickled taco vegetables?
These are especially delicious with fish tacos, shrimp tacos, grilled chicken tacos, and carnitas. The tangy acidity cuts through rich meats and complements seafood beautifully.
Can I make pickled taco vegetables less spicy?
Yes. Simply reduce the number of jalapeños or remove more of the seeds and membranes before mincing them. This will lower the heat while still keeping the flavor.
Why didn’t my jars seal properly?
Improper sealing can happen if the jar rims were not clean, if there wasn’t enough headspace, or if the jars weren’t processed long enough in the water bath.
How do I know if my pickled vegetables went bad?
If a jar lid is bulging, leaking, or has an unusual smell after opening, discard it. Properly sealed jars should remain safe and flavorful for months.
Can I use these pickled vegetables for other dishes?
Absolutely. Many people love adding Pickled Taco Vegetables to burrito bowls, salads, grilled meats, sandwiches, and even burgers for a burst of tangy crunch.
Nutrition & Time Table
| Category | Amount |
|---|---|
| Prep Time | 30 minutes |
| Cooking Time | 20 minutes |
| Total Time | 50 minutes |
| Calories | Varies by serving |
| Protein | Low |
| Carbohydrates | Moderate |
| Fat | Low |
Related Recipes
Print


Pickled Taco Vegetables
Description
Bright, crunchy, and tangy, these Pickled Taco Vegetables are the perfect topping for tacos, bowls, and grilled dishes. The combination of pineapple, cabbage, jalapeños, and spices creates a bold, vibrant flavor.
Ingredients
• 2 ripe pineapples, cleaned and cut into small pieces
• 2 large red bell peppers, cleaned and cut into small pieces
• 1 small head red cabbage, shredded
• 1 medium head green cabbage, shredded
• 1 large red onion, diced
• 6 jalapenos, seeded, stemmed and minced (more or less depending on how hot you like it)
• 1 cup fresh cilantro, coarsely chopped
• 6 medium garlic cloves, minced
• 1/2 cup fresh lime juice, about 6 limes
• 3 cups cider vinegar
• 3 cups white vinegar
• 2 cups water
• 1/2 cup granulated sugar
• 2 tablespoons pickling salt
• 1 tablespoon ground cumin
• 2 teaspoons ground coriander
Instructions
1. Prepare a large pot or canner with boiling water and place eight 1-pint jars inside to sanitize.
2. In a very large bowl combine pineapple, red bell pepper, red cabbage, green cabbage, red onion, jalapenos, cilantro, and garlic.
3. In a medium pot combine lime juice, cider vinegar, white vinegar, water, sugar, pickling salt, cumin, and coriander.
4. Bring the pickling liquid to a boil and reduce to a simmer.
5. Remove sterilized jars and fill each with the vegetable mixture, leaving one inch of headspace.
6. Press vegetables gently using the handle of a wooden spoon.
7. Ladle the hot pickling liquid into the jars, again leaving one inch from the top.
8. Use the spoon handle to release air bubbles.
9. Dip jar lids into boiling water for 30 seconds to sanitize.
10. Place lids on jars and tighten bands finger-tight.
11. Return jars to boiling water and process for 10 minutes.
12. Remove jars and allow them to cool until the lids pop.
13. Store sealed jars at room temperature for up to six months.
14. Drain before serving and use as a topping for tacos or Mexican dishes.