Some cakes ask you to cream butter, whip egg whites, chill dough, and dirty half the kitchen.
This one doesn’t.
This quick and creamy yogurt cake is the definition of “minimal effort, maximum reward.”
With only 3 plain yogurts, 2 eggs, a bit of sugar, flour, and cornstarch, you get a soft, custardy cake that tastes like a cross between a light cheesecake and a vanilla flan. The batter comes together in minutes—no mixer required if you don’t feel like it—and the oven does the rest.
It’s the kind of recipe you reach for when:
- You want dessert but don’t want to measure 15 ingredients.
- You have a few yogurts in the fridge approaching their date and refuse to waste them.
- Guests are on their way and you need something homemade, fast, and foolproof.
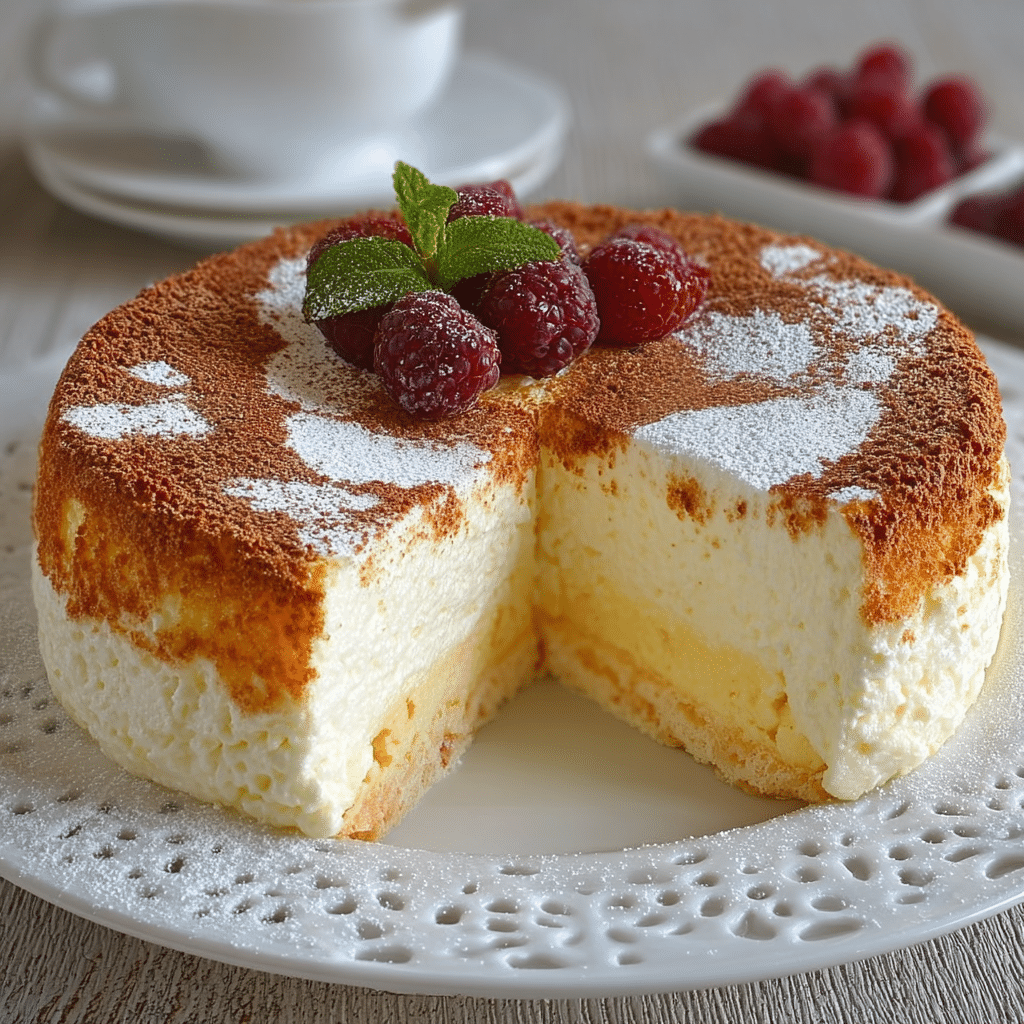
Once baked, the cake has a beautifully golden top, a creamy center, and a delicate, melt-in-your-mouth crumb. It’s delicious warm, even better chilled, and endlessly customizable with citrus zest, fruit toppings, or a dusting of powdered sugar.
Core Ingredients for Making the Recipe
One of the charms of this cake is how short the shopping list is. You may already have everything at home.
For the Quick and Creamy Yogurt Cake
- 3 plain yogurts (approx. 375 g total)
- Any plain, unsweetened yogurt works. Greek yogurt will give a slightly richer texture; regular yogurt makes the cake a little lighter and more custardy.
- 2 eggs
- Use medium or large eggs. They provide structure and help the cake set without being heavy.
- 120 g sugar
- Regular granulated sugar. You can reduce slightly if you prefer less sweetness.
- 40 g all-purpose flour
- Just enough to bind the batter and give it a cake-like structure without losing the creamy feel.
- 1 tablespoon cornstarch
- Helps thicken the batter and gives the cake its smooth, velvety texture.
Helpful but Optional Add-Ins
These keep the original recipe intact but add extra flavor. Use them if you like:
- 1 teaspoon vanilla extract or vanilla sugar
- Finely grated zest of 1 lemon or ½ orange
- A small pinch of salt (to balance sweetness)
For the Pan and Serving
- Butter or oil for greasing the pan
- 1–2 tablespoons flour or fine breadcrumbs for dusting the pan
- Powdered sugar, fresh berries, fruit compote, or a drizzle of honey (optional but lovely for serving)
Step-by-Step

This cake is wonderfully forgiving. As long as you mix the ingredients smoothly and bake until just set, you’ll end up with something delicious.
1. Prepare the Pan and Oven
- Preheat the oven to 170–175°C (340–350°F).
- This slightly gentler heat helps the cake cook through evenly without cracking or browning too quickly.
- Choose your pan
- A 20–22 cm (8–9 inch) round cake pan or springform works very well.
- You can also use a square pan of similar size if you prefer sliceable bars.
- Grease and line
- Lightly grease the bottom and sides of the pan with butter or a neutral oil.
- For extra insurance, line the base with a circle of baking paper.
- Dust the sides with a little flour or fine breadcrumbs and tap out the excess.
Preparing the pan properly makes it easy to release this delicate cake without tearing it.
2. Mix the Wet Ingredients
- Combine yogurt and eggs
- In a large mixing bowl, add the 3 yogurts and 2 eggs.
- Whisk gently until the mixture is smooth and uniform.
- Add sugar
- Add the 120 g sugar to the bowl.
- Whisk for 1–2 minutes until the sugar begins to dissolve and the mixture looks slightly paler.
- Optional aromatics
- If you’re using vanilla and/or citrus zest, whisk them in now along with a tiny pinch of salt.
- At this stage the mixture should be silky, pourable, and beautifully fragrant.
There’s no need to beat vigorously; over-beating can incorporate too much air and cause the cake to rise and collapse dramatically. Gentle and smooth is perfect.
3. Add the Dry Ingredients
- Combine flour and cornstarch
- In a small bowl, whisk together the 40 g flour and 1 tablespoon cornstarch.
- This helps distribute the cornstarch evenly so there are no thick, gummy spots.
- Sift into the wet mixture
- Sift the flour–cornstarch mixture directly over the yogurt batter to avoid lumps.
- Whisk gently
- Using a whisk or spatula, stir until the dry ingredients are just incorporated and you have a smooth, lump-free batter.
- Scrape around the bottom and sides of the bowl to make sure no pockets of flour remain.
The batter will be a little thinner than traditional cake batter—more like a thick custard or pancake batter. That’s exactly what gives the final cake its creamy texture.
4. Pour and Bake
- Transfer to the pan
- Pour the batter into your prepared pan.
- Tap the pan lightly on the counter a couple of times to release any large air bubbles.
- Bake
- Place the pan on the middle rack of the preheated oven.
- Bake for 30–40 minutes, depending on your oven and pan size.
- Check for doneness
- The cake is ready when:
- The edges are lightly golden and pulling away from the sides.
- The center is set but still has a very slight wobble when you gently jiggle the pan—similar to a baked cheesecake.
- A toothpick inserted near the center may come out with a few moist crumbs or a light creamy smear, but not raw liquid.
- The cake is ready when:
If the top is browning too quickly while the center is still soft, loosely tent the cake with foil for the last 5–10 minutes.
5. Cool and Unmold
This cake is softer than a classic sponge, so a little patience during cooling will reward you with neat slices.
- Initial cooling
- Remove the cake from the oven and let it cool in the pan on a rack for 10–15 minutes.
- Release the edges
- Run a thin knife or spatula carefully around the sides of the cake to loosen it.
- Unmold
- If using a springform pan, open the ring gently.
- If using a regular pan, place a plate on top, flip, and then flip again onto a serving dish so the top is upright.
- Final cooling
- Let the cake cool to room temperature before dusting with powdered sugar or slicing.
- For a firmer, more cheesecake-like texture, chill the cake in the fridge for at least 1–2 hours before serving.
Flavor Variations and Creative Twists
This basic yogurt cake is like a blank canvas. Once you’ve tried it in its simplest form, you can customize it endlessly depending on your mood and what you have in the pantry.
1. Lemon or Orange Yogurt Cake
Brighten the cake with citrus:
- Add zest of 1 lemon (or ½–1 orange) to the batter.
- For extra punch, drizzle the warm cake with a quick syrup made from 2 tablespoons lemon juice + 2 tablespoons sugar, gently heated until the sugar dissolves.
You’ll get a light, tangy cake that pairs beautifully with berries or whipped cream.
2. Vanilla Bean Yogurt Cake
For an elegant dessert with pure vanilla flavor:
- Replace the plain yogurt with vanilla yogurt, or
- Add the seeds of half a vanilla bean plus 1 teaspoon vanilla extract.
Serve with a drizzle of caramel sauce and toasted nuts for a simple yet luxurious treat.
3. Fruit-Topped Yogurt Cake
Transform this simple dessert into a fruit tart-style cake:
- Arrange thin slices of apple, pear, peach, plum, or apricot on top of the batter before baking.
- Sprinkle lightly with sugar and a pinch of cinnamon or cardamom.
The fruit will sink slightly into the custardy cake as it bakes, creating a soft, juicy topping.
4. Berry Swirl Yogurt Cake
Add color and flavor with a berry swirl:
- Spoon small dollops of raspberry jam, blueberry compote, or strawberry sauce over the batter in the pan.
- Use a toothpick or knife to gently swirl them through the surface.
Once baked, you’ll have pretty marbled slices with bursts of fruity flavor.
5. Chocolate-Chip Yogurt Cake
For a kid-friendly (or chocolate-lover) version:
- Fold 50–70 g mini chocolate chips into the batter just before pouring into the pan.
- Or sprinkle them over the top halfway through baking so they don’t sink completely.
The chocolate melts into the creamy cake, giving you little pockets of richness in every bite.
6. Nutty Yogurt Cake
Add crunch and a toasted aroma:
- Sprinkle chopped pistachios, almonds, or hazelnuts over the top of the batter before baking.
- Alternatively, fold a small handful into the batter itself.
This is especially nice if you serve the cake with honey or a drizzle of salted caramel.
How to Serve Quick and Creamy Yogurt Cake
One of the nicest things about this cake is how versatile it is—equally at home as a simple snack or as a plated dessert.
Serve Warm
Fresh from the oven and slightly warm, the cake is almost custard-like in the center. Try it:
- With a light dusting of powdered sugar.
- Alongside a cup of tea or coffee as an afternoon treat.
- With a spoonful of fruit compote—such as berries gently simmered with a little sugar.
Serve Chilled
After a few hours in the fridge, the texture sets more firmly, similar to a light cheesecake. This is perfect if you want neat, clean slices.
- Cut into wedges and top with fresh berries, kiwi slices, or segments of citrus.
- Add a dollop of whipped cream or Greek yogurt and a drizzle of honey.
Dress It Up for Guests
To turn this ultra-simple cake into a dessert that looks restaurant-worthy:
- Slice it into slim wedges or squares.
- Plate each slice with:
- A line of berry coulis or chocolate sauce on the plate,
- A little quenelle of whipped cream, and
- A sprig of fresh mint.
A small sprinkle of crushed pistachios or almonds over the top adds color and texture.
Tips & Helpful Notes
Use Plain, Not Highly Flavored Yogurt
Flavored yogurts (like strawberry or peach) often contain additional sugar and thickeners that can alter the texture and sweetness of the cake.
- Best choice: Plain, unsweetened yogurt.
- If using sweetened yogurt, reduce the sugar slightly (start with 100 g) and taste the batter.
Don’t Skimp on the Cornstarch
The combination of a little flour + cornstarch is what gives this cake its particular texture—creamy but sliceable.
- If you use only flour, the cake may be more “bready.”
- If you use only cornstarch, it may become too gelatinous.
The balance in the recipe works well, so stick to the proportions if possible.
Avoid Over-Baking
Because of the high yogurt content, this cake can dry out if left too long in the oven.
- Start checking at about 30 minutes.
- It’s better to pull it out when the center is still slightly wobbly than wait until it’s completely firm; it will continue to set as it cools.
Let It Cool Before Slicing
The cake is soft when hot. If you try to slice it immediately, it may break apart.
- For clean slices, cool to room temperature and then refrigerate for at least an hour.
- For a rustic, spoon-style serving, you can scoop it while still warm and serve in bowls with sauce or fruit.
Experiment With Sweetness
Different people prefer different levels of sweetness.
- 120 g sugar gives a pleasantly sweet cake, especially if you serve it plain.
- If you know you’ll be adding sweet toppings (jam, caramel, or ice cream), you can reduce the sugar to 100 g without affecting the texture much.
Final Thoughts
This Quick and Creamy Cake with 3 Yogurts and 2 Eggs is proof that baking doesn’t have to be complicated or time-consuming to be rewarding. With just five basic ingredients and a single mixing bowl, you can create a dessert that’s:
- Comforting and familiar,
- Elegant enough for company,
- Light yet indulgent,
- And endlessly adaptable to the flavors of the season.
It’s the sort of recipe that quickly becomes a house favorite—the one you make on lazy Sunday afternoons, for last-minute guests, or simply because you have some yogurt in the fridge and feel like something sweet.
Once you’ve tried the base version, you’ll likely find yourself experimenting: a little lemon this time, some berries next time, maybe chocolate chips or nuts after that. Each variation keeps the spirit of the cake—simple, creamy, and unfussy—while giving you something just a little different.
In a world full of elaborate layer cakes and intricate desserts, this humble yogurt cake quietly reminds us that sometimes the best treats are the simplest ones, made from everyday ingredients and shared with the people we love.
FAQ
Can I use Greek yogurt instead of regular yogurt?
Yes. Greek yogurt makes the cake a little richer and denser because it contains less water and more protein. If your Greek yogurt is very thick, you can loosen it with 1–2 tablespoons of milk before mixing so the batter isn’t too stiff.
Can I make this cake without cornstarch?
Cornstarch helps give the cake its silky, custardy texture. If you don’t have any, you can swap it with the same amount of extra flour. The cake will still be good, just slightly more like a soft sponge and a little less creamy.
Can I double the recipe?
Absolutely. To double:
- Use 6 yogurts (approx. 750 g), 4 eggs, 240 g sugar, 80 g flour, and 2 tablespoons cornstarch.
- Bake in a larger pan—such as a 23×33 cm (9×13 inch) dish—and extend the baking time by about 10–15 minutes, checking for doneness.
How long does the cake keep?
- At room temperature, covered: about 1 day (if not too warm).
- In the refrigerator, covered: 3–4 days.
The texture will firm up in the fridge, but many people like it even more that way.
Can I freeze the yogurt cake?
Yes. Once cooled, cut into slices, wrap individually in plastic wrap, and place in a freezer bag or airtight container. Freeze for up to 2 months. Thaw overnight in the fridge or at room temperature for 30–60 minutes. The texture may become very slightly denser, but it remains pleasant.
Why did my cake crack on top?
A few small cracks are normal for this style of creamy cake. Large cracks can be caused by:
- Baking at too high a temperature,
- Over-baking, or
- A sudden temperature change (e.g., opening the oven door too often).
The easiest fix? Dust generously with powdered sugar or cover with fruit—no one will notice.
Can I bake this in small ramekins or muffin tins?
Yes! This batter works very well as individual mini cakes.
- Grease and fill ramekins or muffin cups about ¾ full.
- Bake at the same temperature but reduce baking time to 18–25 minutes, depending on size.
- Check for set edges and a slight wobble in the center.
These mini versions are perfect for dinner parties or lunchboxes.