Introduction
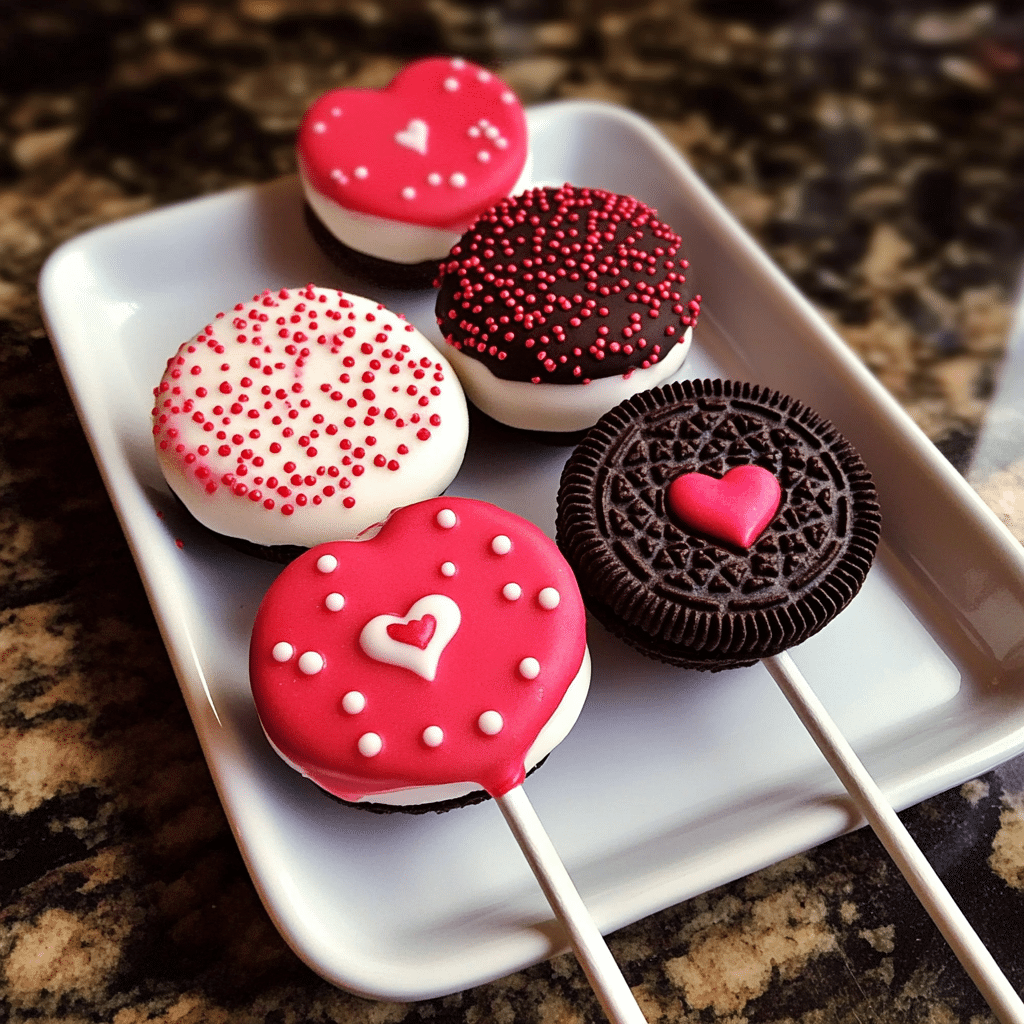
Valentine’s Day Oreo Pops are the ultimate sweet treat for celebrating love in the most fun and delicious way possible. These adorable pops start with classic Oreo cookies, dipped into smooth, velvety chocolate and decorated with all the festive flair you could imagine—sprinkles, colorful drizzles, and heart-shaped embellishments. Whether you’re looking to impress your partner, treat the kids, or add a little extra sweetness to your Valentine’s Day party, these Oreo pops are an easy and delightful way to spread some love. Their combination of crunchy Oreos and rich chocolate is simply irresistible, making them a treat everyone will love.
The first time I made Valentine’s Day Oreo Pops, I was amazed at how simple yet rewarding they were to create. The process was quick, but the fun came in decorating each pop with love. As I dipped each Oreo into the chocolate and sprinkled them with vibrant colors, I couldn’t help but feel the excitement of making something special for my loved ones. The best part was seeing their faces light up when they tasted them—the combination of the sweet, creamy chocolate and the crunch of the Oreo was an instant hit.
What I love most about these Oreo pops is their versatility. You can personalize them with your favorite toppings, whether it’s white chocolate drizzles, crushed nuts, or even a dash of sea salt for a sweet-salty twist. They’re perfect for a classroom party, a romantic gesture, or even as a fun baking activity to enjoy with the family. Valentine’s Day Oreo Pops bring joy and love in every bite, making them a go-to dessert for any occasion that calls for something sweet.
Perfect for:
- Valentine’s Day celebrations
- Gift-giving for friends, family, and loved ones
- Classroom treats for kids
- Party favors for themed events
- A sweet homemade touch for your loved one
Why You’ll Love This Recipe
Here’s why Valentine’s Day Oreo Pops are sure to become a go-to treat:
- Easy to Make: These Oreo pops are simple to prepare, making them ideal for both experienced bakers and beginners. No complicated steps or special skills required!
- Customizable Decorations: You can get creative with how you decorate these pops, from using sprinkles and chocolate drizzles to adding personalized messages or designs.
- Perfect for Gifting: These pops make adorable gifts for your loved ones or as part of a treat box, and their cute, festive look is sure to brighten anyone’s day.
- Chocolate Lovers’ Dream: Combining Oreos with rich, creamy chocolate makes these pops a chocolate lover’s dream, giving you the perfect blend of sweetness and crunch.
- Fun for Kids: Get kids involved in the process! They’ll love dipping the cookies and adding sprinkles to make their own personalized pops.
Preparation and Cooking Time
- Total Time: 1 hour 15 minutes
- Preparation Time: 30 minutes
- Chilling Time: 45 minutes
- Servings: 12 Oreo Pops
- Calories per serving: Approximately 150-200 calories
- Key Nutrients: Protein: 1g, Carbs: 20g, Fat: 10g
Ingredients
Gather these ingredients to make your Valentine’s Day Oreo Pops:
- 12 Oreo cookies (or more, depending on servings)
- 12 lollipop sticks (available in craft stores or online)
- 8 oz white chocolate or milk chocolate, chopped (or chocolate melts)
- 2 oz dark chocolate, melted (for drizzling)
- Red, pink, and white sprinkles (or other festive toppings like heart confetti)
- 2 tablespoons heart-shaped sprinkles (optional)
- 1 teaspoon vanilla extract (optional, for extra flavor)
- 1 teaspoon coconut oil or vegetable oil (optional, for thinning chocolate)
Ingredient Highlights
- Oreo Cookies: Classic and beloved, Oreos provide the perfect crunch and creaminess in each bite. They’re also a great base for dipping in chocolate.
- Chocolate: White or milk chocolate works best for dipping, while dark chocolate adds a drizzle of contrast for a refined touch.
- Lollipop Sticks: These sticks help transform the cookies into fun, easy-to-hold treats, making them perfect for gift-giving or parties.
- Sprinkles: Sprinkles are essential for adding color and excitement to the Oreo pops. Red, pink, and white are ideal for Valentine’s Day, but you can mix and match to create your desired look.
Step-by-Step
 Instructions

Here’s how to make Valentine’s Day Oreo Pops:
Prepare the Oreo Pops:
- Melt the Chocolate: In a microwave-safe bowl, melt the white or milk chocolate in 30-second intervals, stirring each time until smooth and fully melted. Add a teaspoon of coconut oil or vegetable oil to thin the chocolate if needed for a smoother dip. You can also add a dash of vanilla extract for extra flavor.
- Insert the Lollipop Sticks: Carefully insert a lollipop stick into the filling of each Oreo cookie. Be gentle to avoid breaking the cookie. Dip the stick into the melted chocolate before inserting it to create a stronger bond.
- Dip the Oreos: Dip each Oreo into the melted chocolate, ensuring it’s completely coated. Tap the stick gently on the side of the bowl to remove any excess chocolate and ensure a smooth coating.
- Add Decorations: While the chocolate is still soft, decorate the Oreo pop with sprinkles, heart-shaped confetti, or any Valentine’s Day-themed decorations you desire. Be creative with your designs!
- Drizzle with Dark Chocolate: Melt the dark chocolate and drizzle it over the coated Oreos for a touch of elegance and extra flavor. You can also create zig-zags or patterns for added flair.
Chill and Set:
- Chill the Pops: Place the decorated Oreo pops on a parchment-lined baking sheet or plate and refrigerate for at least 45 minutes, or until the chocolate has fully set and hardened.
- Serve: Once set, your Oreo pops are ready to enjoy! If gifting, wrap each pop in clear cellophane bags tied with a ribbon.
How to Serve
Valentine’s Day Oreo Pops are versatile, and here’s how to serve them in creative ways:
- Gift Bags: Wrap the Oreo pops in cute gift bags with Valentine’s-themed ribbons, perfect for handing out to friends, family, or colleagues.
- On a Dessert Table: Display the pops on a dessert table at a Valentine’s Day party for a festive and colorful treat everyone can grab.
- With Hot Chocolate: Serve these pops alongside a warm cup of hot chocolate or milk for a delightful pairing on a chilly February evening.
- As Party Favors: Use them as party favors at a Valentine’s Day event, and watch your guests’ faces light up with excitement.
- On a Tray: Arrange them on a decorative tray with other themed treats, like heart-shaped cookies or chocolate-covered strawberries, to create a festive and visually appealing dessert spread.
Additional Tips
Here are some tips to ensure your Valentine’s Day Oreo Pops turn out perfectly every time:
- Let the Chocolate Set Completely: Be sure the chocolate is completely set before handling or serving, as it will be much easier to work with.
- Use Quality Chocolate: High-quality chocolate ensures a smooth, glossy finish and rich flavor. Avoid using chocolate chips, as they may not melt as smoothly as melts or bars.
- Customize Your Decorations: Mix different sprinkles and decorations to make the pops unique to your style. You can even write short messages like “Love” or “XOXO” with melted chocolate.
- Use a Tall Cup for Dipping: For easier dipping, use a tall cup or glass to hold the melted chocolate. This will make dipping the cookies much more convenient.
- Ensure a Firm Stick: Inserting the lollipop stick into the filling with a little chocolate ensures the stick stays secure when handling the pops.
Recipe Variations
Here are 10 variations you can try for Valentine’s Day Oreo Pops:
- Chocolate-Dipped Oreo Pops: Use dark chocolate or milk chocolate for a rich coating instead of white chocolate.
- Peanut Butter Oreo Pops: Spread a thin layer of peanut butter on the Oreos before dipping them for an extra flavor twist.
- Strawberry Oreo Pops: Add freeze-dried strawberries to the white chocolate for a fruity touch.
- Sprinkles Variety: Use rainbow sprinkles, gold glitter, or edible pearls for different looks.
- Mint Oreo Pops: Use mint-flavored Oreos for a refreshing twist on the classic.
- Coconut Oreo Pops: Roll the dipped cookies in shredded coconut for a tropical flavor.
- Double-Dipped Oreo Pops: Dip the Oreos twice, first in white chocolate and then in milk chocolate, for a more indulgent treat.
- Caramel Oreo Pops: Drizzle caramel over the chocolate-coated Oreos for added richness.
- Red Velvet Oreo Pops: Use red velvet Oreos for a bold, colorful twist on this recipe.
- Oreo Pops with Chocolate Ganache: Make a ganache with heavy cream and dark chocolate for a silky smooth dip that’s richer than regular melted chocolate.
Freezing and Storage
- Freezing: Oreo pops can be frozen for up to 2 weeks. Place them in an airtight container, with parchment paper between layers to prevent sticking. Let them thaw at room temperature for a few minutes before serving.
- Storage: Store leftover Oreo pops in an airtight container at room temperature for up to 5 days. Make sure they are kept in a cool, dry place away from direct sunlight.
Special Equipment
Here are some special equipment items to make preparing your Valentine’s Day Oreo Pops easier:
- Microwave-Safe Bowls: To melt your chocolate safely and evenly.
- Lollipop Sticks: These are essential for turning your Oreos into fun, easy-to-hold treats.
- Parchment Paper: Used to line the baking sheet to prevent the pops from sticking while they cool.
- Tall Cup or Glass: For dipping the Oreos in chocolate without making a mess.
- Squeeze Bottle or Piping Bag: For drizzling melted chocolate in fun patterns.
FAQ Section
- Can I use other cookies instead of Oreos?
Yes, you can use other sandwich cookies like Nutter Butters, golden Oreos, or even homemade cookies. - Can I use candy melts instead of chocolate?
Yes, candy melts are perfect for dipping and come in various colors and flavors, making them ideal for themed treats. - How long can I store Oreo pops?
You can store Oreo pops for up to 5 days at room temperature in an airtight container. They can also be frozen for up to 2 weeks. - Can I make these without the lollipop sticks?
Absolutely! You can make these pops without sticks and just serve them as dipped Oreos on a tray. - How can I make these more festive?
You can add a variety of decorations such as colored sugar, edible glitter, or even personalized messages using melted chocolate.

Valentine’s Day Oreo Pops
- Total Time: 1 hour 15 minutes
- Yield: 12 oreo pops 1x
Description
Valentine’s Day Oreo Pops are the perfect sweet treat to celebrate love and affection. These adorable pops are made by dipping classic Oreo cookies into smooth chocolate and decorating them with festive colors, sprinkles, and heart-shaped embellishments. Whether you’re creating a treat for your loved ones, hosting a Valentine’s Day party, or just craving a simple DIY dessert, Oreo pops are easy to make, fun to decorate, and guaranteed to bring smiles. These bite-sized delights combine the familiar crunch of Oreos with the richness of chocolate, making them a favorite for all ages.
Ingredients
Gather these ingredients to make your Valentine’s Day Oreo Pops:
- 12 Oreo cookies (or more, depending on servings)
- 12 lollipop sticks (available in craft stores or online)
- 8 oz white chocolate or milk chocolate, chopped (or chocolate melts)
- 2 oz dark chocolate, melted (for drizzling)
- Red, pink, and white sprinkles (or other festive toppings like heart confetti)
- 2 tablespoons heart-shaped sprinkles (optional)
- 1 teaspoon vanilla extract (optional, for extra flavor)
- 1 teaspoon coconut oil or vegetable oil (optional, for thinning chocolate)
Instructions
Prepare the Oreo Pops:
- Melt the Chocolate: In a microwave-safe bowl, melt the white or milk chocolate in 30-second intervals, stirring each time until smooth and fully melted. Add a teaspoon of coconut oil or vegetable oil to thin the chocolate if needed for a smoother dip. You can also add a dash of vanilla extract for extra flavor.
- Insert the Lollipop Sticks: Carefully insert a lollipop stick into the filling of each Oreo cookie. Be gentle to avoid breaking the cookie. Dip the stick into the melted chocolate before inserting it to create a stronger bond.
- Dip the Oreos: Dip each Oreo into the melted chocolate, ensuring it’s completely coated. Tap the stick gently on the side of the bowl to remove any excess chocolate and ensure a smooth coating.
- Add Decorations: While the chocolate is still soft, decorate the Oreo pop with sprinkles, heart-shaped confetti, or any Valentine’s Day-themed decorations you desire. Be creative with your designs!
- Drizzle with Dark Chocolate: Melt the dark chocolate and drizzle it over the coated Oreos for a touch of elegance and extra flavor. You can also create zig-zags or patterns for added flair.
Chill and Set:
- Chill the Pops: Place the decorated Oreo pops on a parchment-lined baking sheet or plate and refrigerate for at least 45 minutes, or until the chocolate has fully set and hardened.
- Serve: Once set, your Oreo pops are ready to enjoy! If gifting, wrap each pop in clear cellophane bags tied with a ribbon.
- Prep Time: 30 minutes
- Category: lunch
Nutrition
- Calories: 150-200 kcal
- Fat: 10g
- Carbohydrates: 20g
- Protein: 1g
Conclusion
Valentine’s Day Oreo Pops are a sweet, fun, and easy way to celebrate the holiday of love. Their combination of crunchy cookies, smooth chocolate, and festive decorations makes them the perfect treat for Valentine’s Day. Whether you’re making them as gifts, serving them at a party, or simply enjoying them with your family, these Oreo pops will add a touch of sweetness and joy to any occasion. So, roll up your sleeves and start dipping—your loved ones will thank you for it!
These Oreo pops are simple to make but full of love. With just a few ingredients, you can create beautiful, personalized treats that everyone will adore. The smooth chocolate coating and colorful sprinkles or heart-shaped decorations make them perfect for the occasion. Plus, they’re an ideal DIY project for kids or anyone looking to add a little extra charm to their Valentine’s Day celebrations.
I can’t wait to see your Oreo pop creations! Be sure to snap a photo and tag me on Instagram—I’d love to see how you bring this festive treat to life! Don’t forget to leave a comment and share how you made it your own. Happy baking!