Introduction
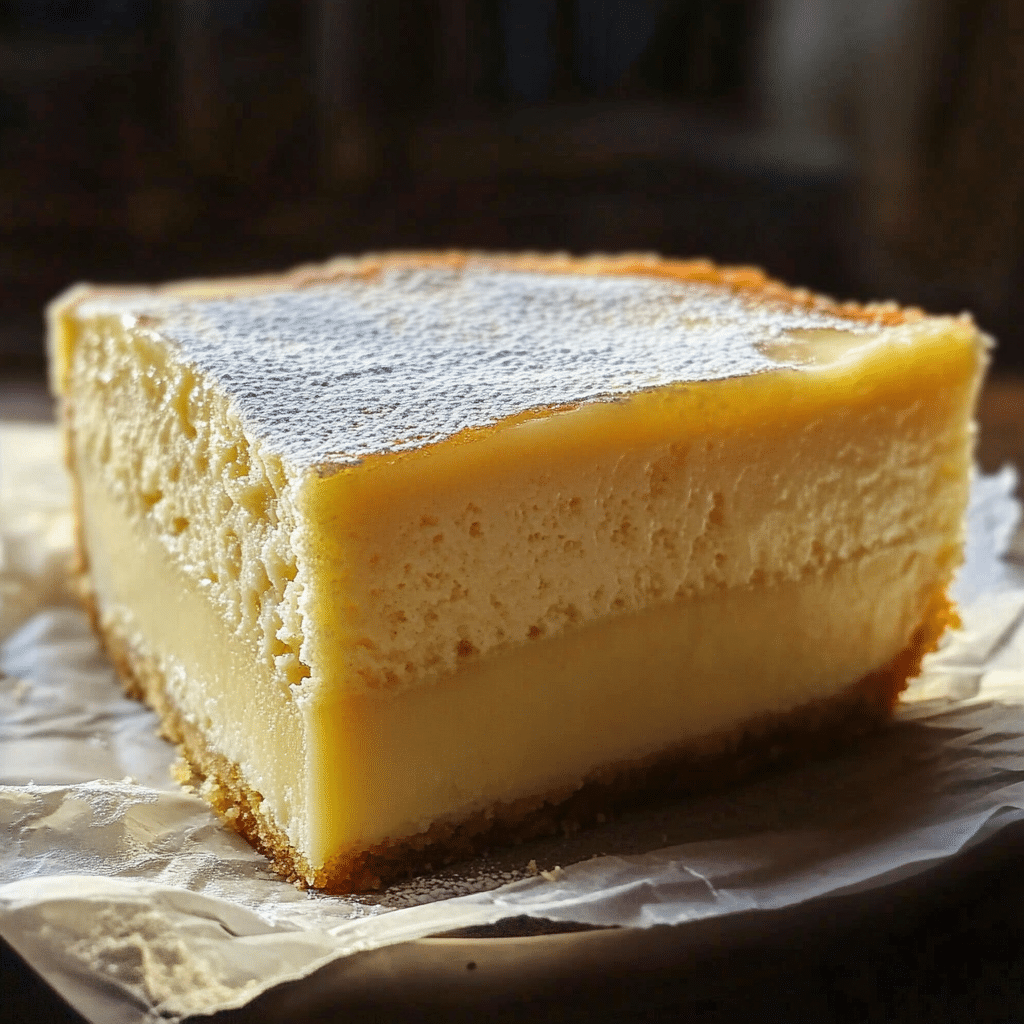
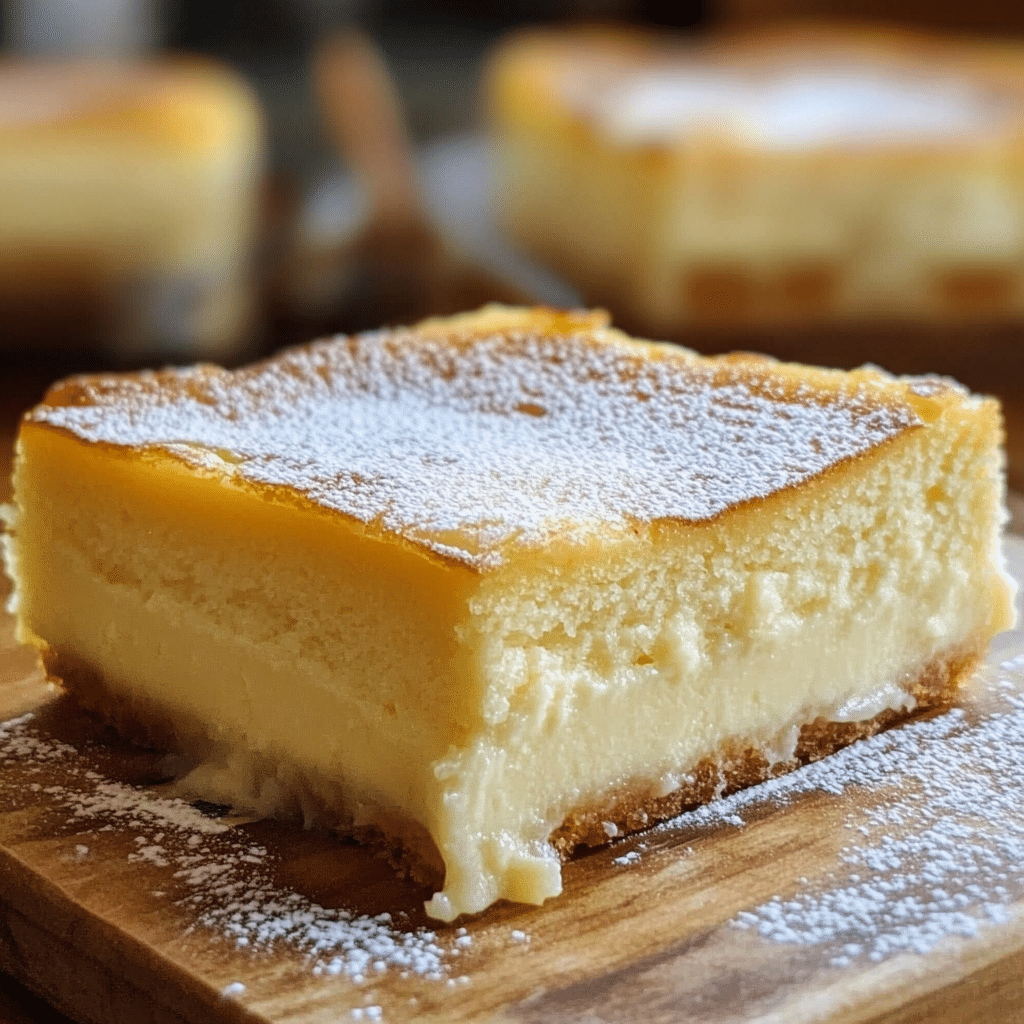
Vanilla Magic Custard Cake is a delightful dessert that truly lives up to its magical name. What’s so amazing about it? You start with just one simple batter, and as it bakes, the magic happens! The batter transforms into three distinct layers: a dense custard layer at the bottom, a soft and creamy middle, and a light, sponge-like top. It’s like getting three desserts in one, and the best part is, it’s so easy to make!
I remember the first time I baked this cake, I was skeptical about how such a simple recipe could result in something so beautiful and delicious. But when I pulled it out of the oven and saw the layers perfectly formed, I knew it was something special. The subtle vanilla flavor adds a touch of elegance, and when you take that first bite, the creamy custard, soft middle, and airy top combine in the most satisfying way.
What I love about Vanilla Magic Custard Cake is how versatile it is. It’s perfect for any occasion, whether you’re hosting a casual family gathering or an elegant dinner party. It’s simple to prepare but feels so special, making it a great way to impress guests or treat yourself to something indulgent. And the best part? It’s a universally loved dessert that everyone seems to enjoy, from kids to adults. So, grab your ingredients and experience the magic for yourself – you won’t be disappointed!
Perfect for:
- Family gatherings
- Casual weekday treats
- Elegant dinner parties
- Celebrations and potlucks
- A light, comforting dessert
Why You’ll Love This Recipe
Here’s why Vanilla Magic Custard Cake is bound to become your new favorite dessert:
- Three Magical Layers: One batter creates a dense custard, creamy middle, and fluffy sponge, offering a delightful textural experience.
- Simple Ingredients: With everyday pantry staples, you can whip up a stunning dessert without a trip to the store.
- Light and Comforting: This cake is perfectly sweet and light, making it an ideal end to any meal without being overly rich.
- Elegant Yet Effortless: Despite its sophisticated look, this cake requires minimal effort and preparation.
- Customizable Flavor: You can easily adapt the base recipe with different flavors like lemon or almond to suit your taste.
Preparation and Cooking Time
- Total Time: 4 hours (including chilling time)
- Preparation Time: 20 minutes
- Baking Time: 50 minutes
- Chilling Time: 3 hours
- Servings: 9 servings
- Calories per serving: Approximately 220-250 calories
- Key Nutrients: Protein: 5g, Carbs: 30g, Fat: 10g
Ingredients
To make this magical cake, you’ll need the following ingredients:
- 4 large eggs, separated
- 1 cup granulated sugar
- ½ cup unsalted butter, melted and cooled
- 2 teaspoons vanilla extract
- 1 ¼ cups all-purpose flour
- 2 cups whole milk, lukewarm
- ¼ teaspoon salt
- Powdered sugar, for dusting
Ingredient Highlights
- Eggs: Separating the eggs is key to creating the light and fluffy top layer of the cake.
- Milk: Lukewarm milk ensures a smooth and lump-free batter.
- Vanilla Extract: Enhances the flavor and gives the cake its comforting vanilla aroma.
- Flour: Provides structure to the batter, allowing the three distinct layers to form during baking.
Step-by-Step Instructions
Here’s how to make Vanilla Magic Custard Cake:
Prepare the Batter
- Preheat the Oven: Preheat your oven to 325°F (160°C) and grease an 8×8-inch baking dish or line it with parchment paper.
- Separate the Eggs: Separate the egg whites and yolks, placing them in two large bowls.
- Whip the Egg Whites: Using an electric mixer, beat the egg whites until stiff peaks form. Set aside.
- Mix the Yolks and Sugar: In the second bowl, whisk the egg yolks and granulated sugar until light and creamy.
- Add Butter and Vanilla: Slowly add the melted butter and vanilla extract to the yolk mixture, whisking until smooth.
Combine the Ingredients
- Incorporate the Flour: Sift the flour and salt into the yolk mixture, stirring until well combined.
- Add the Milk: Gradually pour in the lukewarm milk, whisking constantly to create a smooth batter.
- Fold in the Egg Whites: Gently fold the beaten egg whites into the batter in three additions. The batter will be thin and slightly lumpy—this is normal.
Bake the Cake
- Pour and Bake: Pour the batter into the prepared baking dish and smooth the top with a spatula. Bake for 50-55 minutes, or until the top is golden brown and the center jiggles slightly when shaken.
- Cool Completely: Allow the cake to cool in the pan for 30 minutes, then refrigerate for at least 3 hours to set the layers.
Serve the Cake
- Slice and Dust: Slice the cake into squares and dust the top with powdered sugar before serving.
How to Serve
Vanilla Magic Custard Cake is versatile and can be served in a variety of ways:
- Classic Dusting: Keep it simple with a light dusting of powdered sugar.
- With Fresh Berries: Add fresh strawberries, raspberries, or blueberries for a burst of color and flavor.
- Drizzle with Sauce: Serve with a drizzle of caramel, chocolate, or berry sauce for added indulgence.
- Accompanied by Ice Cream: Pair with a scoop of vanilla or strawberry ice cream for a refreshing contrast.
- For Special Occasions: Garnish with edible flowers or a dollop of whipped cream for an elegant presentation.
Additional Tips
Here are some tips to ensure your Vanilla Magic Custard Cake turns out perfectly every time:
- Room Temperature Eggs: Allow your eggs to come to room temperature before starting to achieve better volume when whipping.
- Don’t Overmix: Be gentle when folding the egg whites into the batter to preserve their airiness.
- Monitor Baking Time: Avoid overbaking; the cake should have a golden top and a slight jiggle in the center.
- Chill Thoroughly: The layers set properly only after the cake has been chilled, so don’t skip this step.
- Use the Right Pan: An 8×8-inch square pan works best; larger pans may affect the thickness of the layers.
Recipe Variations
Try these variations to put a unique spin on your Vanilla Magic Custard Cake:
- Lemon Magic Custard Cake: Add 2 tablespoons of lemon zest and replace half the milk with lemon juice.
- Chocolate Magic Custard Cake: Replace ¼ cup of flour with cocoa powder for a chocolatey twist.
- Coconut Magic Custard Cake: Substitute ½ cup of milk with coconut milk and sprinkle shredded coconut on top.
- Almond Magic Custard Cake: Add ½ teaspoon of almond extract for a nutty aroma and flavor.
- Berry Layered Cake: Layer fresh or frozen berries between the batter before baking.
- Spiced Custard Cake: Add cinnamon, nutmeg, or cardamom for a warm, spiced flavor.
- Vanilla Bean Custard Cake: Use vanilla bean paste for an intense vanilla flavor with visible specks.
- Coffee Custard Cake: Replace ½ cup of milk with strong brewed coffee for a subtle mocha flavor.
- Maple Custard Cake: Sweeten the batter with maple syrup instead of sugar for a rich, earthy flavor.
- Nutty Magic Cake: Add chopped nuts like pecans or walnuts for a crunchy topping.
Freezing and Storage
- Storage: Store leftover cake in an airtight container in the fridge for up to 3 days.
- Freezing: To freeze, wrap individual slices tightly in plastic wrap and store in a freezer-safe container for up to 1 month. Thaw in the fridge overnight before serving.
Special Equipment
Here are some tools to make preparing your Vanilla Magic Custard Cake even easier:
- Electric Mixer: For whipping the egg whites to stiff peaks effortlessly.
- 8×8-inch Baking Dish: The perfect size for achieving even layers.
- Whisk: Essential for creating a smooth batter.
- Sifter: For evenly dusting powdered sugar on top of the cake.
- Offset Spatula: Ideal for spreading and smoothing the batter.
- Measuring Cups and Spoons: For precise ingredient measurements.
- Mixing Bowls: Two large bowls for separating and mixing the egg whites and yolks.
- Cooling Rack: To cool the cake evenly before refrigerating.
- Rubber Spatula: For folding the egg whites gently into the batter.
FAQ Section
- Can I use a different size pan?
An 8×8-inch pan is recommended for best results, but a 9×9-inch pan can also work, though the layers may be thinner. - Why is my batter so thin?
A thin batter is normal for this recipe—it’s what helps create the distinct layers during baking. - How do I know when the cake is done?
The top should be golden, and the center should jiggle slightly when shaken. - Can I skip the chilling step?
No, chilling is crucial for setting the layers and achieving the desired texture. - Can I substitute low-fat milk?
Whole milk is recommended for the best texture and flavor, but 2% milk can work in a pinch. - Why didn’t my layers form?
Ensure your egg whites are beaten to stiff peaks and gently folded into the batter to maintain the layers. - Can I use plant-based milk?
Yes, almond or oat milk can be used, but the texture may vary slightly. - How long can I store this cake?
It’s best enjoyed within 3 days when stored in the refrigerator. - Can I add fruit to the batter?
Yes, fresh or frozen berries can be folded into the batter for added flavor and texture. - Can I double the recipe?
Yes, but use a larger pan and adjust the baking time accordingly.
Vanilla Magic Custard Cake
- Total Time: 4 hours
- Yield: 9 servings 1x
Description
Vanilla Magic Custard Cake is a delightful dessert that lives up to its magical name. With just one batter and a simple preparation process, this cake transforms into three distinct layers during baking: a dense custard layer at the bottom, a soft and creamy middle, and a fluffy sponge-like top. This light yet indulgent cake is perfect for any occasion, from casual family gatherings to elegant dinner parties. The subtle vanilla flavor adds a touch of sophistication, making it a universally loved dessert.
Ingredients
To make this magical cake, you’ll need the following ingredients:
- 4 large eggs, separated
- 1 cup granulated sugar
- ½ cup unsalted butter, melted and cooled
- 2 teaspoons vanilla extract
- 1 ¼ cups all-purpose flour
- 2 cups whole milk, lukewarm
- ¼ teaspoon salt
- Powdered sugar, for dusting
Instructions
Prepare the Batter
- Preheat the Oven: Preheat your oven to 325°F (160°C) and grease an 8×8-inch baking dish or line it with parchment paper.
- Separate the Eggs: Separate the egg whites and yolks, placing them in two large bowls.
- Whip the Egg Whites: Using an electric mixer, beat the egg whites until stiff peaks form. Set aside.
- Mix the Yolks and Sugar: In the second bowl, whisk the egg yolks and granulated sugar until light and creamy.
- Add Butter and Vanilla: Slowly add the melted butter and vanilla extract to the yolk mixture, whisking until smooth.
Combine the Ingredients
- Incorporate the Flour: Sift the flour and salt into the yolk mixture, stirring until well combined.
- Add the Milk: Gradually pour in the lukewarm milk, whisking constantly to create a smooth batter.
- Fold in the Egg Whites: Gently fold the beaten egg whites into the batter in three additions. The batter will be thin and slightly lumpy—this is normal.
Bake the Cake
- Pour and Bake: Pour the batter into the prepared baking dish and smooth the top with a spatula. Bake for 50-55 minutes, or until the top is golden brown and the center jiggles slightly when shaken.
- Cool Completely: Allow the cake to cool in the pan for 30 minutes, then refrigerate for at least 3 hours to set the layers.
Serve the Cake
- Slice and Dust: Slice the cake into squares and dust the top with powdered sugar before serving.
- Prep Time: 20 minutes
- Category: breakfast
Nutrition
- Calories: 220-250 kcal
- Fat: 10g
- Carbohydrates: 30g
- Protein: 5g
Conclusion
Vanilla Magic Custard Cake is a truly enchanting dessert that combines simplicity with elegance. Its unique three-layer structure—light on top, creamy in the middle, and dense at the bottom—offers an irresistible combination of textures that will have everyone coming back for seconds. The delicate vanilla flavor is subtle yet rich, making it the perfect treat for any occasion.
Whether you serve it plain, add a dusting of powdered sugar, or top it with fresh berries, this cake is incredibly versatile. It’s perfect for a casual family dinner or an elegant gathering, and it’s sure to impress with its beautiful layers and delicious flavor.
Treat yourself to the magic of this custard cake—you won’t regret it! Don’t forget to share your photos and tag me on Instagram. I’d love to see how you make this dessert your own. Enjoy!
