Christmas treats don’t have to be complicated to feel magical.
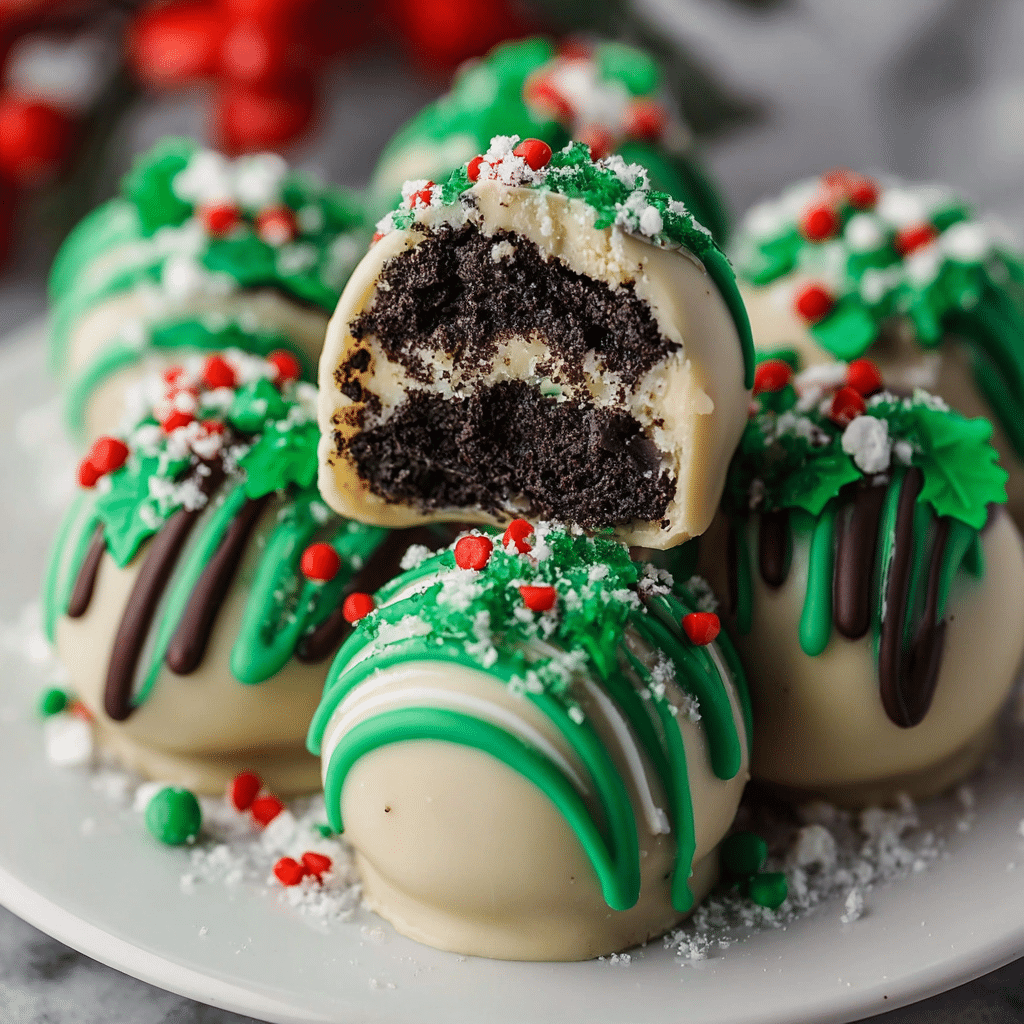
These Christmas Oreo Truffles are proof: rich, fudgy bites of crushed Oreos and cream cheese, enrobed in smooth white chocolate and topped with festive sprinkles. Each truffle tastes like the center of an Oreo cheesecake wrapped in a holiday candy shell—a perfect mix of creamy, crunchy, and sweet.
They’re the kind of dessert that looks impressively bakery-made, yet comes together with just a few simple ingredients and no baking at all. Whether you’re filling cookie tins, building a holiday dessert platter, or looking for a fun treat to make with kids, these truffles deliver Christmas joy in every bite-sized ball.
Unlike traditional holiday cookies that can require chilling, rolling, and multiple batches in the oven, these truffles are wonderfully simple. You crush, mix, roll, dip, and decorate. That’s it. Still, they manage to capture the spirit of the season with their red, green, and white colors and their indulgent flavor.
Perfect for parties, gifts, or a cozy night in with hot chocolate, Christmas Oreo Truffles are festive, fuss-free, and totally irresistible. Once you make them, they’re almost guaranteed to become a yearly holiday tradition.
Core Ingredients for Making the Recipe
To prepare these festive Christmas Oreo Truffles, you only need a few pantry staples.
For the Truffles
- 36 Oreo cookies (original, with filling)
- 8 oz (225 g) cream cheese, softened to room temperature
- 1 teaspoon vanilla extract (optional, for extra flavor)
- 1/4 teaspoon salt (optional, helps balance sweetness)
For the Coating & Decoration
- 16 oz (450 g) white chocolate or vanilla candy melts
- 4 oz (115 g) dark or milk chocolate for drizzling (optional)
- Red, green, and white sprinkles or nonpareils
- Crushed candy canes, holiday confetti sprinkles, or edible glitter (optional, for extra decoration)
Step-by-Step

- Prepare the Oreo crumbs
Place the Oreo cookies in a food processor and pulse until they become fine crumbs. If you don’t have a food processor, put the cookies in a zip-top bag and crush them with a rolling pin until no large pieces remain. - Make the truffle mixture
Add the softened cream cheese to a large bowl. Pour in the Oreo crumbs and vanilla extract. Mix with a spatula or hand mixer until everything is fully combined and the mixture looks like thick, fudgy dough with no streaks of cream cheese. - Chill the mixture slightly (optional but helpful)
If the mixture feels very soft or sticky, place the bowl in the refrigerator for about 15–20 minutes. This makes it easier to roll into neat balls. - Shape the truffles
Line a baking sheet with parchment paper. Using a small cookie scoop or spoon, portion out about 1 tablespoon of mixture at a time and roll it between your palms to form smooth balls. Arrange them on the prepared baking sheet, leaving a little space between each one. - Chill until firm
Place the tray in the refrigerator for at least 30 minutes or in the freezer for 15–20 minutes, until the truffles are firm. This helps them keep their shape when dipped into the warm chocolate. - Melt the white chocolate
Add the white chocolate or candy melts to a microwave-safe bowl. Microwave in 20–30 second intervals, stirring between each, until fully melted and smooth. Be careful not to overheat the chocolate—stirring well helps it melt evenly. - Dip the truffles
Working with a few truffles at a time, use a fork or dipping tool to submerge each chilled ball in the melted white chocolate. Tap the fork gently on the edge of the bowl to remove excess coating, then slide the truffle back onto the parchment-lined tray. - Decorate while wet
Immediately sprinkle the tops with red and green sprinkles, crushed candy canes, or your favorite holiday decorations before the chocolate sets. The coating firms up quickly, so decorate as you go. - Add chocolate drizzle (optional)
If you’d like a contrasting drizzle, melt the dark or milk chocolate using the same short-burst method. Transfer it to a piping bag or small zip-top bag with the corner snipped off and drizzle over the set or slightly setting truffles in thin lines. - Let the truffles set
Allow the truffles to sit at room temperature until the chocolate hardens, or refrigerate them for about 15 minutes to speed up the process. Once set, they’re ready to serve, gift, or store.
Flavor Variations and Creative Twists
One of the best things about Christmas Oreo Truffles is how easy they are to customize. With just a few swaps, you can create new flavors that still look perfectly festive.
- Peppermint Oreo Truffles
Use peppermint Oreos instead of original, or stir 1/2 teaspoon of peppermint extract into the mixture. Top with crushed candy canes for a cool, minty crunch that screams Christmas. - Double-Chocolate Truffles
Coat the Oreo centers in melted dark or milk chocolate instead of white chocolate. Finish with red and green sprinkles on top for a rich, fudgy treat that chocolate lovers will adore. - Red Velvet Oreo Truffles
Substitute red velvet Oreos if you can find them, or add a tablespoon of cocoa powder and a few drops of red food coloring to the mixture. Dip in white chocolate and decorate with red sprinkles for a striking color contrast. - Nutty Crunch Truffles
Mix finely chopped toasted hazelnuts, almonds, or pecans into the Oreo mixture or sprinkle them on top of the wet chocolate coating. The nuts add texture and a grown-up twist to this sweet bite. - Festive Flavors Mix
Make several small batches with different extracts—peppermint, orange, or almond—for a truffle assortment. Use different sprinkle combinations to match each flavor so guests can tell them apart.
How to Serve
Christmas Oreo Truffles are as versatile in presentation as they are in flavor.
- Holiday dessert platters
Arrange them on a pretty serving plate with other Christmas cookies, fudge, or bark. Their round shape and glossy, decorated tops make them a natural centerpiece. - Gift boxes and tins
Place each truffle in a mini paper candy cup and tuck them into cookie tins or gift boxes lined with parchment paper. Add a ribbon and a handwritten tag for a heartfelt, homemade gift. - Party treats
Serve the truffles as bite-sized sweets at Christmas parties, potlucks, or family gatherings. They pair wonderfully with hot chocolate, coffee, or a mug of mulled cider. - After-dinner indulgence
Enjoy them chilled straight from the fridge after a holiday meal. Their fudgy center and crisp chocolate shell make them the perfect little bite when you’re “too full for dessert” but still craving something sweet.
Tips & Variations
A few simple tips will help your Christmas Oreo Truffles turn out as gorgeous as they are delicious:
- Make sure the cream cheese is softened
Soft cream cheese blends more easily with the Oreo crumbs, creating a smooth, uniform texture. If it’s too cold, you’ll get lumps and streaks. - Crush the Oreos finely
For the best texture, the crumbs should be very fine, almost like sand. Large chunks can make the truffles harder to roll and less smooth. - Chill before dipping
Don’t skip the chilling step. Cold truffle balls are much easier to coat, and they’re less likely to crumble or fall apart in the warm chocolate. - Use candy melts for easier coating
Candy melts or coating wafers are more forgiving than regular white chocolate—they melt smoothly and set quickly, which is handy when making big batches. If your melted chocolate seems thick, stir in a teaspoon of neutral oil to thin it out. - Work in small batches
Keep half of the rolled truffles in the fridge while you dip the rest. If they warm up too much, they may soften and lose their shape in the chocolate. - Customize the decorations
Use Christmas tree sprinkles, holly-shaped decorations, edible glitter, or crushed cookies to match your holiday theme or color scheme.
Final Thoughts
Christmas Oreo Truffles capture everything joyful about holiday baking—without the stress. They’re sweet, creamy, crunchy, and beautifully festive, yet require no oven and just a handful of ingredients.
Whether you’re a beginner in the kitchen or a seasoned baker looking for an easy crowd-pleaser, these truffles fit right in. They’re perfect for gifting, sharing, or stashing in the fridge for those quiet December evenings when you want a little something special with your favorite Christmas movie.
From their rich Oreo centers to their sparkling candy toppings, Christmas Oreo Truffles bring cheer to every dessert table. They’re a simple reminder that sometimes the most delightful holiday treats are the easiest ones to make.
FAQ
Can I use different types of Oreos for this recipe?
Yes! You can use almost any Oreo flavor you like—peppermint, mint, golden, or red velvet all work beautifully. Just keep the total number of cookies the same. Each flavor will give the truffles a slightly different twist, so feel free to experiment.
Do these truffles need to be refrigerated?
Because they contain cream cheese, it’s best to store them in the refrigerator. Place the truffles in an airtight container in single layers, separating layers with parchment paper. They’ll keep well in the fridge for up to 1 week.
Can I make Christmas Oreo Truffles ahead of time?
Absolutely. These truffles are perfect for making ahead. You can prepare them up to several days in advance and store them in the fridge until you’re ready to serve or gift them. The flavors even meld and improve after a day or two.
Can I freeze Oreo truffles?
Yes, they freeze very well. Once the chocolate coating has set, arrange the truffles in a single layer in a freezer-safe container, separating layers with parchment paper. Freeze for up to 2–3 months. Thaw in the refrigerator before serving.
What if I don’t have a food processor?
No problem. Place the Oreos in a sturdy zip-top bag, squeeze out the air, seal it, and crush the cookies with a rolling pin or heavy bottle until they’re finely ground. Then proceed with the recipe as written.
My chocolate coating is too thick. What should I do?
If the melted chocolate seems thick or clumpy, stir it vigorously and, if needed, add 1–2 teaspoons of neutral oil (like vegetable or canola) to thin it out. Microwave in very short bursts, stirring in between, until smooth and fluid again.