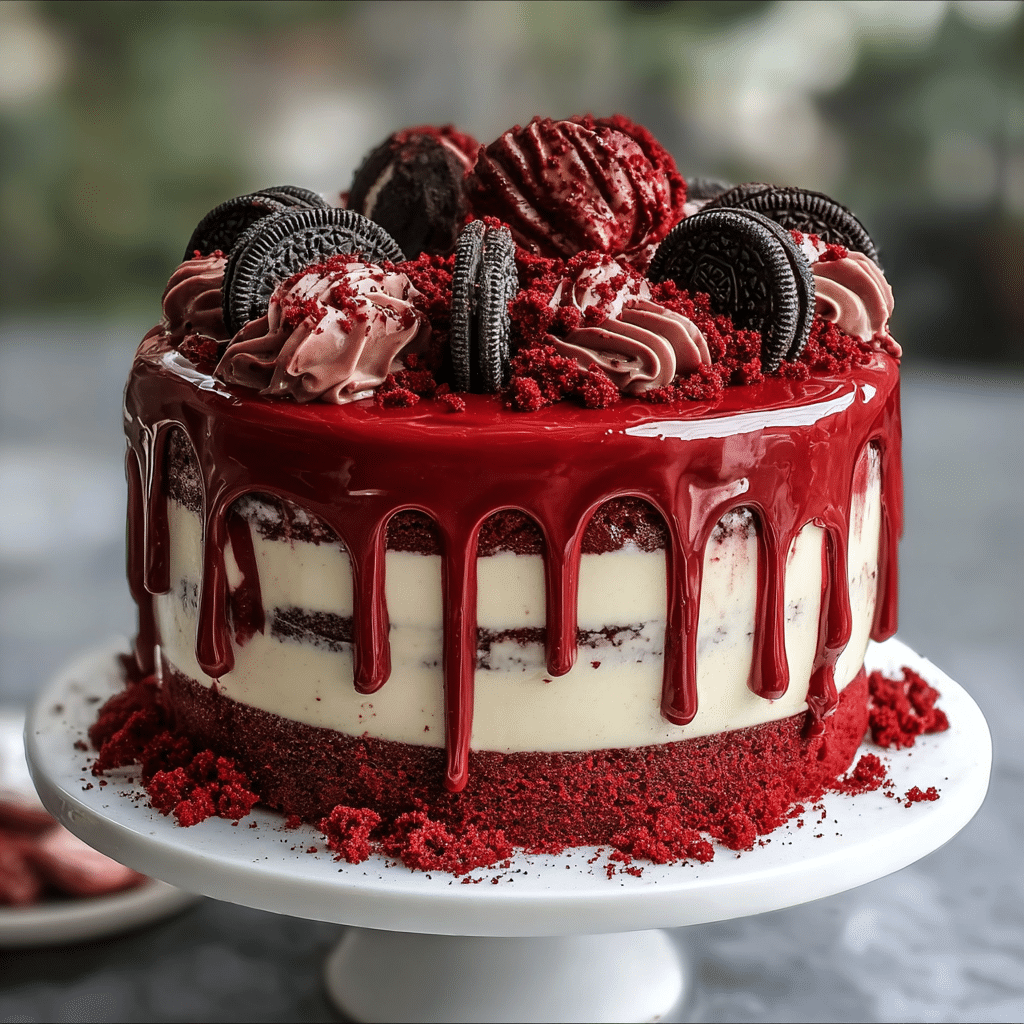
A bold and decadent red velvet cake layered with cream cheese frosting, chocolate cookies, and a glossy red drip.
Yield: 10–12 slices | Bake Temp: 350°F (175°C) | Time: ~1 hr 15 min (including assembly)
Red Velvet Oreo Drip Cake is the kind of dessert that makes people stop, stare, and immediately ask, “Who made that cake?”
It combines everything we love in one show-stopping slice: moist red velvet layers, tangy cream cheese frosting, crunchy chocolate cookies, and a dramatic red chocolate drip that looks straight off a bakery display.
Where a simple sheet cake feels casual, this drip cake feels special—perfect for birthdays, holidays, Valentine’s Day, anniversaries, or any celebration that needs something a little extra. Yet behind the dramatic look, it’s surprisingly approachable. With a basic red velvet batter, a simple cream cheese frosting, and a ganache you can mix in one bowl, you can build this impressive dessert without professional pastry skills.
Each bite brings a mix of textures and flavors: the subtle cocoa and velvety crumb of the cake, the tangy sweetness of the frosting, the crunch of Oreo pieces, and the silky smooth drip that finishes it all. It’s rich without being heavy, playful without being childish, and absolutely unforgettable.
If you’re looking for a dessert that feels bakery-worthy but is completely doable at home, this Red Velvet Oreo Drip Cake will become your new signature showpiece.
Key Ingredients for Red Velvet Oreo Drip Cake
To make this cake, you don’t need dozens of fancy ingredients—just a well-balanced mix of baking staples and a few star elements that bring everything together.
Core Ingredients First
These are the heroes of the recipe:
- 2 ½ cups red velvet cake batter (homemade or from a mix)
- 1 cup crushed chocolate sandwich cookies (like Oreos)
- 1 ½ cups cream cheese frosting
- ½ cup red ganache (red-tinted white chocolate)
From here, we’ll build out the full ingredient list so you can easily prep and assemble your cake.
For the Red Velvet Cake Layers
Use your favorite red velvet recipe or a good-quality box mix. For a standard 2-layer 8-inch cake, you’ll generally need:
- 2 ½ cups prepared red velvet cake batter
(from a homemade recipe or mixed according to box directions) - Nonstick spray or butter + flour, for greasing pans
If you’re making red velvet from scratch, your batter will typically include:
- All-purpose flour
- Cocoa powder (just a bit, for that classic subtle chocolate note)
- Sugar
- Eggs
- Buttermilk
- Oil
- Vinegar
- Red gel food coloring
- Baking soda, salt, and vanilla extract
You don’t need to adjust your usual batter amounts—simply divide it between two 8-inch or 9-inch round pans.
For the Cream Cheese Frosting
This tangy frosting balances the richness of the cake and cookies:
- 8 oz (225 g) cream cheese, softened
- ½ cup (1 stick / 113 g) unsalted butter, softened
- 3–3 ½ cups powdered sugar, sifted
- 1–2 teaspoons vanilla extract
- Pinch of salt
- 1–2 tablespoons heavy cream or milk (optional, to adjust consistency)
For the Oreo Filling & Decoration
- 1 cup crushed chocolate sandwich cookies (about 10–12 cookies), plus extra for topping
- A few whole cookies for garnish on top, if desired
Crush the cookies into medium pieces—small enough to layer easily but big enough to add some crunch and visual contrast.
For the Red Ganache Drip
This glossy red drip is what gives the cake its dramatic look:
- 1 cup white chocolate chips or finely chopped white chocolate
- ⅓ cup heavy cream
- Red gel food coloring (gel or oil-based works best for vibrant color)
Optional, but helpful:
- ½ teaspoon corn syrup (for extra shine)
Step-by-Step

This cake looks elaborate, but the process becomes simple once you break it down into steps: bake, frost, fill, and drip.
1. Prepare and Bake the Red Velvet Cake Layers
- Preheat the Oven
Preheat your oven to 350°F (175°C). Grease two 8-inch or 9-inch round cake pans, then line the bottoms with parchment paper for easy removal. Lightly grease the parchment as well. - Make the Batter
Prepare your red velvet cake batter according to your favorite recipe or box mix instructions. Aim for a smooth, lump-free batter. - Divide and Bake
Divide the batter evenly between the prepared pans (about 1 ¼ cups per pan if making small layers, or more if using larger pans). Smooth the tops. - Bake
Bake for 20–30 minutes, depending on pan size and your oven. The cakes are ready when:- A toothpick inserted in the center comes out clean or with a few moist crumbs.
- The tops spring back lightly when touched.
- Cool Completely
Let the cakes cool in the pans for 10–15 minutes, then turn them out onto a wire rack. Remove parchment and cool completely before frosting. Cold or very cool layers are much easier to frost and decorate.
2. Make the Cream Cheese Frosting
- Beat Butter and Cream Cheese
In a large bowl, beat the softened butter and cream cheese together with a hand mixer or stand mixer until smooth, creamy, and lump-free. - Add Vanilla and Salt
Mix in the vanilla extract and a pinch of salt. - Add Powdered Sugar
Gradually add the powdered sugar, ½ to 1 cup at a time, mixing on low speed at first to avoid a sugar cloud. Increase speed once incorporated until the frosting is fluffy and smooth. - Adjust Consistency
If the frosting is too thick, add 1–2 tablespoons of heavy cream or milk and beat again until it reaches a spreadable yet stable texture—soft enough to spread, but stiff enough to hold its shape on the cake.
3. Prepare the Oreo Filling
- Place 1 cup of chocolate sandwich cookies in a zip-top bag.
- Crush them with a rolling pin or the bottom of a glass until you have chunky crumbs—not powder, but not big chunks either.
- Set aside; you’ll fold these into part of the frosting and sprinkle some between layers if desired.
You can reserve a handful for decorating the top and sides of the cake at the end.
4. Assemble the Layers
Now the fun part begins—building the cake.
- Level the Cakes (Optional but Recommended)
If your cake layers domed during baking, use a large serrated knife to gently trim the tops to create flat, even layers. Save the trimmings for taste-testing or turning into cake pops. - Prepare Your Cake Board or Plate
Place a small dab of frosting in the center of your serving plate or cake board. Set the first cake layer on top—this “glues” the cake in place so it doesn’t slide while you frost. - Layer with Frosting and Cookies
- Spread a generous layer of cream cheese frosting over the first cake layer.
- Sprinkle a layer of crushed cookies over the frosting.
- Gently press the cookie pieces into the frosting so they adhere.
- Add the Second Layer
Place the second cake layer on top, bottom-side up for the flattest surface. Press down gently to secure. - Crumb Coat the Cake
Spread a very thin layer of frosting over the entire cake—top and sides. This is your crumb coat, designed to trap any stray crumbs.- Don’t worry if this coat looks messy or if crumbs show through.
- Chill the cake for 15–30 minutes in the fridge to set the crumb coat.
- Final Frosting Layer
Once the crumb coat is firm, spread a thicker, smoother layer of cream cheese frosting over the cake. Use an offset spatula or bench scraper to create clean sides and a flat top.
If you’d like, you can stir some crushed Oreos into a portion of the frosting and use that for the middle and lower half of the cake, keeping plain cream cheese frosting for the top and upper edges.
5. Make the Red Ganache Drip
The drip should be slightly warm and fluid, but not hot or runny. It’s best to make it once the cake is already frosted and chilled.
- Heat the Cream
Add the heavy cream to a small saucepan or microwave-safe bowl.- If using the stovetop, heat just until small bubbles form around the edges—do not boil.
- If using the microwave, heat in short bursts until hot but not boiling.
- Add the White Chocolate
Place the white chocolate chips or chopped white chocolate into a heatproof bowl. Pour the hot cream over the chocolate and let sit for 2–3 minutes to soften. - Stir Until Smooth
Gently stir the mixture from the center outward until all of the chocolate is melted and the ganache is completely smooth and glossy. If a few bits remain, microwave it for 5–10 seconds and stir again. - Add Red Food Coloring
Add a few drops of red gel food coloring and stir well. Continue adding until you reach a bold, vibrant red. Remember that the color deepens slightly as it cools. - Adjust Consistency
- If the ganache is too thick, add a tiny splash of warm cream.
- If it’s too thin, let it cool for a few minutes to thicken.
The ideal drip should flow slowly down the side of a glass without pooling excessively at the bottom.
6. Add the Drip and Final Decorations
- Chill the Frosted Cake First
For clean drips, the frosted cake should be cold and firm. Chill it for at least 20–30 minutes in the fridge before adding the ganache. - Test the Drip
Place a bit of ganache on the side of a chilled glass or bowl and watch how it runs.- If it races to the bottom, it’s too thin—let it cool more.
- If it doesn’t move at all, warm it slightly or thin with a tiny bit of cream.
- Apply the Drip
You can use a spoon, a squeeze bottle, or a piping bag:- Start around the edges of the cake, gently nudging small amounts over the rim so they drip down the sides.
- Vary the length of the drips for a more organic, bakery-style look.
- Cover the Top
Once you’ve created the drips, spread the remaining ganache over the top of the cake in a thin layer, stopping just before the edge if you don’t want to disturb the drips. - Decorate with Cookies
While the ganache is still slightly soft, decorate the top with:- Whole Oreo cookies
- Halved cookies
- Extra crushed cookies
- Sprinkles, if desired
Refrigerate the cake for at least 15–20 minutes to set the drip and decorations before slicing.
Flavor Variations and Creative Twists
One of the joys of this Red Velvet Oreo Drip Cake is how flexible it is. Once you’ve mastered the basic version, you can play with flavors and textures to suit any occasion.
1. Different Cookie Flavors
- Use chocolate-hazelnut sandwich cookies for a nutty twist.
- Try mint chocolate cookies for a festive winter or holiday cake.
- Use golden sandwich cookies combined with red velvet for a striking red-and-white color contrast.
2. Add a Surprise Filling
Between the layers, you can add:
- A thin layer of chocolate ganache under the frosting for extra richness.
- A layer of crushed raspberries or strawberry compote for a fruity, tangy note.
- A cookies-and-cream mousse (whipped cream folded with crushed cookies) for a lighter, airy middle layer.
3. Play With the Drip
- Swap part of the white chocolate for dark chocolate to deepen the flavor while keeping a red tint.
- Use pink or burgundy coloring instead of bright red for a more romantic or subtle look.
- Add a touch of edible glitter or shimmer dust over the ganache before it sets to make the cake sparkle.
4. Turn It Into a Three-Layer Cake
For extra height and drama, bake three thinner layers instead of two:
- Adjust baking time (thinner layers bake more quickly).
- Add slightly more frosting between layers.
- Reinforce the structure by chilling well between stacking.
5. Cupcake Version
Use the same batter and frosting to create Red Velvet Oreo Drip Cupcakes:
- Bake the batter in lined cupcake tins.
- Core each cupcake and fill with crushed Oreo frosting or ganache.
- Frost with cream cheese frosting and add a mini ganache drip on each.
How to Serve
This cake deserves a little fanfare when it’s time to slice.
- Room Temperature Is Best
Even though the cake should be stored chilled, let it sit at room temperature for 20–30 minutes before serving. The frosting softens slightly, and the flavors become more pronounced. - Use a Sharp, Warm Knife
For neat slices, run a sharp knife under hot water, wipe it dry, then slice. Clean the knife between cuts for picture-perfect layers. - Portion Sizes
The cake is rich, so medium-sized slices are ideal. From an 8-inch cake, you can typically get 10–12 generous slices or up to 14 smaller pieces. - What to Pair It With
- Coffee or espresso balances the sweetness.
- A glass of cold milk or a vanilla latte is delightful with the Oreo crunch.
- For celebrations, serve it alongside berries or a simple scoop of vanilla ice cream.
Tips & Variations for the Best Results
1. Use Room-Temperature Ingredients
For both the cake batter (if homemade) and the frosting:
- Butter, cream cheese, and eggs should be at room temperature for smooth mixing and even baking.
- Cold cream cheese can create lumps in the frosting that are difficult to fix.
2. Don’t Overmix the Batter
Once you add the flour and cocoa (or cake mix) to your wet ingredients:
- Mix just until combined. Overmixing can lead to a dense, tough cake instead of a tender crumb.
3. Chill Between Steps
Chilling is your best friend for neat layers:
- Chill the cake after the crumb coat.
- Chill again briefly after the final frosting layer.
- Add the drip to a cold cake for clean, controlled drips.
4. Adjust the Ganache Carefully
- If the ganache is too thick, add a teaspoon of warm cream at a time and stir well.
- If it’s too thin, let it rest at room temperature for a few minutes and stir occasionally until it thickens slightly.
5. Control the Sweetness
Red velvet, white chocolate, and cookies all add sweetness. To balance:
- Don’t overload the frosting with too much powdered sugar—stop when it’s sweet but tangy.
- A pinch of extra salt can round out the flavor.
- Slightly bitter dark chocolate accents (like a few shavings on top) can also cut the sweetness.
6. Make It Ahead
This cake actually benefits from resting time:
- The flavors meld, and the cake slices more cleanly the next day.
- If making ahead, add the final decorative cookies on top shortly before serving so they stay crisp.
Final Thoughts
Red Velvet Oreo Drip Cake is the definition of a celebration dessert—dramatic, indulgent, and bursting with flavor in every bite. It takes the classic charm of red velvet and gives it a playful upgrade with crunchy chocolate cookies and a glossy red ganache that makes the cake look like it came straight from a boutique bakery.
Despite its impressive appearance, the process is straightforward: bake two layers, whip up a simple cream cheese frosting, crush some cookies, and finish with a quick ganache. With a bit of chilling time and patience during assembly, you’ll have a cake that not only tastes incredible but also becomes the centerpiece of your table.
Whether you’re baking for a birthday, a romantic occasion, a holiday, or simply because you love red velvet and Oreos, this cake delivers on every level—flavor, texture, and wow factor. It’s the kind of dessert that guests remember long after the plates are cleared and that you’ll find yourself wanting to make again and again.
FAQ
Can I use a box mix for the red velvet cake?
Yes. A good-quality red velvet box mix works perfectly for this recipe.
- Prepare the mix according to the package instructions.
- Make sure you have about 2 ½ cups of batter per layer if making two thick layers.
- The real magic of this cake comes from the Oreo filling, cream cheese frosting, and drip, so a mix is absolutely fine and can save time.
Can I make this cake ahead of time?
Absolutely, and it’s often better when made in advance.
- 1 day ahead:
Assemble and frost the cake, add the drip, and store it covered in the refrigerator. Add decorative cookies on top just before serving so they stay crisp. - 2–3 days ahead:
You can bake the cake layers, wrap them tightly in plastic, and keep them in the fridge. Frost and decorate the day you plan to serve.
How should I store leftovers?
- Store the cake, covered, in the refrigerator because of the cream cheese frosting.
- It will keep well for 3–4 days.
- Let leftover slices sit at room temperature for a short time before eating so the texture softens slightly.
If you need longer storage, you can freeze slices (see next question).
Can I freeze Red Velvet Oreo Drip Cake?
Yes, you can.
- For best results, slice the cake and wrap each slice individually in plastic wrap.
- Place wrapped slices in a freezer-safe container or bag.
- Freeze for up to 2–3 months.
To serve, thaw slices in the refrigerator overnight and then let them sit at room temperature for 15–20 minutes before enjoying.
Can I use different types of cookies?
Definitely.
- Any chocolate sandwich cookie will work, and even flavored varieties can be fun.
- Make sure they’re not overly soft; you want a bit of crunch to contrast with the soft cake and frosting.
Vanilla sandwich cookies can also be used for a lighter color contrast with the red cake.
How do I get a bright red color for the drip?
Use red gel food coloring (not liquid, if possible).
- Gel colors are more concentrated, so you’ll need less, and the ganache won’t thin out.
- Add the color slowly, a few drops at a time, until you reach the intensity you want.
How do I avoid crumbs in the frosting?
- Always cool the cake layers completely before frosting.
- Use a crumb coat—a thin first layer of frosting—to trap crumbs. Chill, then apply your final coat.
- Don’t press too hard with the spatula; gentle strokes help keep crumbs sealed in the crumb coat.
Can I adapt this into cupcakes or a sheet cake?
Yes:
- Cupcakes:
- Bake the batter in lined muffin tins.
- Fill each with Oreo-studded cream cheese frosting or ganache, frost the tops, and add a small drip on each cupcake.
- Sheet Cake:
- Bake in a 9×13-inch pan.
- Frost the top with cream cheese frosting, sprinkle crushed Oreos, and drizzle the red ganache over the surface.
The flavor will be the same; only the presentation changes.